
Instruction manual
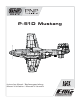


EN
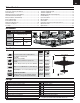
Transmitter Setup
IMPORTANT: After you set up your model, always rebind the transmitter and
receiver to set the desired failsafe positions.
Dual Rates
Take fi rst fl ights in Low Rate. For landings use high rate elevator.
NOTICE: To ensure AS3X functions properly, do not lower rate values below
50%. If lower rates are desired, manually adjust the position of the pushrods
on the servo arm.
NOTICE: If oscillation occurs at high speed, refer to the Troubleshooting Guide
for more information.
Expo
Expo is factory set in the receiver. After fi rst fl ights, you may adjust expo in your
transmitter or refer to the AR636 receiver manual for expo adjustment.
Computerized Transmitter Setup
(DX6i, DX6, DX7S, DX8, DX9, DX10t and DX18)
Start all transmitter programming with a blank ACRO model (do a model
reset), then name the model.
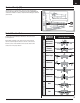
Set Dual Rates to:
HIGH 100%
LOW 70%
Set Servo Travel to: 100%
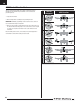
DX6i
1. Go to the SETUP LIST MENU
2. Set MODEL TYPE: ACRO
3. Set REVERSE: Gear Channel
4. Go to ADJUST LIST MENU
5. Set FLAPS: Norm 100 Flap and 0 ELEV ; LAND 80 Flap and
10 ELEV.
DX7S
DX8
1. Go to the SYSTEM SETUP
2. Set MODEL TYPE: AIRPLANE
3. Set WING TYPE: 1 AIL 1 FLAP
4. Go to the FUNCTION LIST
5. Set SERVO SETUP: Reverse GEAR
6. Set FLAP SYSTEM: Choose Flap
NORM: -100% FLAP and 0% ELEV
MID: -30% FLAP and -3% ELEV
LAND: 80% FLAP and -10% ELEV
SPEED 2.0S: SWITCH = FLAP
DX6
DX9
DX10t
DX18
1. Go to the SYSTEM SETUP
2. Set MODEL TYPE: AIRPLANE
3. Set AICRAFT TYPE:
WING: 1 AIL 1 FLAP
4. Go to the FUNCTION LIST
5. Set SERVO SETUP: Reverse GEAR
6. Set FLAP SYSTEM:
SELECT SWITCH D:
POS 0: -100% FLAP and 0% ELEV
POS 1: -30% FLAP and -3% ELEV
POS 2: 80% FLAP and -10% ELEV
SPEED 2.0
6