
EFL3550 E-flite Pitts S-1S Manual


EN
6
Pitts
Model Assembly Continued
2
Clevis Installation
1. Rotate the clevis to the desired length and align the slot with the horn.
2. Pull the tube from the clevis to the linkage.
3. Carefully spread the clevis.
4. Insert the clevis pin into the desired hole in the control horn.
5. Move the tube to hold the clevis on the control horn.
Control Surface Centering
After assembly and transmitter setup, conrm that the control surfaces are
centered. If the control surfaces are not centered, mechanically center the
control surfaces by adjusting the linkages.
If adjustment is required, turn the clevis on the linkage to change the length of
the linkage between the servo arm and the control horn.
After binding a transmitter to the aircraft receiver, set the trims and sub-trims to
0, then adjust the clevises to center the control surfaces.
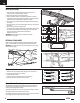
Installing the Wings
OPTIONAL FLYING WIRES
1.
2.
3.
4.
5.
6.
1. Install the bottom wing (leading edge rst) and connect the servo
connectors from the wing to the servo extension.
2. Secure the bottom wing with the single body clip.
3. Install the interplane struts by inserting the curved end into the plastic
receptacles on the top of the bottom wing. Rotate the struts a few degrees
toward vertical while pressing down to seat them in position.
4. Place the top wing in position and insert the cabane and interplane struts
into position.
5. Insert the 4 retainer pins into the leading edge of the wing to lock the struts
into position.
6. Secure the top wing with the two body clips.
7. Connect the aileron linkage between the left top and bottom ailerons. Insert
the Z bend into top connector rst, then attach the clevis to the bottom
connector. See clevis installation below for adjustments.
Repeat for the right side.
IMPORTANT: Make sure both ailerons are parallel to each other.
Disassemble in reverse order.
1
3
4
5
6
7
Flying wires are intended for static display and may dislodge from plane in
ight. It is recommended that the wires be permanently glued into place.
IMPORTANT: If you chose to glue the wires into the Pitts you will no longer be
able to remove the wings.