AR6400/AR6400L User Guide Bedienungsanleitung AR6400/AR6400L Guide de l’utilisateur AR6400/AR6400L AR6400/AR6400L Guida per l’utente
EN The AR6400/AR6400L 6-channel Ultra-Micro receiver with integrated servos, speed control and X-Port™ technology is designed for Ultra-Micro aircraft. Featuring DSM2™ technology the AR6400/ AR6400L is compatible with all Spektrum™, JR®, E-flite® and ParkZone® 2.4GHz DSM2 technology transmitters including: Spektrum DX7, DX6i, DX5e, Spektrum Module Systems, JR12X, JRX9303, E-flite LP5DSM, E-flite HP6DSM, E-flite MLP4DSM and ParkZone’s 2.4GHz DSM2 Transmitter.
EN AR6400L Specifications: Type: DSM2 Ultra-Micro receiver with integrated brushed speed controller and two linear servos Channels: 6 channels or 4 channels plus X-Port Modulation: DSM2 Dimension (WxLxH): 27.75 x 27.15 x 8.10mm Weight: 3.9 g Input Voltage Range: 1-cell LiPo 3.2 to 4.2V Antenna Length: 31mm Resolution: 1024 Compatibility: All DSM2 aircraft transmitters Servos: Force: 2.8 oz (79 g) Stroke: 9.1mm Speed: 0.14 sec Speed Controller: Type: Integrated brushed Max continuous current: 2.
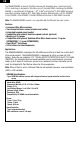
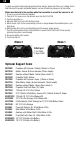
EN Servos The AR6400/AR6400L incorporates integrated servos; optional servos are also available through Spektrum (SPMAS2000/SPMAS2000L). Note that using any other servo may cause damage to the receiver and/or the servo and may void the warranty. Optional Servo (SPMAS2000/SPMAS2000L) Installing and Plugging in the Optional Servos Use double-sided foam tape strips and/or minimal hot glue to mount the servos in place.
EN LED 5. If you entered bind mode correctly, you will see a solid LED within about 10 seconds. You should now be bound to the transmitter and have full control and function. IMPORTANT: After Binding Once the system is bound, the transmitter should always be turned on first and then the receiver to prevent the receiver from re-entering bind mode. If your receiver inadvertently enters bind mode, simply unplug the battery from the receiver and reinstall with the transmitter remaining on.
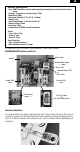
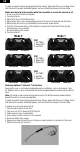
EN To safely accomplish advanced programming feature changes, please enlist the use of a helper. One to hold the aircraft to prevent unintended flyaways, and one to make the changes on the transmitter. Sticks must be held in this position while the transmitter is on and the receiver is off. 1. Ensure a successful bind was completed 2. Turn transmitter on 3. Move THRO stick to full throttle position 4. Move control sticks to the corresponding position for the servo to be reversed (see illustration) 5.
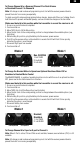
EN To Change Channel 6 to a Reversed Channel 2 for Dual Ailerons or Reversed Channel 2 to Channel 6 Note: All changes made in advanced programming must start with the receiver powered down to prevent the motor from running unexpectedly. To safely accomplish advanced programming feature changes, please enlist the use of a helper. One to hold the aircraft to prevent unintended flyaways, and one to make the changes on the transmitter.
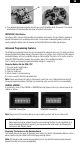
EN To safely accomplish advanced programming feature changes, please enlist the use of a helper. One to hold the aircraft to prevent unintended flyaways, and one to make the changes on the transmitter. Sticks must be held in this position while the transmitter is on and the receiver is off. 1. Ensure a successful bind was completed 2. Plug the X-Port accessory or the optional servo into the X-Port/CH5 3. Turn the transmitter on 4. Move the THRO stick to the full throttle position 5.
EN Transmitter Specific Binding Instructions DX5e: 1. To bind your AR6400/AR6400L to the DX5e, plug the battery into the receiver. The LED on the receiver will begin flashing. 2. Move the sticks and switches on the transmitter to the desired failsafe positions (low throttle and neutral control positions). 3. Pull and hold the Trainer Switch on the transmitter while turning the transmitter on. Release the trainer switch once the LEDs on the front of the transmitter flash. 4.
EN Troubleshooting Guide Problem Possible Cause Solution Aircraft will not “throttle up” but all other controls seem to function. • User did not lower throttle trim and throttle stick prior to initializing the aircraft. • Throttle channel is reversed. Note: Futaba transmitters (equipped with Spektrum modules) may require you to reverse the throttle channel. • Is the Brushed/Brushless option correctly selected for the power system? • Lower throttle stick and throttle trim to their lowest settings.
EN Tips on Using Spektrum 2.4GHz ModelMatch™ Some Spektrum and JR transmitters offer a patent pending feature called ModelMatch. ModelMatch prevents the possibility of operating a model using the wrong model memory, potentially preventing a crash. With ModelMatch each model memory has its own unique code (GUID) and during the binding process the code is programmed into the receiver.
EN Warranty Period Exclusive Warranty- Horizon Hobby, Inc., (Horizon) warranties that the Products purchased (the “Product”) will be free from defects in materials and workmanship for a period of 1 year from the date of purchase by the Purchaser. Limited Warranty (a) This warranty is limited to the original Purchaser (“Purchaser”) and is not transferable. REPAIR OR REPLACEMENT AS PROVIDED UNDER THIS WARRANTY IS THE EXCLUSIVE REMEDY OF THE PURCHASER.
EN your complete name, street address, email address and phone number where you can be reached during business days, your RMA number, a list of the included items, method of payment for any non-warranty expenses and a brief summary of the problem. Your original sales receipt must also be included for warranty consideration. Be sure your name, address, and RMA number are clearly written on the outside of the shipping carton.
EN FCC Information This device complies with part 15 of the FCC rules. Operation is subject to the following two conditions: (1) This device may not cause harmful interference, and (2) this device must accept any interference received, including interference that may cause undesired operation. Caution: Changes or modifications not expressly approved by the party responsible for compliance could void the user’s authority to operate the equipment.
DE Bedienungsanleitung AR6400/AR6400L Der AR6400/AR6400L-6-Kanal-Ultra-Micro-Empfänger mit integrierten Servo-, Motorregler- und X-Port Techno- logie wurde speziell für Micro-Flugmodelle entwickelt. Durch die DSM2-Technologie ist der AR6400/AR6400L kompatibel mit allen Spektrum-, E-flite-und ParkZone-Sendern. Das sind die DSM2-Sender Spektrum DX7, DX6i, DX5e, alle Spektrum-Modul-Systeme, E-flite LP5DSM, HP6DSM, MLP4DSM und alle ParkZone-Sender.
DE AR6400L Technische Daten: Typ: D SM2 Ultra-Micro-Empfänger mit integriertem Motorregler (Bürstenmotoren) und zwei linear-Servos Kanalzahl: 6 Kanäle Modulation: DSM2 Größe (LxBxH): 27,7mm x 27,1mm x 8,1mm Gewicht: 3,9g Eingangsspannung: 1-zelliger LiPo 3,2 – 4,2V Antennenlänge: 31mm Auflösung: 1024 Kompatibilität: mit allen DSM2 Flug-Sendern und Modulen Servos: Gewicht: 79g Stellweg: 9,1mm Stellgeschwindigkeit: 0,14 sec Motorregler: Typ: integriert für Bürstenmotoren Belastung A Max.
DE Servos Der AR6400/AR6400L verfügt über integrierte Servos, Sie können aber noch bis zu 3 Servos SPMAS200/SPMAS200L einsetzen. Bitte beachten Sie das der Einsatz anderer Servos zu Defekten des Empfängers oder der Servos führen kann und dadurch die Garantie erlischt. Installation zusätzlicher Servos Optional Servo (SPMAS2000/SPMAS2000L) Benutzen Sie doppelseitiges Klebeband oder ein wenig Heißkleber um die Servos zu befestigen.
DE LED 5. Wenn Sie den Bindevorgang erfolgreich abgeschlossen haben, dann leuchtet die LED nach 10 sec. konstant. Jetzt ist der AR6400L gebunden. Wichtig: nach dem Binden Wenn das System gebunden ist, schalten Sie erst den Sender und danach den Empfänger ein. Wenn erst der Empfänger eingeschaltet wird geht der AR6400/AR6400L in den Bindemodus und muss neu gebunden werden. Senderprogrammierung Die Senderprogrammierung sollte von einem erfahrenen Piloten erfolgen.
DE Die Knüppel müßen in die folgenden Positionen gebracht werden bei eingeschaltetem Sender und abgeschaltetem Empfänger. 1. Stellen Sie sicher das der Bindevorgang abgeschlossen ist. 2. Schalten Sie den Sender ein 3. Bewegen Sie den Gas-Knüppel nach oben 4. Bringen Sie den Knüppel mit der umzukehrenden Funktion in die beschriebenen Positionen 5. Halten Sie diese Position und stecken den Akku an den Empfänger 6.
DE Wechsel von CH6 zu reversed CH2 für zwei Querruderservos Achtung: Alle Änderungen in der Programmierung nur bei ausgeschaltetem Empfänger durchführen Die Steuerknüppel müssen in folgenden Positionen gehalten werden wenn der Sender angeschaltet ist und der Empfänger ausgeschaltet ist. 1. Stellen Sie sicher das der Bindevorgang komplett ist. 2. Schalten Sie den Sender ein 3. Stellen Sie den Gashebel auf Vollgas 4. Bewegen Sie nun die Steuerhebel in die abgebildeten Positionen 5.
DE mode geändert wurde 8. Schalten Sie den Empfänger ab 9. Schalten Sie den Sender ab Mode 2 Mode 1 CH5/X-port 1. Gas Voll 2.
DE Anleitung zum Binden von Spektrum Sendern DX5e: 1. Den Akku mit dem AR6400/AR6400L verbinden. Die LED am Empfänger beginnt schnell zu blinken. 2. Bringen Sie alle Steuerknüppel in ihre Fail-Safe-Positionen (Gas unten, alles andere auf mitte) 3. Den Trainerschalter ziehen und halten, dann den Sender einschalten. Dabei beginnt die LED am Sender zu blinken. 4. Wenn die LED am Empfänger aufhört zu blinken, ist der Bindevorgang beendet und das System ist betriebsbereit. DX6i: 1.
DE Problemlösungen Problem Ursache Lösung Die Drehzahl lässt sich nicht herunterregeln.
DE Tips zum Umgang mit Spektrum 2,4GHz ModelMatch™ Einige unserer Spektrum-Sender besitzen ModelMatch. Dies verhindert, das man ein Modell mit dem falschen Speicherplatz im Sender betreiben kann. Bei ModelMatch besitzt jedes Modell einen individu- ellen Code (GUID), der beim Binden an den Empfänger übermittelt wird. Nach dem Binden funktioniert der Empfänger nur mit diesem Modellspeicherplatz.
DE Garantiezeitraum Exklusive Garantie – Horizon Hobby Inc (Horizon) garantiert, dass das gekaufte Produkt (Produkt) frei von Material- und Montagefehlern ist. Der Garantiezeitraum entspricht den gesetzlichen Bestimmung des Landes, in dem das Produkt erworben wurde. In Deutschland beträgt der Garantiezeitraum 6 Monate und der Gewährleistungszeitraum 18 Monate nach dem Garantiezeitraum. Garantieeinschränkungen (a) Die Garantie wird nur dem Erstkäufer (Käufer) gewährt und kann nicht übertragen werden.
DE Wartung & Reparatur Muss Ihr Produkt gewartet oder repariert werden, wenden Sie sich entweder an Ihren Fachhändler oder direkt an Horizon. Packen Sie das Produkt sorgfältig ein. Beachten Sie, dass der Originalkarton in der Regel nicht ausreicht, um beim Versand nicht beschädigt zu werden. Verwenden Sie einen Paketdienstleister mit einer Tracking Funktion und Versicherung, da Horizon bis zur Annahme keine Verantwortung für den Versand des Produktes übernimmt.
DE Entsorgungsrichtlinien in der Europäischen Union Konformitätserklärung Konformitätserklärung gemäß Gesetz über Funkanlagen und Telekomunikationseinrichtungen (FTEG) und der Richtlinie 1999/5/EG (R&TTE) Declaration of conformity in accordance with the Radio and Telecommunications Terminal Equipment Act (FETG) and directive 1999/5/EG (R&TTE) Horizon Hobby Deutschland GmbH Hamburger Straße 10 D-25335 Elmshorn erklärt das Produkt: declares the product: Spektrum AR6400, AR6400L Geräteklasse: equipment cl
FR Guide de l’utilisateur - AR6400/AR6400L Le récepteur 6 voies AR6400/AR6400L Ultra-Micro à servos intégrés, contrôleur de vitesse et à technologie X-Port™ a été conçu pour les aéronefs Ultra-Micro.
FR Spécifications - AR6400L : Type : récepteur DSM2 Ultra-Micro à contrôle de vitesse intégré pour moteurs à charbons (brushed) et deux servos linéaires Canaux : 6 voies ou 4 voies et un X-Port Modulation : DSM2 Dimensions (l x L x h) : 27,75 x 27,15 x 8,10 mm Poids : 3,9 g Gamme de tension d'entrée : batterie 1 élément LiPo 3,2 à 4,2 V Longueur de l'antenne : 31mm Résolution : 1024 Compatibilité : tous les émetteurs pour aéronefs DSM2 Servos : Force : 2,8 onces (79 g) Course : 9,1mm Vitesse : 0,14 se
FR Servos L'AR6400/AR6400L incorpore des servos intégrés ; des servos optionnels sont également disponibles auprès de Spektrum (SPMAS2000/SPMAS2000L). Veuillez noter que l'utilisation de tout autre servo peut endommager le récepteur et/ou le servo et invalider la garantie. Servo optionnel (SPMAS2000/SPMAS2000L) Installation et branchement des servos optionnels Utilisez des rubans adhésifs double face en mousse et/ou mettez un minimum de colle chaude pour monter les servos à demeure.
FR DEL 5. Si vous êtes entré correctement en mode affectation, vous verrez la DEL rester allumer en l'espace de 10 secondes. Vous devriez à présent être relié à l'émetteur et disposer du contrôle ainsi que des fonctions. IMPORTANT : après l'affectation Une fois que le système est affecté, il faut toujours allumer l'émetteur en premier, puis allumer le récepteur, ceci afin d'éviter que le récepteur passe à nouveau en mode affectation.
FR s'assurer l'assistance d'un aide. Une personne tient l'aéronef pour éviter un envol intempestif, une autre effectue les modifications au niveau de l'émetteur. Les manettes doivent être maintenues dans cette position, l'émetteur étant allumé et le récepteur éteint. 1. Assurez-vous que l'affectation a réussi 2. Allumez l'émetteur 3. Déplacez la manette THRO vers la position plein gaz 4. Déplacez les manettes de commande vers la position correspondante pour que les servos soient inversés (cf.
FR Pour permuter le canal 6 en un canal 2 inversé pour les ailerons avec 2 servos ou le canal inversé 2 en canal 6 Nota : toutes les modifications de programmation avancée doivent commencer récepteur éteint pour éviter une mise en route inattendue du moteur. Pour effectuer des modifications au niveau des options de programmation avancées, il convient de s'assurer l'assistance d'un aide.
FR Pour permuter le canal 5 vers le X-port et inversement Note : Lorsque le X-Port est actif, les canaux CH5 et CH6 ne sont pas disponibles ; l'aileron inversé (CH2) reste néanmoins disponible. Nota : toutes les modifications de programmation avancée doivent commencer récepteur éteint pour éviter une mise en route inattendue du moteur. Pour effectuer des modifications au niveau des options de programmation avancées, il convient de s'assurer l'assistance d'un aide.
FR Instructions spécifiques d'affectation pour les émetteurs DX5e : 1. Pour affecter votre AR6400/AR6400L au DX5e, raccordez la batterie au récepteur. La DEL du récepteur commence à clignoter. 2. Déplacez les manettes et interrupteurs de l'émetteur pour les amener dans les positions de sécurité désirées (gaz bas et position neutre des commandes). 3. Tirez l'interrupteur d’écolage situé sur l'émetteur tout en mettant en marche l'émetteur.
FR Guide de dépannage Problème Cause possible Solution L'aéronef « ne prend pas les gaz », mais toutes les autres commandes semblent fonctionner. • L'utilisateur n'a pas baissé le trim des gaz et la manette des gaz avant d'initialiser l'aéronef. • Le canal des gaz est inversé. Nota : les émetteurs Futaba équipés de modules Spektrum peuvent requérir l'inversion du canal des gaz.
FR Conseils pour l’utilisation deSpektrum 2,4 GHz ModelMatch™ Bien que votre système 2,4 GHz à technologie DSM soit très intuitif et qu’il fonctionne presque comme les systèmes 72 MHz, vous trouverez ci-dessus quelques questions fréquentes de clients. Q: Dois-je d’abord allumer l’émetteur ou le récepteur ? R: Si l’on allume le récepteur en premier—tous les servos à l’exception de celui des gaz sont amenés à la position de sécurité défi nie pendant l’affectation.
FR Durée de la garantie Garantie exclusive - Horizon Hobby, Inc. (Horizon) garantit que le Produit acheté (le « Produit ») sera exempt de défauts matériels et de fabrication à sa date d’achat par l’Acheteur. La durée de garantie correspond aux dispositions légales du pays dans lequel le produit a été acquis. La durée de garantie est de 6 mois et la durée d’obligation de garantie de 18 mois à l’expiration de la période de garantie.
FR Maintenance et réparation Si votre produit doit faire l’objet d’une maintenance ou d‘une réparation, adressez-vous soit à votre revendeur spécialisé, soit directement à Horizon. Emballez le produit soigneusement. Veuillez noter que le carton d‘emballage d’origine ne suffi t pas, en règle générale, à protéger le produit des dégâts pouvant survenir pendant le transport.
FR Sécurité et avertissements En tant qu’utilisateur du produit, vous êtes responsable pour en assurer un fonctionnement sûr excluant toute atteinte à l’intégrité corporelle ainsi qu’aux biens matériels. Conformez-vous scrupuleusement à toutes les indications et à tous les avertissements relatifs à ce produit ainsi qu’aux éléments et produits que vous utilisez conjointement à celui-ci. Votre modèle reçoit des signaux radio qui le dirigent.
IT AR6400/AR6400L Guida per l'utente Il micro ricevitore a 6 canali AR6400/AR6400L con servo integrato, controllo della velocità e tecnologia X-Port™ è adatto per gli aerei Ultra-Micro. Con la tecnologia DSM2™ l'AR6400/AR6400L è compatibile con tutti i trasmettitori Spektrum™, JR®, E-flite® e ParkZone® con tecnologia 2.4GHz DSM2, incluso: Spektrum DX7, DX6i, DX5e, sistemi modulari Spektrum, JR12X, JRX9303, E-flite LP5DSM, E-flite HP6DSM, E-flite MLP4DSM e i trasmettitori ParkZone a 2.4GHz DSM2.
IT Specifiche di AR6400L: Tipo: Ricevitore DSM2 Ultra-Micro con controllo integrato di velocità a spazzole e due servo lineari Canali: 6 canali o 4 canali con la X-Port Modulazione: DSM2 Dimensioni (LxLxA): 27,75 x 27,15 x 8,10mm Peso: 3.9 g Intervallo tensione in ingresso: 1 cella LiPo 3.2 a 4.2V Lunghezza dell'antenna: 31mm Risoluzione 1024 Compatibilità: Tutti i trasmettitori per aerei DSM2 Servo: Forza: 79,38 g (79 g) Corsa: 9,1mm Velocità: 0.
IT Servo: L'AR6400/AR6400L incorpora dei servo integrati; sono disponibili anche dei servo opzionali tramite la Spektrum (SPMAS2000/SPMAS2000L). Da notare che l'uso di altri servi può causare dei danni al ricevitore e/o al servo stesso, invalidando così la garanzia. Servo opzionale (SPMAS2000/SPMAS2000L) Installazione e inserimento nei servo opzionali Usare dei pezzi di nastro in schiuma biadesivo e/o un po' di colla a caldo per montare i servo al loro posto.
IT LED 5. 5. Se si è entrati correttamente nella modalità di collegamento, si vedrà un LED acceso per 10 secondi. Adesso si è collegati al trasmettitore e si avrà un pieno controllo e una piena funzionalità. IMPORTANTE: Dopo il collegamento Una volta che il sistema è collegato, il trasmettitore deve essere acceso sempre per primo e poi bisogna accendere il ricevitore per evitare che esso entri nuovamente in modalità di collegamento.
IT Per portare a termine in sicurezza le modifiche delle funzioni avanzate, è bene farsi aiutare da qualcuno. Uno tiene l'aereo per evitare dei voli accidentali e l'altro apporta i cambiamenti sul trasmettitore. Le barre devono essere tenute in questa posizione quando il trasmettitore è acceso e il ricevitore è spento. 1. Assicurarsi che il collegamento sia avvenuto con successo 2. Accendere il trasmettitore 3. Muovere la barra del THRO per tutta la posizione del throttle 4.
IT Per cambiare il canale 6 ad un canale inverso 2 per i doppi alettoni o da un canale inverso 2 al canale 6 Nota: Tutte le modifiche apportate nella programmazione avanzata devono iniziare con il ricevitore spento per evitare che il motore si azioni inavvertitamente. Per portare a termine in sicurezza le modifiche delle funzioni avanzate, è bene farsi aiutare da qualcuno. Uno tiene l'aereo per evitare dei voli accidentali e l'altro apporta i cambiamenti sul trasmettitore.
IT Nota: Tutte le modifiche apportate nella programmazione avanzata devono iniziare con il ricevitore spento per evitare che il motore si azioni inavvertitamente. Per portare a termine in sicurezza le modifiche delle funzioni avanzate, è bene farsi aiutare da qualcuno. Uno tiene l'aereo per evitare dei voli accidentali e l'altro apporta i cambiamenti sul trasmettitore. Le barre devono essere tenute in questa posizione quando il trasmettitore è acceso e il ricevitore è spento. 1.
IT Istruzioni specifiche per il collegamento del trasmettitore DX5e: 1. Per collegare il vostro AR6400/AR6400L al DX5e, inserire la batteria nel ricevitore. Il LED sul ricevitore inizierà a lampeggiare. 2. Muovere le barre e gli interruttori sul trasmettitore alle posizioni desiderate di fail-safe, ossia prova di guasto (throttle basso e posizioni di controllo neutre). 3. Tirare e tenere l'interruttore trainer sul trasmettitore mentre lo si accende.
IT Guida alla risoluzione dei problemi Problema Possibile causa Soluzione Nell'aereo non funziona il “throttle” ma gli altri controlli sembrano funzionare. • L'utente non ha abbassato il trim del throttle e la barra del throttle prima di inizializzare all'aereo. • Il canale del throttle è invertito. Nota: Trasmettitori Futaba (dotato con i moduli Spektrum) può essere necessario invertire il canale del throttle.
IT Consigli sull'uso di Spektrum 2.4GHz ModelMatch™ Alcuni trasmettitori Spektrum e JR offrono un elemento, con brevetto in corso, chiamato ModelMatch. ModelMatch impedisce di adoperare un modello che usa il modello di memoria errato, evitando un potenziale danno. Con ModelMatch, ogni memoria del modello ha il suo codice unico (GUID) e durante il processo di collegamento il codice è programmato nel ricevitore.
IT Durata della Garanzia Periodo di garanzia Garanzia esclusiva - Horizon Hobby, Inc., (Horizon) garantisce che i prodotti acquistati (il “Prodotto”) sono privi di difetti relativi ai materiali e di eventuali errori di montaggio. Il periodo di garanzia è conforme alle disposizioni legali del paese nel quale il prodotto è stato acquistato. In Germania, tale periodo di garanzia ammonta a 6 mesi e si estende ad altri 18 mesi dopo tale termine.
IT Manutenzione e riparazione Se il prodotto deve essere ispezionato o riparato, si prega di rivolgersi ad un rivenditore specializzato o direttamente ad Horizon. il prodotto deve essere Imballato con cura. Bisogna far notare che i box originali solitamente non sono adatti per effettuare una spedizione senza subire alcun danno.
IT Informazioni sulla conformità per l’Unione Europea Dichiarazione di conformità (in conformità con ISO/IEC 17050-1) N.
© 2010 Horizon Hobby, Inc. 4105 Fieldstone Road, Champaign, Illinois 61822, USA (877) 504-0233 • www.horizonhobby.com • www.spektrumrc.com Horizon Hobby LTD. Units 1-4 Ployters Rd., Staple Tye, Harlow, Essex CM18 7NS, United Kingdom +44 (0)1279 641 097 • www.horizonhobby.co.uk Horizon Hobby GmbH Hamburger Str. 10, 25335 Elmshorn, Germany +49 4121 46199 60 • www.horizonhobby.de Spektrum and E-flite products are distributed exclusively by Horizon Hobby, Inc.