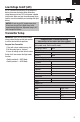
™ ® UMX Cessna 182 Instruction Manual Bedienungsanleitung Manuel d’utilisation Manuale di Istruzioni SAFE® Select Technology, Optional Flight Envelope Protection
EN NOTICE All instructions, warranties and other collateral documents are subject to change at the sole discretion of Horizon Hobby, LLC. For up-to-date product literature, visit www.horizonhobby.com and click on the support tab for this product.
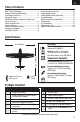
EN Table of Contents SAFE® Select Technology .......................................4 Transmitter and Receiver Binding...........................4 Low Voltage Cutoff (LVC) ........................................5 Transmitter Setup ..................................................5 ESC/Receiver Arming, Battery Installation and Center of Gravity ....................................................6 Control Direction Tests ...........................................7 Control Centering ......................
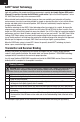
EN SAFE® Select Technology The evolutionary SAFE® Select technology can offer an extra level of protection so you can perform the first flight with confidence. No complex transmitter programming is required. Just simply flip your GEAR switch (Channel 5) to position 0 to make the SAFE Select system active. Flip the Gear switch to position 1 to turn OFF SAFE Select and fly with just the assistance of AS3X.
EN Low Voltage Cutoff (LVC) LVC is a feature built into your ESC to protect the battery from over-discharge. When the battery charge becomes too low, LVC limits power supplied to the motor. When you hear the motor power pulse, land the aircraft immediately and recharge the flight battery. NOTICE: Do not rely on LVC to determine when to land your aircraft. Set a flight timer to the recommended flight time. Repeated flying to LVC will damage the battery.
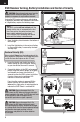
EN ESC/Receiver Arming, Battery Installation and Center of Gravity CAUTION: Always keep hands away from the propeller. When armed, the motor will turn the propeller in response to any throttle movement. Arming the ESC/receiver also occurs after binding as previously described, but subsequent connection of a flight battery requires the following steps. AS3X The AS3X® system will not activate until the throttle stick or trim is increased for the first time.
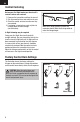
EN Control Direction Tests Traditional Control Direction Test You should bind your aircraft and transmitter before doing these tests. Move the controls on the transmitter to make sure the aircraft control surfaces move correctly and in the proper direction. Make sure the tail linkages move freely and that paint or decals are not adhered to them. AS3X®/SAFE® Control Direction Test This test is meant to check that the AS3X® system is functioning properly. 3.
EN Control Centering Before your first flight make sure the aircraft’s control surfaces are centered. 1. Power on the transmitter and then the aircraft. 2. Set all transmitter trims and sub-trims to zero. 3. Check the control surfaces to make sure they are centered. 4. If centering is required, use a pair of pliers to carefully bend the metal linkage (see illustration). Make the U-shape narrower to make the connector shorter. Make the U-shape wider to make the linkage longer.
EN Flying Tips and Repairs We recommend flying your aircraft outside in calm conditions. Always avoid flying near houses, trees, wires and buildings. You should also be careful to avoid flying in areas where there are many people, such as busy parks, schoolyards or soccer fields. Consult local laws and ordinances before choosing a location to fly your aircraft.
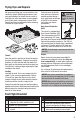
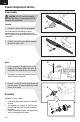
EN Power Components Service Disassembly CAUTION: DO NOT handle the propeller while the flight battery is connected to the ESC. Personal injury could result. A Propeller 1. Remove the spinner (A) from the propeller. Since the propeller and spinner are glued together, glue residue will need to be cleaned from the spinner or propeller when these parts are used again. 2. Carefully remove the screw (B) and propeller (C) from the motor shaft. Motor C B D 1.
EN Troubleshooting Guide AS3X/SAFE Problem Control surfaces not at neutral position when transmitter controls are at neutral Model flies inconsistently from flight to flight Controls oscillate in flight, (model rapidly jumps or moves) Possible Cause Control surfaces may not have been mechanically centered from factory Aircraft was moved after the flight battery was connected and before sensors initialized Solution Center control surfaces mechanically by adjusting the U-bends on control linkages Disconnect an
EN Troubleshooting Guide (Continued) Problem LED on receiver flashes rapidly and aircraft will not respond to transmitter (after binding) Control surface does not move Controls reversed Motor loses power Motor power quickly decreases and increases then motor loses power Motor/ESC is not armed after landing Possible Cause Solution Less than a 5-second wait between first Leaving transmitter on, disconnect and powering on transmitter and reconnect flight battery to aircraft connecting flight battery to aircraf
EN Purchaser’s Remedy Horizon’s sole obligation and purchaser’s sole and exclusive remedy shall be that Horizon will, at its option, either (i) service, or (ii) replace, any Product determined by Horizon to be defective. Horizon reserves the right to inspect any and all Product(s) involved in a warranty claim. Service or replacement decisions are at the sole discretion of Horizon. Proof of purchase is required for all warranty claims.
EN Warranty and Service Information Country of Purchase Phone Number/ Email Address Horizon Service Center servicecenter.horizonhobby.com/ (Repairs and Repair Requests) RequestForm/ productsupport@horizonhobby.com United States Horizon Product Support (Product Technical Assistance) 877-504-0233 of America websales@horizonhobby.com Sales 800-338-4639 sales@horizonhobby.co.
EN Compliance Information for the European Union EFL UMX Cessna 182 BNF Basic (EFLU5650) EU Compliance Statement: Horizon Hobby, LLC hereby declares that this product is in compliance with the essential requirements and other relevant provisions of the RED and EMC Directive. A copy of the EU Declaration of Conformity is available online at: http://www.horizonhobby.com/content/ support-render-compliance.
Replacement Parts – Ersatzteile – – Pièces de rechange – Recapiti per i ricambi – Part # • Nummer Numéro • Codice Description Beschreibung Description Descrizione EFLU5609 Spinner: UMX Cessna 182 Spinner: UMX Cessna 182 UMX Cessna 182 Cône Ogiva: UMX Cessna 182 EFLU5608 Landing Gr set w/ Pant: UMX Cessna 182 Fahrwerksset mit Radschuhen: UMX Cessna 182 UMX Cessna 182 Train d'atterrissage avec habillage Set Carrello con Copri ruota: UMX Cessna 182 EFLU5667 Bare Fuselage: UMX Cessna 182 Bloßer
– Optional Parts and Accessories – – Optionale Bauteile und Zubehörteile – – Pièces optionnelles et accessoires – – Parti opzionali e accessori – Part # • Nummer Description Numéro • Codice Beschreibung Description Descrizione Set fascette fissaggio (5): Ultra Micros PKZ1039 Hook and Loop Set (5): Ultra Micros Klettband (5): Ultra Micros Bande autoagrippante (5) SPMA3060 USB-Interface: UM AS3X Programmer UM AS3X Programmiergerät Interface USB pour module AS6410NBL EFLUC1007 Celectra 2S 7.
© 2016 Horizon Hobby, LLC. E-flite, AS3X, UMX, DSM, DSM2, DSMX, ModelMatch, Bind-N-Fly, Celectra, SAFE, and the SAFE logo, and the Horizon Hobby logo are trademarks or registered trademarks of Horizon Hobby, LLC. The Spektrum trademark is used with permission of Bachmann Industries, Inc. Cessna and Cessna 182 are trademarks or registered trademarks of Textron Innovations, Inc. and are used under license by Horizon Hobby, LLC.