UMX ™ Instruction Manual Bedienungsanleitung Manuel d’utilisation Manuale di Istruzioni SAFE® Select Technology, Optional Flight Envelope Protection
NOTICE All instructions, warranties and other collateral documents are subject to change at the sole discretion of Horizon Hobby, LLC. For up-to-date product literature, visit horizonhobby.com and click on the support tab for this product.
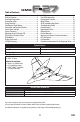
UMX Table of Contents Post Flight.............................................................9 Post-Flight Inspection ...........................................9 Changing the Propeller..........................................10 Motor Service .......................................................10 AS3X Troubleshooting Guide .................................10 Troubleshooting Guide ..........................................11 Parts Explosion .....................................................
First Flight Preparation Flying Checklist • Remove and inspect contents • Begin charging the flight battery • Program your computer transmitter • Install the flight battery in the aircraft (once it has been fully charged) • Bind your transmitter • Perform a control direction test • Familiarize yourself with the controls • Find a suitable area for flying ❏ Always turn the transmitter on first ❏ Plug the flight battery into the lead from the ESC ❏ Allow the ESC to initialize and arm properly ❏ Fly the model ❏ L
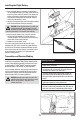
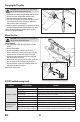
Installing the Flight Battery 1. Remove the canopy. 2. Insert the flight battery in the battery compartment. The recommended battery is a snug fit and should not require any other means of restraint. If the battery fits loosely in the battery compartment, apply hook and loop material to the battery and inside the compartment to hold the battery in place. 3. Stay clear of the propeller and connect the battery connector to the aircraft power lead, noting correct polarity.
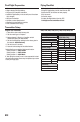
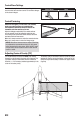
Control Horn Settings The table at the right shows the factory settings for the elevon control horns and servo arms. Do not make changes to the elevon linkages. Control Horns Servo Control Centering Before the first flights, or in the event of an accident, make sure control surfaces are centered when the transmitter controls and trims are neutral. The transmitter sub-trim must be set to zero. Adjust the linkages mechanically if the control surfaces are not centered.
Flight Control Direction Tests Transmitter input test This test ensures that the flight control system is reacting properly to your transmitter inputs. Assemble the aircraft and bind your transmitter to the aircraft receiver prior to performing this test. Transmitter Input CAUTION: Keep all body parts, hair and loose clothing away from the propeller at all times, as these items could become entangled.
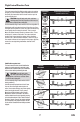
Flight Modes The aircraft has two flight modes pre-programmed into the receiver: SAFE® Mode (switch position 0 or 1) Acro Mode (switch position 2) Experienced Mode has no bank or pitch limiting, giving In SAFE® Mode the aircraft has bank and pitch limiting to help prevent the pilot from over-controlling. The aircraft an unlimited flight envelope.
In Flight Trimming Familiarize yourself with the Flying Your Aircraft section prior to trimming your aircraft. Trimming should be done in calm wind conditions and with a fully charged transmitter and flight battery. Trimming should only be necessary in AS3X mode, as the flight controller will compensate for minor trim issues in SAFE mode.
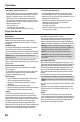
Changing the Propeller CAUTION: Always disconnect the flight battery before performing propeller service. 1. Disconnect and remove the flight battery from the aircraft. 2. Remove the 5mm washer head propeller screw. 3. Pull the propeller from the propeller adapter. 4. Place the new propeller on the propeller adapter with the raised numbers on the prop facing toward the motor and the front of the aircraft. 5. Install the propeller screw.
Troubleshooting Guide Problem Possible Cause Throttle stick and/or throttle trim is too high Aircraft will not respond to throttle but responds Throttle channel is reversed to other controls Motor is unplugged from receiver Extra propeller noise or extra vibration Damaged propeller, prop shaft or motor Screw on prop shaft is too loose Flight battery charge is low Propeller is installed backwards Reduced flight time or aircraft underpowered Flight battery is damaged LED on receiver flashes rapidly and ai
Parts Explosion 11 6 10 12 9 14 3 13 8 5 7 2 1 13 5 3 14 4 7 Replacement Parts Part # 1 BLH03201 2 BLH03202 3 BLH03203 4 BLH03205 5 EFLU4251 6 EFLU4252 7 EFLU4253 8 EFLU4067 9 EFLUM180BLB 10 EFLUP037503 11 PKZU2227 12 PKZU2228 13 PKZU2229 14 SPM6832 EN Optional Parts Description Part # Flight Control: UM F-27 FPV Motor Mount: UM F-27 FPV Control Horn Set: UM F-27 FPV Pushrod Set: UM F-27 FPV Painted Fuselage: UMX F-27 Fin Set: UMX F-27 Servo Cover Set: UMX F-27 Prop Adaptor BL180 BL Outrun
Limited Warranty What this Warranty Covers Horizon Hobby, LLC, (Horizon) warrants to the original purchaser that the product purchased (the “Product”) will be free from defects in materials and workmanship at the date of purchase.
Warranty and Service Contact Information Country of Purchase Horizon Hobby Horizon Service Center (Repairs and Repair Requests) Horizon Product Support (Product Technical Assistance) United States of America Sales European Union Horizon Technischer Service Sales: Horizon Hobby GmbH Contact Information servicecenter.horizonhobby.com/ RequestForm/ productsupport@horizonhobby.com 877-504-0233 websales@horizonhobby.com 800-338-4639 service@horizonhobby.
UMX © 2018 Horizon Hobby, LLC. E-flite, UMX, DSM, DSM2, DSMX, Bind-N-Fly, BNF, the BNF logo, Plug-N-Play, AS3X, SAFE, the SAFE logo, ModelMatch, Passport, Prophet, EC3, and the Horizon Hobby logo are trademarks or registered trademarks of Horizon Hobby, LLC. The Spektrum trademark is used with permission of Bachmann Industries, Inc. All other trademarks, service marks and logos are property of their respective owners. US 8,672,726. US 9,056,667. Other patents pending. Created 6/18 56636 IT http://www.