Instruction Manual Bedienungsanleitung Manuel d’utilisation Manuale di Istruzioni SAFE® Select Technology, Optional Flight Envelope Protection
EN NOTICE All instructions, warranties and other collateral documents are subject to change at the sole discretion of Horizon Hobby, LLC. For up-to-date product literature, visit www.horizonhobby.com and click on the support tab for this product.
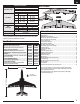
EN Quick Start Information 1. Blank (Acro) Model 2. Wing Type: 1 Aileron, 1 Flap Transmitter Setup 3. Servo Reversing: Normal 4.
EN Preflight 1 2 3 4 5 6 7 Remove and inspect contents. Read this instruction manual thoroughly. Charge the flight battery. Fully assemble the aircraft. Install the flight battery in the aircraft (once it has been fully charged). Check the Center of Gravity (CG). Bind the aircraft to your transmitter. 8 9 10 11 12 13 Make sure all linkages move freely. Perform the control direction test with the transmitter. Adjust the flight controls and transmitter as needed. Perform a radio system range test.
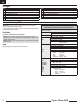
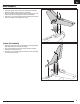
EN Model Assembly Horizontal Tail Installation 1. Connect both elevator servo connectors to the extensions in the fuselage labeled ELEV. Feed the excess servo wire into the fuselage. 2. Press the horizontal tail onto the fuselage, ensuring the alignment tab on the tail fits into the hole in the fuselage and no servo wires are pinched. 3. Insert two 3 x 16 mm screws through the horizontal surface and into the rear holes in the fuselage. Do not over tighten the screws. Vertical Tail Installation 1.
EN Model Assembly (Continued) Wing Installation 1. Find the y-harnesses included in the accessory bag. 2. Connect the y-harness marked AILE to both aileron servos. 3. Connect the y-harness marked FLAP to both flap servos. 4. Connect the y-harness marked GEAR to both main gear retracts. 5. Feed the y-harness leads from the aileron and flap servos and the retracts through the hole in the bottom of the fuselage as shown. 6. Slide the wing into place, ensuring not to pinch any of the servo wires. 7.
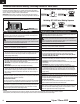
EN Battery Installation and ESC Arming Battery Selection We recommend a 22.2V 3200–38700mAh30C 6S LiPo battery with EC5 connector for standard operation. If using a different battery, the battery should be of similar capacity, dimensions and weight to fit in the fuselage. Always be sure the model balances at the recommended CG with the battery chosen. 1. Lower the throttle to the lowest setting. 2. Power on the transmitter and wait 5 seconds. 3.
EN Transmitter and Receiver Binding / Switching ON and OFF SAFE Select This product requires an approved Spektrum™ DSM2®/DSMX® compatible transmitter. Visit www.bindnfly.com for a complete list of approved transmitters. The aircraft has an optional SAFE Select feature, which can be switched ON or OFF easily by binding in a specific manner as described below.
EN Control Surface Centering After assembly and transmitter setup, confirm that the control surfaces are centered. If the control surfaces are not centered, mechanically center the control surfaces by adjusting the linkages. If adjustment is required, turn the clevis on the linkage to change the length of the linkage between the servo arm and the control horn. After binding a transmitter to the aircraft receiver, set the trims and sub-trims to 0, then adjust the clevises to center the control surfaces.
EN In Flight Trimming During your first flight, trim the aircraft for level flight at 3/4 throttle with flaps and gear up. Make small trim adjustments with your transmitter’s trim switches to straighten the aircraft’s flight path. After adjusting trim do not touch the control sticks for 3 seconds. This allows the receiver to learn the correct settings to optimize AS3X performance. Failure to do so could affect flight performance.
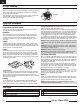
EN Power Components Service CAUTION: Always disconnect the flight battery before performing service on any of the power system components. A Disassembly B The wing is removed in the illustrations for clarity. It is possible to access all of the power system components without removal of the wing. 1. Remove the two screws (A) from the fan unit cover (B) and pull the cover out of the fuselage. 2. Remove the two screws (C) from the fan unit tabs. 3.
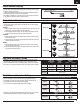
EN Troubleshooting Guide AS3X Problem Possible Cause Damaged propeller or spinner Imbalanced propeller Oscillation Inconsistent flight performance Incorrect response to the AS3X Control Direction Test Motor vibration Loose receiver Loose aircraft controls Worn parts Irregular servo movement Trim is not at neutral Sub-Trim is not at neutral Aircraft was not kept immobile for 5 seconds after battery connection Incorrect direction settings in the receiver, which can cause a crash Solution Replace propell
EN Problem Possible Cause Control surface does not move Controls reversed Motor power pulses then motor loses power Control surface, control horn, linkage or servo damage Wire damaged or connections loose Transmitter is not bound correctly or the incorrect airplanes was selected Flight battery charge is low BEC (Battery Elimination Circuit) of the ESC is damaged Transmitter settings are reversed ESC uses default soft Low Voltage Cutoff (LVC) Weather conditions might be too cold Battery is old, worn out,
EN AMA National Model Aircraft Safety Code Effective January 1, 2014 A. GENERAL A model aircraft is a non-human-carrying aircraft capable of sustained flight in the atmosphere. It may not exceed limitations of this code and is intended exclusively for sport, recreation, education and/or competition. All model flights must be conducted in accordance with this safety code and any additional rules specific to the flying site. 1. Model aircraft will not be flown: (a) In a careless or reckless manner.
EN Limited Warranty What this Warranty Covers Horizon Hobby, LLC, (Horizon) warrants to the original purchaser that the product purchased (the “Product”) will be free from defects in materials and workmanship at the date of purchase.
EN FCC Information FCC ID: BRWDASRX15 This equipment has been tested and found to comply with the limits for a Class B digital device, pursuant to part 15 of the FCC Rules. These limits are designed to provide reasonable protection against harmful interference in a residential installation. This equipment generates, uses and can radiate radio frequency energy and, if not installed and used in accordance with the instructions, may cause harmful interference to radio communications.
©2018 Horizon Hobby, LLC. E-Flite, Plug-N-Play, Bind-N-Fly, BNF, the BNF logo, DSM2, DSMX, EC5, AS3X, SAFE, the SAFE logo and the Horizon Hobby logo are trademarks or registered trademarks of Horizon Hobby, LLC. The Spektrum trademark is used with permission of Bachmann Industries, Inc. All other trademarks, service marks and logos are property of their respective owners. http://www.horizonhobby.