PRIVACY SCREENS User Manual English
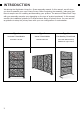
INTRODUCTION Introducing the Highlander Home Inc. Screen assembly manual. In this manual, we will show you how to assemble your own Privacy Screen. Before beginning the assembly, make sure that there is ample room for installing and assembling your product. The amount of Base Shelf Trays with your assembly may also vary depending on the type of product purchased. In this manual, we offer the installation guideline of 3 different basic setups of privacy fence.
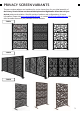
PRIVACY SCREEN VARIANTS There are unique patterns and variations for you to choose from for your ideal assembly of the Privacy Screen. Below are the available options that HighLander offers that suit your desired pattern and variation. We offer variety of patterns and configurations, for more information. Please visit www.youshouldhaveit.com or contact info@youshouldhaveit.com. We offer favorable discount if you purchase from our website.
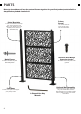
PARTS Below is a breakdown of how the parts will come together for your final product, as detailed in a simplified exploded view below Privacy Screen Poles/Brackets A total of two brackets will keep your screen secured to the posts. If you decide not to use brackets, there will be an alternative step. Your screen will be secured with two posts and optional brackets.
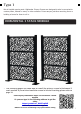
Type 1 Not all installs require posts. Highlander Privacy Screens are designed to also be mounted to custom pillars, framed in wood, or other surfaces. It’s as easy as just face mounting them or building a frame for them to sit in. HORIZONTAL 3 STACK MODULE ● The following pages will show how to install the privacy screen in Horizontal 3 stack module. If you wish to install the screen in Vertical stacking, please refer to page 10.
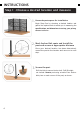
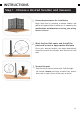
INSTRUCTIONS Step 1 - Choose a desired location and measure 1. Have adequate space for installation Begin Step One by choosing a desired location and gather the required tools to assist you in measuring the specifications and dimensions to set up your privacy screen installation. Anchor Bolt spots and Install the 2. Mark post and secure at appropriate distance Once your desired location has been determined, mount the post to the location and move on to next step. 3.
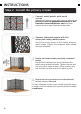
INSTRUCTIONS Step 2 - Install the brackets and privacy screen metal panels with metal 1. Connect screws Assemble all three screens with screw by aligning the privacy screen into appropriatescrewplaces so that it becomes flush with the each other and have another person to keep the privacy screen intact. the metal panels with Pre2. Connect setup pole using metal screws Secure the privacy screen to the bracket using the metal screws. Tighten the hardware while holding the parts into place.
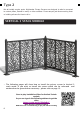
Type 2 Not all installs require posts. HighLander Privacy Screens are designed to also be mounted to custom pillars, framed in wood, or other surfaces. It’s as easy as just face mounting them or building a frame for them to sit in. VERTICAL 3 STACK MODULE ● The following pages will show how to install the privacy screen in Vertical 3 stack mode. If you wish to install the screen which can be relocated and anchored to the ground when necessary , please refer to page 13.
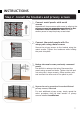
INSTRUCTIONS Step 1 - Choose a desired location and measure 1. Have adequate space for installation Begin Step One by choosing a desired location and gather the required tools to assist you in measuring the specifications and dimensions to set up your privacy screen installation. Anchor Bolt spots and Install the 2. Mark post and secure at appropriate distance Once your desired location has been determined, mount the post to the location and move on to next step. 3.
INSTRUCTIONS Step 2 - Install the privacy screen metal panels with metal 1. Connect screws Assemble all three screens with screw by aligning the privacy screen into appropriatescrewplaces so that it becomes flush with the each other and have another person to keep the privacy screen intact. the metal panels with Pre2. Connect setup pole using metal screws Secure the privacy screen to the bracket using the metal screws. Tighten the hardware while holding the parts into place.
Type 3 This product is different from previous type 1 and 2. It comes with different installation hardware. It is free standing privacy fence.
INSTRUCTIONS Step 1 - Choose a desired location and measure 1. Have adequate space for installation Begin Step One by choosing a desired location and gather the required tools to assist you in measuring the specifications and dimensions to set up your privacy screen installation. the posts Base and secure them 2. Install (OPTIONAL) Once your desired location has been determined, Place the posts to the location, mount (OPTIONAL) and install them at appropriate distance. 3.
INSTRUCTIONS Step 2 - Install the privacy screen 1. Locate the brackets and line upinto place Begin Step Two by locating the privacy screen to the inner sections of the post and line up the brackets to the holes, as shown. Have another person assist you and keep the screen intact. Secure the privacy screen using screws 2. Secure the privacy screen using a total of ten screws, five for each side. Tighten the screws using L key. 3.
Technical support Get in touch with us and we’d love to answer all your questions or comments. We have our team ready to help with anything you need. www.youshouldhaveit.com info@youshouldhaveit.com There are unique patterns and variations for you to choose for your ideal assembly of the Privacy Screen. Below are the available options that Highlander offers that suit your desired pattern and variation. We offer variety of patterns and configurations. For more information, Please, visit www.