
Installation Instructions


3
3. Place shower receptor directly on sub-floor or slab, level
receptor in both directions — place level along top edge of
tile flanges — do not use floor area which is tapered for
water drainage.
HINT: You may want to install shower receptor in a bed
of gypsum cement or panel/floor adhesive for
additional support.
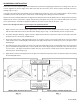
4. Seal waste by installing drain seal around 2” (inch) waste
pipe. Apply a lubricant of some kind (Iiquid soap or silicone
sealant works well) to the inside and outside of drain seal
prior to installation. Tamp in place to bottom of drain body
using a 1/4” (inch) diameter rod. Make sure top of drain seal
is even with top of 2” (inch) waste pipe as shown in sectional
view and in full compliance with local code regulations per-
taining to below floor waste connections. (Fig. C)
After you have installed your shower receptor and have made your sanitary drain-waste-vent stack connections, you are now
ready to assemble and install your (3) three piece Molded Fiberglass Shower Wall unit.
FIG. E
SHOWER WALL
After all of the required hole drilling is completed, it is much easier to assemble the unit outside of the alcove and set in place as
a one-piece unit. If you prefer not to follow this procedure, the Corner Panel
must
be installed first.
Sl-154 (06•06)
SECTIONAL VIEW