
Installation Instructions


4
Sl-154 (06•06)
A. One of the Side Panels will require drilling for the mixing/control valve handle(s). The showerhead may be located through the
Side Panel or above it (which ever you chose in your rough plumbing). Double check all measurements before you do any
drilling. The drilling should be completed before the unit is installed. Drill from the finished (inside) surface.
B. The Corner and Side Panels have a mounting flange that is designed to accept standard “deck” screws, the positioning of the
studs and bracing have been laid-out to give maximum support (horizontally and vertically) behind these flanges. The mount-
ing flanges have pre-marked holes - to avoid cracking the flange, it is recommended that you pre-drill all of the holes with a 5/
32” (inch) diameter drill bit. Countersink holes for flush screw head fit.
C. To avoid any creaking or bowing that may take place with normal settling of the structure, it is mandatory that every pre-
marked mounting hole be utilized.
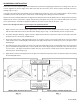
D. On the Corner Panel, you will notice a groove on the right and left side, going the full height of the panel. We recommend that
a bead of “clear” silicone sealant be applied into each groove, this will insure a watertight seal when the Side Panel blades are
inserted into these grooves. See drawing, Fig. F.
E. If a shower door (enclosure) is to be installed with this unit, we recommend bonding a piece of 1 x 3 to the backside of each
Side Panel prior to installation of the unit. If a curtain is to be used, the same 1 x 3 reinforcing strip should be used to “back-
up” the mounting brackets. If unit has been installed and no reinforcing strips have been used and you decide to mount either
a shower door or curtain - You must use “Molly” type clinching anchors for all screws. See drawing, Fig. G.