E-TECH Co., Ltd 1/19 ▶ User’s Manual◀ FILE: IM400 manual.doc 1. Introduction 2. Description of Unit 3. Technical Specifications 4. Features and Operation 5. Antenna Installation 2004.11.
E-TECH Co., Ltd 2/19 1. Introduction IM400 has a compact size with a various features in the range of 420~500MHz. IM400 Has a various features shown as below. IM400 constructed with a microprocessor controlled, temperature compensated Phase Locked Loop(PLL) frequency synthesizer. The radio features a double conversion receiver and a direct FM transmitter modulator.
E-TECH Co., Ltd 3/19 3. Technical Specifications 3-1 General 1) Frequency range : 420~500 MHz 2) Channels : 255 Channels 3) Channel spacing : 12.5 kHz/25 kHz 4) Communication method : Simplex 5) Antenna Impedance : 50 ohm 6) Power supply voltage : DC 13.
E-TECH Co., Ltd 4/19 3-3 Receiver 1) Receiver Type : Double Super Hetero type 2) Sensitivity : -0.25uV 이하(12dB SINAD 시) 3) Frequency Stability : ±0.00025%(±2.5PPM) 4) SPURIOUS Rejection : -75 dB 5) Adjacent Channel Selectivity: -65 dB (Narrow) , -70 dB (Wide) 6) Distortion : 5% (1 kHz 60%) 7) Hum & Noise : -40 / -45 dB(HP8920A 300Hz ∼ 3kHz BPF) 8) Audio output : Normal 3W ( Max 5W ) 9) BAND SPREAD : 70MHz 10) Speaker size : 48 * 30 Rectangle 4.
E-TECH Co., Ltd 5/19 4-1 Features & Operation 1. Monitor Press the Monitor key momentarily to disable the Tone squelch. 2. Radio Call By using Various 5Tone, individual / Group call is available. 16 Receiving codes are available as well as open call. 3. Missed calls list 16 Missed calls can be listed. If a call remains unanswered, the call will be stored by the radio. 4. contact list During a call, the contact list may be used to give access to up to 16 preprogrammed numbers accessed via the menu. 5.
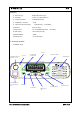
E-TECH Co., Ltd 6/19 4-2 LCD Display and Icons 1.ANT GAZE ; Shows the received signal strength. 2.TX POWER HIGH: Indicate power level 3.KEY LOCK: Appears during key lock function is ON. 4.ALART(BEEP) ON/OFF: Appears when beep sound is turned ON. 5.Battery level indicator: Indicates reaming battery power. 6.VOX ON/OFF: Appears when VOX function is turned On. 7.SCAN: Appears when Scan function is activated. 8.SCRAMBLE: Appears while the voice scrambler function is activated. 9.TALK AROUND Indicator.
E-TECH Co., Ltd 7/19 3. Contact list 1). to enter Menu Mode. 2) or 3) to select 4) or 5) to exit to until to scroll list 4. Status call list 4-1. Making STATUS call 1) to enter Menu Mode. 2) or 3) to select 4) or to until to scroll list 5) Push PTT KEY for sending message on the LCD. 4-2 Make STATUS Message 1) to enter Menu Mode. FILE: IM400 Service manual.doc 2004.11.
E-TECH Co., Ltd 8/19 2) or 3) to select 4) or 5) to until to scroll list to SELECT 5. Lone work 1). to enter Menu Mode. 2) or 3) to select 4) or to until to select ON/OFF 6. Tx power .1). to enter Menu Mode. 2) or 3) to select 4) or FILE: IM400 Service manual.doc to until to select HIGH / LOW POWER 2004.11.
E-TECH Co., Ltd 5) 9/19 to select 7. Tx Tone Selecting Transmitting TONE(CTCSS/DCS). 1). to enter Menu Mode. 2) or 3) to select 4) or to until to Select TONE을 either CTCSS or DCS. 0= NON TONE 1-38 CTCSS 101 – 183 DCS TONE 5) to select exit 8. Rx Tone Changing Receiving TONE(CTCSS/DCS). 1). to enter Menu Mode. 2) or 3) to select 4) or to until to select TONE either CTCSS or DCS. 0= NON TONE 1-38 CTCSS 101 – 183 DCS TONE. FILE: IM400 Service manual.doc 2004.11.
E-TECH Co., Ltd 5) 10/19 to select exit 9. Group Changing GROUP Tone. 1). to enter Menu Mode. 2) or 3) to select 4) or 5) to until to select scroll list to select exit 10. Beep on/off 1). to enter Menu Mode. 2) or 3) to select 4) or 5) to select to until to select on off . 11. Key lock 1). to enter Menu Mode. FILE: IM400 Service manual.doc 2004.11.
E-TECH Co., Ltd 11/19 2) or 3) to select 4) or 5) to select to until to select key lock /unlock. 12. Squelch level 16 level is available. 0 = terminate sq function 1). to enter Menu Mode. 2) or 3) to select 4) or 5) to until to the scroll list to select exit 13. Auto Squelch 1). to enter Menu Mode. 2) or 3) to select FILE: IM400 Service manual.doc to until 2004.11.
E-TECH Co., Ltd 12/19 4) or 5) to select to select on /off . 14. Scan 1). to enter Menu Mode. 2) or 3) to scan. to until 4) Push PTT for exit 15. DTMF 1). to enter Menu Mode. 2) or 3) to select 4) or 5) to select to until to select ON /OFF. 16. Vox on/off 1). 2) to enter Menu Mode. or FILE: IM400 Service manual.doc to until 2004.11.
E-TECH Co., Ltd 13/19 3) to select 4) or 5) to select to select ON /OFF. 17. Vox Level 16 level is available.. 1). to enter Menu Mode. 2) or 3) to select 4) or 5) to select to until to scroll list for exit 18. Auto Vox 1). to enter Menu Mode. 2) or 3) to select 4) or 5) to select FILE: IM400 Service manual.doc to until to select ON /OFF. 2004.11.
E-TECH Co., Ltd 14/19 19. Priority Scan 1). to enter Menu Mode. 2) or 3) to select 4) or 5) to select to until to select ON /OFF. 20. Priority scan CH 1). to enter Menu Mode. 2) or 3) to select 4) or 5) to until to scroll list to select for exit 21. Power save 1). 2) to enter Menu Mode. or FILE: IM400 Service manual.doc to until 2004.11.
E-TECH Co., Ltd 15/19 3) to select 4) or 5) to select to select ON /OFF. 22. Talkaround 1). to enter Menu Mode. 2) or 3) to select 4) or 5) to select to until to select ON /OFF. 23. Password 1). to enter Menu Mode. 2) or 3) to select 4) or 5) to select FILE: IM400 Service manual.doc to until to select ON /OFF. 2004.11.
E-TECH Co., Ltd 16/19 24. Password CH 1). to enter Menu Mode. 2) or 3) to select to until 4) ---- will display on the LCD( enter old password) or by pushing up and down KEY to change password. by pushing enter KEY to change digit of password. 5) Enter new password by 4 digit. 25. Location Indicate where the radio is located by blinking green light every 7 seconds. 1). to enter Menu Mode. 2) or 3) to select 4) or 5) to select to until to select ON /OFF. 26. Scramble 1).
E-TECH Co., Ltd 17/19 3) to select 4) or 5) to select to select ON /OFF. 27. Status call Send 1). to enter Menu Mode. 2) or 3) to select 4) or 5) to select to until to select ON /OFF. 5.
E-TECH Co., Ltd 18/19 5-2 Selecting an Antenna Site/Location on a Metal Body Vehicle 1. External installation – Check the requirements of the antenna supplier and install the vehicle antenna external to a metal body vehicle in accordance with those requirements. 2. Roof top – For optimum performance and compliance with RF Energy Safety standards, mount the antenna in the center area of the roof. 3.
E-TECH Co., Ltd 19/19 5-3 Antenna Installation Procedure 1. Mount the antenna according to the instructions provided with the antenna kit. cable to the radio mounting location. Run the coaxial If necessary, cut off the excess cable and install the cable connector. 2. Connect the antenna cable connector to the radio antenna connector on the rear of the radio. 5-4 Completing the Installation 1. Mount the microphone clip to a convenient spot near your radio. 2.