E-TON YUKON II OWNER’S MANUAL CXL-150 Copyright ©2008-2009 ETON America, all rights reserved.
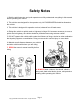
Important Notices READ and UNDERSTAND this owner’s manual Both the operator and the adult supervisor should completely read and understand this owner’s manual before operating this vehicle. This owner’s manual will instruct you in the safe operation of the vehicle. NO Passengers This vehicle was designed for operation ONLY by the operator, (Driver). The load limit and seat configuration is designed for the operator ONLY. It is not safe to carry passengers on the vehicle.
Table of Contents Safety notes Vehicle identification number location Controls, switches and feature locations Control feature operations Engine stop switch Throttle lever Front & Rear Brakes Parking brake Fuel System Fuel tank Fuel valve Inline Fuel Filter Engine Oil Checking Engine Oil Level Changing Engine Oil Engine Oil Cooler Transmission Shifting Gears Checking Transmission Oil Level Changing Transmission Oil Tires & Wheels Tire inspection Tire pressure Spark Plug Spark Arrester Screen Air Filter Brak
Safety Notes 1. Both the adult instructor and youth operator must fully understand everything in this manual before operating this vehicle. 2. This vehicle was designed for the operator only. NO PASSENGERS should be allowed on this vehicle. 3. This vehicle is designed for operation on level, obstacle free off-road areas. 4. Riding this vehicle on public roads or highways is illegal. If it becomes necessary to cross a public road or highway, the vehicle should be pushed across using extreme caution. 5.
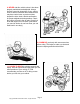
9. NEVER ride this vehicle unless it has been properly maintained and adjusted. Always perform a pre-ride inspection of your vehicle. Look for wires, bolts and other fasteners that may have come loose on previous rides. Inspect the drive chain, throttle and brakes for proper adjustment and operation. Check the engine oil level in the oil tank. Check fuel level and inspect for fuel leaks. (Remember, you can ride further in one hour than you can walk back in one day!) 10.
12. NEVER REFUEL this vehicle when hot. Ask your adult supervisor to refuel your vehicle. Gasoline is extremely flammable and will ignite if spilled on a hot engine or muffler. Never smoke or expose the fuel to an open flame or spark while refueling your vehicle. Always refuel your vehicle in a safe place free of any ignition source. 13. NEVER run the vehicle in an enclosed area.
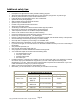
Additional safety tips: • • • • • • • • • • • • • • • • • • • • • • • • • • • Participate in an approved ATV safety education training program. Always provide responsible adult supervision for ATV operators younger than 18 years of age. Never let youths less than 16 years old ride full-sized ATV's. Follow all safety recommendations of the ATV manufacturer. Operate ATVs only during daylight. Wear a helmet with face protection at all times. Operate only four-wheeled ATVs.
Vehicle Identification Numbers Vehicle Identification Number (VIN) is located at the front of the unit under the front fender on a plate mounted between the main frame rails. Engine serial number is located on the left-hand side of the engine on the crankcase housing. Your VIN RFZ______________ Eng. No._______________ Controls, Switches & Feature Locations Locations of controls and features: 1. Rear Brake Lever 2. Headlight Switch 3. Horn Button 4. Engine Stop Switch 5. Front Brake Lever 6.
Control Features Engine Stop Switch As your operator gains more experience, you can increase the throttle travel to allow for The stop switch is a red colored rocker switch located on the left-hand handle bar. To start and run the engine, this switch must be placed in the on, “O”, position. The vehicle is also equipped with a safety brake switch which will prevent the engine from starting until the parking brake is engaged. additional speed to be obtained.
The rear brake is the primary stopping brake on your vehicle. Using the rear brake to stop your vehicle will prevent steering control loss. Fuel Tank Use your front and rear brakes in combination to control your speed while descending a grade. Use caution not to apply too much pressure to your front brakes so that the wheels lock up, stop turning, and cause a loss of steering control.
Use unleaded automobile gasoline with an octane level of 89 or higher. Your ATV is equipped with an inline fuel filter to prevent dirt and debris from entering the carburetor and engine. Your ATV is equipped with a fuel gauge located in the instrument cluster between the handlebars. Check the filter for dirt or damage before each ride and at each refueling. Replace the filter if dirty or damaged. NEVER REFUEL YOUR ATV when the engine is HOT.
dusty or humidity is high the engine oil should be change more frequently. Engine Oil Changing Engine Oil Your ATV uses automotive type engine oil to lubricate the engine. The engine oil dip stick is located on the right hand side of your engine below the transmission shifting lever. To check your oil level, remove the dip stick by turning the thumb hold counter clockwise until the stick has been completely disengaged from the threads.
Transmission Shifting Oil Cooler Your ATV is equipped with a fully automatic C.V.T. transmission and has forward and reverse gearing. A transmission shifting shaft is located on the right hand side of your engine. The engine oil is cooled by pumping the oil through an external oil cooling radiator located at the front of the unit. It is important that the cooling fins of the radiator be kept clean of dirt build up to prevent engine overheating.
Slowly move the shifting lever to the desired gear pausing slightly at the neutral position. Once you have the gear selected increase the throttle slowly until the transmission becomes fully engaged and the vehicle starts moving in the desired direction. When shifting gears it is important that you bring the vehicle to a complete stop with the rear brake fully engaged and the engine at idle.
Tires and Wheels Spark Plug Replace spark plug at the beginning of each season with a replacement plug NGK – C7HSA. Tire & Wheel inspection It is important to inspect your tires and wheels for damage and wear before each riding session. Inspect each tire for cuts, tears and punctures. Inspect the wheel rim for dents and separation of the wheel from the tire bead. Replace any tire or wheel found to be damaged. Operating your ATV with damaged tires or wheels is dangerous.
Air Filter Air Filter Maintenance Remove the filter element from the air box and replace the filter element as needed. Braking Systems To maintain the highest performance from your engine and to reduce excessive wear that could cause engine failure the engine requires a continuous flow of clean air. Air is taken into the engine through an air filter to clean the air prior to mixing it with fuel in the carburetor.
Inspect the brake arm, spring, rod and fastener for signs of wear or damage. Operate the brake lever while watching the brake mechanism for proper operation. Tighten, repair or replace parts as needed to insure safe brake operation. Clean any build-up of mud or debris from the brake mechanism. The brakes are equipped with a wear indicator to alert you when your brake shoes need replacing. Apply light pressure to the brake lever and slowly push the unit forward.
Purging Brake Lines After riding your unit, be sure to clean any build up of mud, sand and dirt from the brake rotor skid plate. This will protect the rotor disc from rust and corrosion. For the hydraulic brake system to operate safely, the brake system must be purged of air in the lines and reservoir. To bleed the air will require two people to perform the following procedure. To Fill the Reservoir Remove the reservoir cover by removing the two cover bolts.
the proper tension retighten the axle position locking bolt. Drive Chain The drive chain will stretch with use and will require periodic adjustments. To check the chain tension, remove the chain guard and measure the slack. The amount of slack in the chain should not exceed 10-20mm or ¼” - ½”. The chain should be kept well lubricated to prevent excess wear and premature failure.
The speed of the unit can be adjusted by adjusting the throttle stop screw to limit throttle travel. Loosen the throttle stop screw locking nut and turn the throttle stop screw clockwise to reduce the throttle travel thus reducing the maximum speed of the unit. Turning the stop screw counter clockwise will increase the throttle travel thus increasing the maximum speed of the unit. Tighten the stop screw locking nut when the desired throttle travel has been established.
9. Check all nuts, bolts and other fasteners for loose conditions. 10. Inspect unit for any broken or damaged parts. 11. Check all indicator lights and switches for proper operation. 12. Insure you are wearing proper clothing and protective gear: Helmet, Gloves Pads, etc. When reinstalling the battery, be sure to connect the red cable to the positive (+) terminal and the black cable to the negative (-) terminal. The battery should be replaced every three years or when it no longer holds a charge.
Turning your ATV Learning to turn your ATV requires you to learn to shift your weight and control the throttle to allow the rear wheels to turn properly. When making a turn, the wheels on the outside of the turn must travel a wider radius and thus a greater distance than the inside wheels of the turn. Since the rear axle does not permit a different rate of rotation, it is not enough to merely steer your ATV into the turn.
Standard Accessories Your Yukon comes equipped with a front and rear cargo racks. The weight limit on these racks is 30Lbs each. Exceeding these limits can result in loss of control causing damage to your unit and serious injuries. Also standard is the full front brush bar. The brush bar protects the ATV and engine oil cooler unit. The screen on the bar must be kept free of debris to allow air to free flow to the oil cooling radiator. Dual driving lights and Brake/Tail light for additional safety.
YUKON II Specifications Engine Type Displacement Bore / Stroke Compression Power Four cycle Air/Oil cooled 149.56 cc φ57.4 * 57.8mm 9.7 : 1 10.6ps @ 7500rpm Transmission Type Automatic (C.V.T. V-Belt) Chassis Overall Length Overall Width Overall High Wheel Base Dry Weight 1730mm / 68.1" 980mm / 38.6" 1070mm / 42.1" 1115mm / 43.9" 172kg / 379lbs Suspension Front Dual A-arm Adjustable Shocks @ 3.5" travel Rear Swing Arm Adjustable Shock @ 3.
Sprockets Front Rear Chain 12 teeth 34 teeth #520 O-Ring Battery Fluids Fuel Engine Oil Transmission 12V-9AH - GTX9 Type Volume Type Volume Type Volume Unleaded Gasoline 89 octane 6.5liters / 1.7gal SAE 30W 1.0liters / 1gt SAE 80/90 weight gear Oil 750cc / 25.4oz Spark Plug NGK Nipendenso Champion Electrode Gap C7HSA/NGK U22FS-U Z9Y (Not recommended) 0.6-0.7mm / 0.023-0.
Maintenance Schedule Fuel Line Throttle Operation Air Filter system & Element Spark Plug Carburetor Idle Speed Drive Chain Brake Shoe Wear Brake System Nut, Bolt, Fastener Wheels & Wheel Nuts Steering System Suspension System Waste Gas Recovery Valve Gear & Engine Oil Intake & Exhaust Valve Adj.
YUKON II Wiring Diagram Copyright ©2008-2009 ETON America, all rights reserved.
ETON AMERICA, LLC. LIMITED VEHICLE WARRANTY ETON America warrants all new ETON vehicles sold by authorized Eton Dealers to be free from defects in materials and workmanship, subject to the following exclusions and limitations. New vehicles sold by an authorized dealer to original retail consumers are covered by this policy for a period of six (6) months from the date of delivery. There is no mileage limitation.
ETON AMERICA, LLC. LIMITED VEHICLE WARRANTY Scheduled maintenance service is the responsibility of the owner during and after the warranty period. In the event of a failure or required repair, the owner should take vehicle to an authorized dealer for repair without undue delay and within a maximum of thirty, (30), days of the occurrence of the problem. All eligible warranty repairs must be made at any authorized dealer’s normal place of business.
Owner’s Notes: Copyright ©2008-2009 ETON America, all rights reserved.
ETON AMERICA, LLC. LIMITED VEHICLE WARRANTY ETON America warrants all new ETON vehicles sold by authorized ETON Dealers to be free from defects in materials and workmanship, subject to the following exclusions and limitations. New vehicles sold by an authorized dealer to original retail consumers are covered by this policy for a period of six (6) months from the date of delivery. There is no mileage limitation. This warranty is given to the original retail purchaser and is non-transferrable.
ETON AMERICA, LLC. LIMITED VEHICLE WARRANTY LIMITATIONS.
ETON America LLC ATV LIMITED WARRANTY FEDERAL EMMISSION CONTROL SYSTEMS ETON America LLC warrants each new Scooter/moped vehicle that includes as standard equipment a taillight and a stoplight; a) Is designed, built and equipped so as to conform at the time of initial retail purchase with all applicable regulation of the United States Environmental Protection Agency (“US EPA”) and: b) Is free from defects in material and workmanship which would cause such Scooter/moped vehicle to fail to conform with applic
Copyright ©2008-2009 ETON America, all rights reserved.