USER MANUAL PORTABLE ELECTRIC SCOOTER
CONTENTS 1. STANDARD INSTRUCTIONS 4 2. BEFORE USE / SAFETY INSTRUCTIONS 5 3. BOX CONTENT 8 4. MAIN PARTS 9 5. SCOOTER PARTS DIAGRAM 10 6. FOLDING, UNFOLDING AND ADJUSTING THE HANDLEBAR HEIGHT 11 7. OPERATING INSTRUCTIONS 12 8. RIDING OPERATION 16 9. WARNINGS 18 10. BATTERY AND CHARGER 20 11. CLEANING AND MAINTENANCE 21 12. STORAGE AND MAINTENANCE 21 13. TROUBLESHOOTING 22 14. PROTECT THE ENVIRONMENT 22 15. TRADE MARK AND LEGAL STATEMENT 23 16.
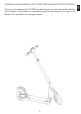
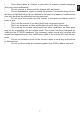
Thank you for choosing the E-TWOW portable electric scooter (hereinafter referred to as scooter). The scooter is a recreational vehicle that allows you to travel in an efficient, fun, economic and ecologic manner.
1. STANDARD INSTRUCTIONS The scooter is a two-wheeled vehicle, designed for adults over the age of 18. It can support a maximum weight of 100 kg. For a safe operation, we recommend a minimum weight of 50 kg. The scooter is sold fully assembled and it comes with a dedicated charger. The operating instructions found in this manual are valid for all E-TWOW scooters. The manual comes with a separate Specification Sheet where you can see the particular features of each scooter model.
To safely ride the scooter and to avoid accidents, collisions or loss of control, please carefully read the following instructions. The use of the scooter in violation of the warnings and instructions found in this manual is at your own risk and E-TWOW is relieved of any liability regarding any damages caused by inappropriate use of the scooter. The warnings and instructions found in this manual are marked with different symbols.
• To avoid damaging the scooter’s electrical parts, please do not immerse the scooter in water with the depth of more than 4 cm, and don’t wash it with water under pressure (for more information, please read the Cleaning and Maintenance chapter). • For your own safety and in order to protect the scooter, please don’t ride the scooter in bad weather such as heavy rain or snow. • Make sure that the voltage indicated on the charger is the same as that of the power supply.
7 EN • Don’t allow babies or children to play with the scooter’s plastic wrappings (they may cause suffocation) • Do not connect or disconnect the charger with wet hands. • Do not disassemble, repair or modify the scooter. The scooter does not contain fuses or light bulbs that can be replaced by the user. Any repairs or modifica tions shall only be made by authorized service personnel. • Do not leave the scooter and the charger in the reach of children under 8 years of age.
3. BOX CONTENT When opening the box, make sure it contains the fully assembled scooter, along with the charger and the user manual. Check that all the components are present and in good condition. If you are missing any components, contact your dealer or your nearest service center. Please keep the box and the packing materials in case you need them to transport your scooter in the future.
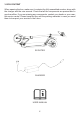
1. Handlebar 2. Display 3. LED headlight 4. Folding hock 5. Folding hock EN 4. MAIN PARTS 6. Battery charging port 7. Folding lever 8. Folding axle 9.
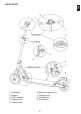
5. SCOOTER PARTS DIAGRAM 1. Acceleration lever 2. Power button 3. Settings button 4. On/off light button 5. Horn button 6. Handlebar 7. Controller 8. Folding bar 9. Front fender 10. Battery front cover 11. Protection cover 12. Folding buttons 13.
(a) (d) (b (c) (e) (f) Folding steps • To fold the scooter start by adjusting the handlebar’s height to the minimum. Do this by opening the lock lever as shown in figures (a) and (b). • Next, press down on the display as shown in figure (d), while also pushing the height button, as shown in figure (c), to lower the handlebar’s height. Push the lock lever back into lock position.
(g) (h) Unfolding steps • Press the rear fender to release the folding hook from the opening located on the rear brake. Then, lift the handlebar until it reaches its normal position. You should hear a click when the locking bolt comes into place. • Raise the two handles of the handlebar until they align into the normal position. • Push the lock lever as shown in figures (a) and (b).
Lights Press the On/Off light button when necessary. The display will show a symbol that indicates that the lights are on (both the LED headlight and the rear stop light). Press again when you no longer need the lights to turn them off. If the lights are off, the rear stop light will only turn on when braking. Displaying the mileage When the display is powered, it shows 2 modes: ODO and TRIP. ODO displays the total mileage, whereas TRIP displays the mileage of the current trip, from the last reset.
Menu for speed limit To set up a speed limit, please follow the steps detailed below: • Turn off the scooter • Press and hold the electromagnetic brake lever with your left thumb. Keep it pressed during the entire operation • Turn on the scooter. The display will show the L1 option.
To avoid dangerous situations, we recommend that you only use this function for climbing ramps, or that you only use it on specially arranged tracks. Setting the functions To choose one of the 3 functions (P1, P2, P3), follow these instructions: • Turn on the scooter • Press the electromagnetic brake lever all the way and keep it pressed during the entire operation. • Press the power button. The display will show the P1 symbol. Press the On/ Off light button to navigate the 3 functions P1—P2—P3.
8. RIDING OPERATION GETTING READY • Put on your protective gear and choose a suitable place for driving the scooter (see the SAFETY INSTRUCTIONS chapter) • Unfold the scooter and adjust the handlebar to the suitable height, according to your stature (see the Folding, unfolding and adjusting the handle-bar height chapter) • Press the power button. Make sure the scooter battery is sufficiently charged to power the scooter for the desired ride.
Braking instructions Electromagnetic brake: Press the electromagnetic brake lever with the left thumb to activate the electromagnetic brake. The harder you press, the stronger the braking force will be. When you activate the brake, the rear stop light will turn on. If the lights are already on, the rear stop light will double its luminous intensity when you push the brake lever. Rear mechanical brake: Press the rear fender to activate the rear mechanical brake.
9. WARNINGS Failure to follow the following instructions could cause serious injuries. DO NOT ride the scooter in the rain and/or don’t ride through any body of water with a depth bigger than 4 cm. DO NOT press the acceleration lever when walking with the scooter. DO NOT carry heavy objects on the scooter’s handlebar. DO NOT ride the scooter with only one foot. Slow down when riding over speedbumps, thresholds or other terrain bumps.
EN The scooter is meant for one rider only. DO NOT carry other adults, children or pets on the scooter. DO NOT rotate the handlebar suddenly when riding the scooter at a high speed DO NOT ride on public roads, on roads that are assimilated to public roads, on lanes or on unsafe roads, and do not violate legal regulations. Do not attempt to ride the scooter up and down stairs with steps that are taller than 3 cm and don’t jump over obstacles.
10. BATTERY AND CHARGER Each scooter is equipped with a battery and a charger. Please do not use batteries or chargers from other manufacturers, as the scooter, the battery, or the charger may be damaged. In this case, our company will not be responsible for the damages. Furthermore, each model has a dedicated charger, as detailed in the product specification sheet. Please do not use a charger from another model! The battery On the scooter’s first use, the battery should be fully charged.
WARNING! Ensure that the scooter is turned off, it is not connected to the power supply and the charging port cover is sealed before performing any maintenance operation. Cleaning Use a soft, damp cloth to clean the main frame. Difficult to remove dirt can be cleaned with a soft brush, then cleaned with a soft, damp cloth. The scratches on the plastic parts can be polished with fine abrasive paper. WARNING! Do not wash the scooter with alcohol, gasoline, acetone or other corrosive / volatile solvents.
13. TROUBLESHOOTING ** ERROR CODES E1 – Overcurrent protection – This error appears when the scooter is accelerated, and the engine is not allowed to function for more than 4 seconds. The E1 error disappears when you release the acceleration lever. E2 – Communication error in the control block. This error clears when interacting with the scooter, resetting the communications.
E-TWOW and the logo icon are trademarks. All rights reserved. The E-TWOW scooter is covered by relevant patents. For patent information, visit https://www.e-twow. com. We have tried to include descriptions and instructions for all the scooter’s functions at the time of printing. However, your scooter might differ slightly from the model shown in this document. Note that there are several E-TWOW models with different functions and some of the features mentioned here may not apply to your scooter.
16. TECHNICAL SPECIFICATIONS BOOSTER V Overall Expand Size Overall Fold Specifications Size Scooter Weight Wheel diameter Maximum load Top Speed BOOSTER PLUS S BOOSTER PLUS 1020*1160*380 mm 970*330*145 mm 11.3 Kg 11.1 Kg 10.8 Kg 8” / 20 cm 100 Kg 20-25--30-36 km/h* 20-25--30-32 km/h* Grade Ability 25 degree slope 25 degree slope max. 40 Km max. 35 Km max.
EN GT Overall Expand Size Overall Fold Specifications Size Scooter Weight Wheel diameter Maximum load GT 2020 1132*1075*382mm 1060*324*150mm 11.9 Kg 13 Kg 8” / 20 cm 125 Kg Top Speed 40 km/h* Grade Ability 25 degree slope max. 50 Km Capability Range (with Can vary according to the weight of the passenger, speed, fully charged slope degree, wind speed, road conditions, temperature battery) and other factors. Under 10 degrees Celsius autonomy decreases by up to 30% Power 7.