
User Manual


OSD Pro Overview - Basic Steps for setting up your OSD Pro
Document Version 1.3
Note: this document is provided to give a “quick overview” of how
easy it is to set up the OSD Pro with basic functionality. It’s
important to read the OSD Pro and eLogger instruction manuals
for important warnings and other information.
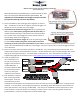
1) Connect the OSD Pro, GPS, and eLogger pieces together, as shown at
right. The OSD Pro connects to the “LCD/TX” port of the eLogger, and
the GPS connects to the “GPS” port of the eLogger.
2) If your OSD Pro kit includes the eLogger V4: If you are powering your
OSD Pro system with a battery pack greater than 4S (about 16V), the
included throttle monitoring Y cable needs to be connected between
the “Throttle” input of the eLogger V4, and any receiver channel, to
provide backup power to the eLogger V4.
If your OSD Pro includes the eLogger V3: If you are powering your OSD
Pro system with a battery pack greater than 3S, OR you will not be
connecting any of the servo inputs of the OSD Pro to your receiver, the battery backup harness (included with your kit)
needs to be connected between the USB port of the eLogger, and a spare receiver channel. See the eLogger manual for
more information.
3) Connect your video camera and Video Transmitter to the OSD Pro. This is the hardest part to do with any OSD, since
cameras and transmitters have nonstandard connectors. Our FPV dealers often supply complete packages with custom
hookups for the supplied camera/Tx. The below shows one way to wire it. Also, note that there are many user
supplied wiring diagrams for the osd Pro online at http://www.rcgroups.com/forums/showthread.php?t=1286603
4) Install the software from
the included CD or from
the web, and connect the
eLogger to the PC with the
included USB cable. If
prompted, update the OSD
Pro to the latest firmware
version, by clicking the
"Update Firmware" button.
5) Click “Hardware, Configure
OSD” and the page shown
below appears. Select the
text parameters you want
to display from the dropdown box, and drag them to where you want them on the simulated screen, renaming the text
if desired. In my case below, I have configured Temperature, Pack Voltage, mAH, GPS altitude and speed, distance to
home, GPS sattelites in view, call sign, and GPS HDOP. I also want to use the RADAR “synthetic map” feature, which
shows me where I am (and the direction I’m pointing) in relation to home. And, I want the graphical compass and
graphical battery. These are all configured on the same software page.