HOMEY USER MANUAL J 9338 Digital Camera Please read these instructions thoroughly before operating the units RECEIVED 1 2 NOV 200 |
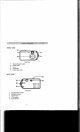
FRONT VIEW Front View . Shutter/Select button . Power LED . Lens . Viewfinder . Hand strap hook BACK VIEW Back View . Shutter/Select button . Mode/On button . View Finder LCD display .
1. Getting stared 1.1 What can | do with my Camera? 1.2 What can | do with my Digital Pictures? | 1.3 What can | do with my Video Clips? ! 1.4 Camera Package Contents | 1.5 Recharging the battery (non-replaceable} i 1.6 Turing the camera ori and off 1.7 Checking the battery level | 1.8 Automatic power off saves battery { 1.9 Checking Camera Status 2. Taking Pictures 2.1 Taking a picture 2.2 Setting the image resolution 2.3 Setting frequency i 2.4 Self Timer Mode i 2.5 Video Mode 2.
3.3 Computer system requirements . | 4. Transferring Pictures & Video Clips to your Computer | 4.1 Before you transfer pictures i 4.2 Connecting fo your computer | 4.3 Transferring the pictures 4.4 How fo use Photo Studio ® 2000 ] 8. Using your camera as a Web Cam | 5.1 Setting up Web Cam | 5.2 Enjoying your Web camera i 8. Troubleshooting Problems : 6.1 Troubleshooting 7. Getting Help 7.1 Online Services 7.2 Customer Support 7.3 ArcSoft® Software Help = Appendix 8.1 Technical Specifications 8.
1.1 What can | do with my Camera? Capture: Enjoy point & shoot operation Communicate: Use the camera as a web camera 1.2 What can | do with my Digital Pictures? ; View: View pictures on a computer using the ArcSoft® el Software or 9338 manager supplied ¢ Save: save pictures ta the computer memory Communicate: Send the pictures over the Internet fo family and friends 1.3 What can | do with my Video Clips? Save: Save your video clips on a computer using the Mini Cam manager software supplied.
following steps to recharge the battery: 1.5.1 Connect the Camera to a computer with a USB cable, 1.5.2 A sound of beep is made and red light shines through the glass cover shows the camera is in charging. 1.5.3 10 hours is needed to fully charge the battery at the first time. From then on, only 1 to 2 hours is needed. The battery can be recharge for about 500 times. 1.6 Turing the camera on and off Turn on the camera by pressing the Modern button once.
is in standby mode. Press the Mode/On button to reactive the ! camera. The camera will sound a high beep and the LCD will 1 comeback on to indicate that the camera is ready and in operation. 1.9 Checking Camera Status Press mode key, LCD display be change turn, at the same time | hear a “beep” sound every step. i Please see the details description on next chapter about the i status. : i 2.1 Taking a picture : 2.1.1 Switch the camera ON. 2.1.2 Frame your subject using the camera viewfinder. 2.1.
2.2 Setting the image resolution i 2.2.1 Pressing the Mode/On button will later the camera order 4 00: Pictures taken | { oF: Power off mode SE: Self-timer mode ds: Continuous mods for taking video profit C8: three picture continuous taken mode CA: Clear all images CL: Clear last image Lo: Change from high to low to high resolution Ld: Change the image compression mode from yes ! mode/no mode 80: Charge the fitter frequency from 50/60 mode. 2.2.2 The picture quality setting are described as below 2.2.2.
2.3.2 Press the Shutter/Select Button and select the correct filter frequency 2.4 Self Timer Mode You camera is designed with a self-timer function which will allow you to take pictures with a 10 seconds timer built in. frame your subject and use the stand (optional) to position your camera. 2.4.1 Switch the camera on. 2.4.2 Use the Mode/On button to select the Self-timer mode. 2.4.3 Frame your subject, 24.
2.6 Three-continuous mode To take three continuous pictures, press the Mode/On bunion till “CS” displaying on the LCD. Press the shutter/Select key once, and with a beep sound, three pictures are taken continuously, and the number will add 3 after the action. 2.7 Clear the last picture 2.7.1 Press the Mode/On button until the “CL” appears on the LCD. 2.7.2 Press the Shutter/Select button once the last picture in the camera is deleted. 2.8 Clear Memory Mode 2.8.
the computer, Install the software 3.1.1 How fo install the driver 3.1 3.1.1.1 3112 3.11.3 3.1.14 31.15 insert the CD-ROM disc into the CD-ROM drive and close the CD-ROM drawer. An installation wizard will automatically launch. Click Folio the instruction presented on the screen to complete the installation. Click “OK” to restart your computer and wait for your PC to restart automatically. 3.1.2 How to install PhotoStudio® 2000 3.1.2.1 3.1.22 3.1.23 3.1.24 3.1.25 3.1.26 3.1.
3.2 Software included with your camera 3.2.1 3.2.2 3.2.3 Arc Soft Photo Studio 2000 : For photo edit and video play Digicam: Download picture from 9338 Mini Cam to pC OCCAM: Drive the camera as a PC camera in PC Mode 3.3 Computer system requirements This camera is designed for PC only. For acceptable picture transfer and editing, we recommend the following minimum requirement: 3.3.1 332 3.33 3.34 335 3.
4.1 Before you transfer pictures Important! Before you transfer your pictures make sure you have installed the software from the CD. 4.2 Connecting to your computer Connecting with the USB cable. (two pictures about USB on computer side and on camera side) 4 4.21 Plug the labeled end “ of the USB cable into the socket marked™ on your computer 4.22 Plug the other end of the USB cable into the port on your camera. 4.2.3 An interface “New Hardware Found” will show on the computer desktop.
4.3 Transferring the pictures 4.3.1 Running the 8338 manager 4.3.1.1 Select the 9338 manager icon from the program group on the windows start menu or double click the short-cut icon on the desktop, 4.3.1.2 You can start io upload your images from your camera by following these steps in section on uploading images. 4.3.2 Uploading Images 4.3.2.1 Click the "download” button to capture images and download them to PC. 4.3.2.
4.3.2.3 Ali downloaded images will be shown on the panel. 4.3.24 Note if “No photo in the camera” waning comes out, make sure your camera Is connected fo PC and contains photos. Otherwise, please see the appendix “solution for driver conflict problem”. 4.3.2.8 To save one picture; » Click the particular image you want to save fo your computer. + The color of the frame of the image will change from yellow to red. « Then press the “save” button.
10 frames of video. 4.3.2.7.1 When your camera is full, attach it io your PC via USB and run the i camera manager i 4.3.2.7.2 You can now start fo create your own video clips by following these steps. ® Follow the “uploading images” procedures point 1 fo point 3. ® The video clip with a video icon on top left corner will appear on the panel. & Select the video clip and the n press the save button on the panel to save the file You can change the AVI frame rate before | click “save” button.
44.2 Go to “File” -> “Select source”. Select “TCD501" as H source. 4.4.3 Click “Acquire”, the camera manager will appear. i 4.44 Press the Download bunion to transfer all images from | the camera to the panel, | 4.4.5 To upload a single still image stored on the camera to your computer, select the image you would like to | upload and click the “transfer” button, | 4.46 To upload all images stored in the camera, click “select all” button from every page of the images and : then click the “transfer” button.
5.1.3 Fix up your camera with the Web Cam stand, put them i on top of your computer monitor or anther flat surface | to frame the object. 5.1.4 Connect your microphone to your audio card's external microphone connector 5.2 Enjoying your Web camera | Running PC CAM §.5.1 Select the PCC icon from the camera program group on | the windows start menu or double click the PCC shootout icon on the desktop. The PC CAM will appear on the | window. i 4] 5.8.
Troubleshooting The troubleshooting guide is design to help you. if problems continue, please contact your local customer support hotlink. See your registration card for help line contact details. Customer Support ArcSoft® Software Help Technical Specifications Camera: 8.1.1 Memory: internal memory 16MB DRAM 8.1.2 Image performance for video on Web Cam: about 6 fps on VGA 8.1.3 Image sensor: COS 1.3 Mega sensor 8.1.4 Still image resolution: High 1280 x 960, low 640 x 480 8.15 Exposure: automatic 8.1.
8.1.8 8.19 8.1.10 File format: Still image, BMP (driver transfer into JPG) video clip AVI Video clip: approximately 10 to 12 fps for VGA solution External Connector: USB Auto power off: after 30 seconds inactivity 8.2 Tips, Your Safety & Maintenance 8.21 822 8.2.3 Your camera should only be operated within the following environmental conditions: 8.2.1.1 41 to 104 degree Fahrenheit degree Celsius 8.2.1.
8.2.3.5 Never attempt to open or disassemble camera, as this will affect ant warranty claim. 8.3 Regulatory Information FCC Notice The device complies with Part 15 of FCC Rules. Operation is subject to the following two conditions: (1) This device may not cause harmful interference, and (2) This device must accept any interference received, including interference that may cause undesired operation.
harmful interference to radio or television reception, which can be determined by turning the equipment off and on, the user is encouraged to try to correct the interference by one or more of the following measures: Reorient or relocate the receiving antenna. Increase the separation between the equipment and receiver. ® Connect the equipment into an outlet on a circuit different form that to which the receiver is needed. ® Consult the dealer or an experienced radical technician for help.