Craft Paint Spraying Kit CHV512 Operating Instructions Thank you for purchasing this Create by Earlex™ Craft Paint Spraying kit. This is a highly versatile spray kit and can be used on a variety of applications. BEFORE USE - PLEASE READ THESE SAFETY & OPERATING INSTRUCTIONS. Please retain for future reference Go to www.earlexcreate.
ORMATION IMPORTANT INF 1. 2. (not supplied) 3. Certain coatings may require dilution.
CTIONS SAFETY INSTRU WARNING! FIRE AND EXPLOSION HAZARD. l l l l l l l l l l l l CAUTION: TO REDUCE THE RISK OF ELECTRIC SHOCK OR INJURY, DO NOT EXPOSE TO RAIN. STORE INDOORS. The substances used with this spray gun may contain hazardous, harmful, explosive or corrosive materials. ALWAYS COMPLY WITH THE SAFETY INSTRUCTIONS ISSUED WITH THIS PRODUCT AND THE MATERIAL BEING USED. The spray gun must only be used with paints that have a suitable flash point for spraying.
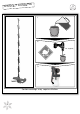
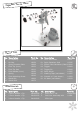
box? What’s in the 1. 400W Turbine Unit 5. Masking Tape (L1955) 2. Craft Spray Gun with 1.0mm needle (see accessory list for extra needles) 6. 250ml Pot (CHVAC01) 3. Air Hose (L0543) 7. Paint Stirrer (L1565) 4. 5 Stencils (L1950) 8. DVD (L1953) DVD l Information a c ri t c le E t n a Import EXTENSION CORDS Your Create by Earlex™ Craft Paint Spraying Kit is supplied with a power cord that is 6 feet long. Make sure your extension cord is in good condition.
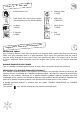
View Exploded Parts 15 1 2 3 4 5 6 14 8 7 9 10 12 11 13 16 Parts List No. Description 1. 2. 3. 4. 5. 6. 7. 8. Air Cap Ring Air Cap Spray Direction Plate Fluid Tip (1mm) Fluid Tip Seal Fluid Needle (1mm) Spring Fluid Adjusting Screw Gland Nut 9. 10. Gland Seal Part No. L0215 L2038 L0206 L0231 L0211 L0230 L0216 L0210 L0208 L0272 No. Description 11. 12. 13. 14. 15. 16. 17. 18. 19. + Accessories No. Description 1. 2. 3. 1.0mm Needle + Tip 1.5mm Needle + Tip 2.
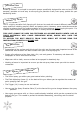
Introduction Create by Earlex™ is a simple to use paint sprayer specifically designed for arts and crafts. The compact, portable unit and easy to use spray gun provides a soft, even spray, perfect for your decorating tasks. Selecting Paint This is a highly versatile Craft Spraying Kit that can be used with several different water-based spray mediums including acrylics, fabric and poster paints.
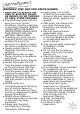
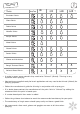
Thinning Paint Yes/no 0% 10% 25% 30% Emulsion Paints Gloss Paints Fabric Paints Metallic Paints Acrylic Paints Wood Stains Gesso Primer Poster Paints Glazes and Varnishes l l l l l l l l Rough Textured Paints X X X Solvent-Based Paints X X X X X In order to spray some materials they need to be “thinned” (diluted). Thinning is very important when spraying. Most paints are supplied ready for brush application and may need to be thinned (diluted) for spraying purposes.
Operation 1. 2. 3. 4. 5. 6. 7. 8. 9. 10. Fill the Paint Container (13) with the material to be sprayed. DO NOT FILL above MAX level indicator. Stir the paint well using Paint Stirrer (16) supplied. Push the Paint Feed Tube (11) firmly into the base of the spray gun body. Screw the container onto the gun body tightly. An airtight seal is essential for the correct operation of this gun.
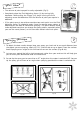
Paint Volume Min. The volume of paint sprayed is easily adjustable (Fig.3). l Completely close the Fluid Adjusting Screw (8) by turning fully clockwise. While pulling the Trigger (14), begin turning the fluid adjusting screw anticlockwise until the volume of paint you require is obtained. l If the paint spray is too wide or contains too much paint turn the Fluid Adjusting Screw (8) clockwise again. Once the correct spray pattern is obtained you are able to commence spraying.
Helpful Hints 1. 2. 3. 4. 5. 6. 7. Evenly control the speed of movement of the spray gun. A fast speed will give a thin coat and a slow speed will give a thick coat. Only apply one coat at a time. If an additional coat is required, follow the paint manufacturer’s instructions for drying times. If spraying small areas or objects keep the output setting low as this will avoid excessive use of paints and will minimize overspray.
Stencilling l l l l l l l l l l l l Your Create by Earlex™ Craft Paint Spraying Kit comes complete with 5 stencils, perfect for decorating walls, furniture, fabric and other items (Fig.6). Attach the stencil to the surface using the masking tape provided, making sure the stencil lies completely flat. This will prevent the air from the gun getting underneath the stencil and raising it from the surface. Prepare your paint and your spray gun as explained earlier in the manual and in the DVD.
tions Cleaning Instruc THE SPRAY GUN MUST BE THOROUGHLY CLEANED IMMEDIATELY AFTER USE. IF THE PAINT DRIES INSIDE THE GUN CLEANING WILL BECOME MUCH MORE DIFFICULT AND MAY RENDER THE GUN INOPERABLE. THIS IS NOT COVERED BY THE LIMITED WARRANTY. The spray gun is the same as a paintbrush, if it is not cleaned the paint will go hard and can become useless. You must therefore clean this out after use. 1. 2. 3. 4. 5. 6. 7. 8. 9. 10. 11. 12. 13. 14. 15. 16. Remove Paint Container (13) from gun.
Needle Assembly 1. 2. 3. 4. 5. 6. 7. 8. 9. Screw the Fluid Tip (4) in place. Gently tighten with a spanner. Insert Fluid Needle (6) into the back of the gun. Next place the Spring (7) into the back of the gun over the Fluid Needle (6). Hold the Trigger (14) down whilst you screw the Fluid Adjusting Screw (8) into place. Release Trigger (14). Place the Spray Direction Plate (3) on top of the Fluid Tip (4). Place the Air Cap (2) over the Fluid Tip (4). Screw on the Air Cap Ring (1).
Troubleshooting Problem The paint runs on the item being sprayed Cause Action Required Paint volume too high Reduce the paint flow by turning Fluid Adjusting Screw (8) clockwise Paint too diluted Moving too slowly Paint too diluted Add undiluted material Paint volume too low Increase the paint flow by turning Fluid Adjusting Screw (8) anticlockwise Reduce speed of application Clean the spray gun Paint too thick Add water Reduce the distance between spray gun and work-piece Gun clogged Clean
Notes 15
PLEASE NOTE: We have done all we can to ensure that, if used correctly and according to these instructions, this Craft Spray Kit will give a long and trouble-free life.