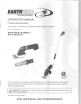
Eurmm The Clean Air Choice OPERATOR'S MANUAL Cordless Shear/Shrubber This product is covered by U.S. patents and other international patents Copyright. All Rights Reserved. i Model #M1E-LD-200M/7.2 ltem#PSS10172 242767 This product has been engineered and manufactured to our high standard for dependability, ease of operation, and operator safety. Properly cared for, it will give you years of rugged, trouble-free performance.
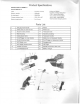
Product Specifications Model # M1E-LD-200M/7.2 ltem#PSS10172 Input 7.2V DC, 1.0 Amp Battery capacity 1350mAH No load speed 1200 RPM Charger (adaptor) input 120V, 60 Hz AC Battery charging time 3 to 5 hours -Lithium-ion Battery -5 position rotating cutting head -3.75 in. Grass Shear Blade -7.5 in. Shrub Trimming Blade - 5/16 in. Max.
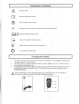
Explanation of Symbols Warning notice Read the instruction manual. Do not expose the tool to rain. Warning! The cutting blades continue to move after switching off. Warning! Keep bystanders away. Only use the battery charger indoors. Battery charger contains a safety transformer Eye protection must be used Charging the battery The battery should be fully charged before using for the first time. The charging time is about 3-5 hours.(See page 13 for instructions.
IMPORTANT SAFETY WARNINGS TO REDUCE RISK OF INJURY: Before use, be sure everyone using this tool reads and understands all safety instructions and other information contained in this manual. WARNING: Personal Injury and Damage! Keep your hands and feet away from the cutting tool, especially when the products are switched on! Never adjust the cutting head when the product is in the "on" position. Do not touch moving blades.
Assembly PACKING LIST - Shear with Grass Shear Blade Assembled- Shrub Trimming Blade - Blade Protection Guard - Telescopic Handle - Wheels and Wheel Shaft - Battery Charger - Instruction Manual UNPACKING This product requires some assembly. Carefully remove the product and any accessories from the box. Make sure that all items listed in the packing list are included. Inspect the product carefully to make sure no breakage or damage occurred during shipping.
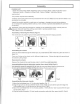
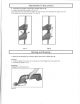
Assembly Removing the telescopic handle (Fig 9-10): 1) Make sure the handle connector (10) is disconnected from the handle connection cable inlet (21) (Fig.9) 2) Move the lock/release lever (11) to the unlock position (fig 7). To release the tool from the wheel cart, pull the tool in the direction shown in Fig.10 Fig.10 Fig.9 Adjustments on this product 1. Adjusting the cutting head. (Fig.11-12) The cutting head can be rotated in 5 angles from 90°. 45 ° ,0 ° to -45 ° ,-90° to get the desirec position.
Adjustments on this product 3. 1) 2) 3) Adjusting the length of telescopic handle (Fig.14-15) Loosen the adjusting coupling (15) (Fig.14) Pull the tube out to increase the height, or push the tube in to decrease the height. (Fig.15) Re-tighten the adjusting coupling (15). (Fig.14) Fig.14 Fig.15 Starting and Stopping 1. Starting and Stopping for cutting without telescopic handle (Fig.16) Starting: 1) Push the safety lock button (2) and press the On/Off trigger (6) at the same time.
Starting and Stopping 2. Starting and Stopping for cutting with the telescopic handle: Starting: 1) Push the safety lock button (17) and press the On/Off trigger (18) at the same time. 2) Release the safety lock (17). Stopping: Release the On Off switch (18). Operating Instructions Fig 17 Proper use (Fig.17): This product is intended for light trimming of shrubs, hedges and lawn edges. Please note that f- s tool is not designed for commercial, trade or industrial use.
Operating Instructions • • • When using the tool hold it away from yourself and stand in a secure position with your weight evenly balanced on both feet. When cutting, move steadily along the line of cut, so that stems are fed directly into the cutter blades. After use, install the blade guard. Recommended cutting/trimming times: -Cut hedges with deciduous leaves in June and October. -Cut evergreen hedges in April and August. -Cut conifer and other fast growing shrubs approx.
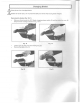
Changing Blades !\ Wear gloves when changing blades. |\ Blades can cause injury. Do not press the safety lock of the shear during blade changes. Removing the blades (Fig. 18-21) • Slide your thumb under the SDS blade changing release switch (9) and then slide the cover (8) away from the housing as shown in Fig. 18-19 Fig. 18 Fig. 19 Lift the cover (8) away from the housing (Fig.20). Remove the blade. (Fig. 21) Fig. 20 Fig.
Changing Blades Installing the blades (Fig. 22-24) There are two holes on the blade and two driving pins on the body. First align the end of the blade inside the plastic housing. Align the rear hole in the blade onto the rear drive pin . Move the raised rib (23) up and down (Fig.22) for shrub trimming blade or move the raised rib (23) left and right for grass shear blade (Fig.23) to allow the front drive pin to enter the front hole in the blade.
Maintenance CAUTION: Blades can cause injury. Do not press the safety lock of the shear during maintenance ^work. Note: To ensure long and reliable service, regularly carry out the following maintenance: • Check for obvious defects such as a damaged/ loose blade, fixings or components. • If the tool should stop working properly, repair should be earned out by your local hardware store. A Never clean the trimming shears in water (especially running water " injury and damage to the shears.
Charging Procedure 1. 2. 3. Insert the charger cable into charging inlet (19) on the tool. Make sure the wall outlet in your home is normal household voltage (AC120V, 60Hz). Insert the battery charger plug into the wall outlet. The red LED charging indicator (20) lights up to tell you that the battery pack is on charge. The battery is fully charged when the red LED charging indicator (20) is no longer lit. During the charging process, it is normal for the handle of the tool to warm up.
WARRANTY LIMITED WARRANTY FOR GRASS & SHRUB SHEAR This product is manufactured for The Great States Corporation/American Lawn Mower Company. The Great States Corporation/American Lawn Mower Company.