
- Ardisam Chipper User Manual


Page 11
GetEarthquake.com
1-800-345-6007
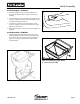
Figure 21. Installing the Hopper Handle
A. 1/4-20 x 3/4 Screw & Nut
Initial Assembly
A
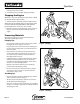
Install the Hopper - All Models
1. Attach the hopper to the rotor housing. Make sure
to engage the metal lip of the hopper liner inside the
housing.
2. Secure the hopper to the rotor housing using two 5/16 x
1/2 hex head bolts, two 5/16 flat washers (Figure 19). Do
not tighten hardware at this time.
3. See Figure 20. From the inside of the hopper install
one 5/16-18 flange nut on each 5/16 weld stud. Finger
tighten only at this time.
4. Check that the hopper is seated correctly and tighten all
hardware.
Install the Handle - All Models
1. Lift the hopper handle up until the outer holes in the
handle align with the holes in the shredder hopper and
secure with 1/4-20 x 3/4 screws, washers, and nuts (A,
Figure 21). Insert the screws from the outside of the
shredder hopper.
Figure 20. Installing Hardware Inside the Hopper
Figure 19. Attaching the Hopper