Operator’s Manual Original Operating Instructions Chipper/Shredders Includes: Model No. 14267 14268 9060300 9060140 9070300 9010400 12547 1692327 1692210 Get parts online at www.getearthquake.com Description 212cc Viper Earthquake Chipper / Shredder 212cc Viper Earthquake Chipper / Shredder (CE) GAS/OIL 8.50 Torque Rated Briggs Earthquake Chipper / Shredder RATIO 8.25 Torque Rated Briggs Earthquake Chipper / Shredder (CE) 11.50 Torque Rated Briggs Earthquake Chipper / Shredder 14.
Operator’s Manual Chipper/Shredders INTRODUCTION Congratulations on your investment in quality. Thank you for purchasing a Chipper/Shredder from Earthquake™. We have worked to ensure that your product meets the highest standards for usability and durability. With proper care, your Chipper/Shredder will provide many years of service. Please read this entire manual before installation and use.
Operator’s Manual Chipper/Shredders SAFETY DANGER OWNER’S RESPONSIBILITY DANGER INDICATES A SERIOUS INJURY OR FATALITY WILL RESULT IF THE SAFETY INSTRUCTIONS THAT FOLLOW THIS SIGNAL WORD ARE NOT OBEYED. Accurate assembly, and safe and effective use of the chipper/ shredder is the owner’s responsibility. • Read and follow all safety instructions. • Carefully follow all assembly instructions.
Operator’s Manual Chipper/Shredders TRAINING 1. Read the operating and service instructions carefully. Be thoroughly familiar with the controls and the proper use of the equipment. Know how to stop the unit and disengage the control quickly. 2. Keep the area of operation clear of all persons, particularly small children, and pets. IMPORTANT THE RIGHT AND LEFT SIDES OF YOUR CHIPPER/ SHREDDER ARE DETERMINED FROM THE OPERATING POSITION, STANDING AND FACING THE UNIT.
Operator’s Manual Chipper/Shredders 21. Never continue to operate the machine if it starts making unusual noise or vibration. Shut the engine off immediately, allow the rotor to stop, disconnect the spark plug wire and secure the wire away from the spark plug. Inspect the unit for any signs of damage or foreign material in the chipping or shredding areas. Remove any solid material that may be preventing the unit from operating properly. 22.
Operator’s Manual Chipper/Shredders Safety Decals This unit has been designed and manufactured to provide you with the safety and reliability you would expect from an industry leader in outdoor power equipment manufacturing.
Operator’s Manual Chipper/Shredders Safety Icons (European Models) Warning: Read Operator’s Manual. Danger: Thrown Objects. Read and understand the Operator’s Manual before using this machine. This machine is capable of throwing objects and debris. Keep bystanders away. Danger: Amputation Hazard. Danger: Thrown Objects. To avoid serious personal injury from rotating cutting blades, keep hands out of inlet while machine is running. This machine is capable of throwing objects and debris.
Operator’s Manual Chipper/Shredders Identification Numbers When contacting your authorized dealer for replacement parts, service, or information you MUST have these numbers. Record your model name/number, manufacturer’s identification numbers, and engine serial numbers in the space provided for easy access. These numbers can be found in the locations shown. NOTE: For location of engine identification numbers, refer to the engine owner’s manual.
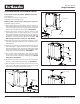
Operator’s Manual Chipper/Shredders Assembly Install Chipper Cone - All Models 1 . Position the chipper cone (A) over the three 5/16-18 threaded studs protruding from the engine plate, and attach using three 5/16-18 flange nuts (B). SEE FIGURE 1 A 2. Rotate cone and cone base away from engine so cone does not contact engine. 3. Tighten the flange nuts securely. Install the Hopper - All Models 1. Attach the hopper to the rotor housing.
Operator’s Manual Chipper/Shredders ATTACHING HOPPER EXTENSION TO HOPPER For European models only (14268, 9060140, and 12547) Tools Required: 5/32” Hex drive wrench (i.e: allen wrench) hopper extension 7/16” Wrench for 1/4-20 flange nut hopper extension NOTE: Assemble extension before adding fuel or engine oil. To attach the hopper extension: 1) Before bolting the handle into position, slide one hopperflange ex- nut tension half (1709470) over the rim of the hopper.
Operator’s Manual Chipper/Shredders Slide bag over discharge chute. Make sure bag noose fits over top of discharge chute and notch in chute bottom. Slide bag over dis- Lift discharge charge chute andchute. slide Make bag bag oversure chute. noose fits over top Make sure bag of discharge noose fits over chute and notch in chute top of discharge chute and notch bottom. in chute bottom. Pull drawstring tight. Pull drawstring tight.
Operator’s Manual Chipper/Shredders Features & Controls Control Functions The information below briefly describes the function of individual controls. Operating requires the combined use of several controls applied in specific sequences. To learn what combination and sequence of controls to use for various tasks see the OPERATION section. Engine Stop / Throttle Control The engine stop / throttle control lever controls turn the engine off and controls the engine speed.
Operator’s Manual Chipper/Shredders General Operating Safety Be sure to read all information in the Safety and Operation sections before attempting to operate this unit. Become familiar with all of the controls and how to stop the unit. Upon start-up and shut-down, you may hear the metalto-metal sound of the triangular hammers and J-hammers positioning themselves on the rotor. This is normal.
Operator’s Manual Chipper/Shredders Stopping the Engine Storage NOTE: In the event of an emergency the engine can be stopped by setting the throttle control to STOP. Before you store your unit for the off-season, read the Maintenance and Storage instructions in the Safety Rules section, then perform the following steps: 1. Slide the throttle control fully left to the STOP position.
Operator’s Manual Chipper/Shredders Chipping & Shredding Recommendations Operation Type of Waste Permitted Size Limitations Notes Shredding Dry or moist organic material including leaves, plants, flowers, fruits, or vegetables. Alternately chip or shred moist green waste with dry waste to avoid plugging of the discharge chute. Branches and twigs up to 1/2” diameter and 18” long. Process at a feeding rate that allows the rotor to keep up and maintain a high rate of speed.
Operator’s Manual Chipper/Shredders Maintenance Schedule & Procedures The following schedule should be followed for normal care of your unit. SAFETY ITEMS Before Every 5 Every 25 Every 100 Every Each Hours Hours Hours 250 Use Hours Check for loose hardware Spring & Fall X X Check all safety labels X Inspect cone, hopper, and guards. X CHIPPER MAINTENANCE ITEMS Clean debris from engine and chipper.
Operator’s Manual Chipper/Shredders A fins B FIGURE 10 - Clean Debris from Engine Cooling Fins Clean Debris from Engine & Chipper Service Interval: Before each use and every 100 hours. The engine requires air flow to cool itself and for combustion. Before each use, clean any debris from the unit especially from around the air shroud intake, air filter, and muffler. Every 100 hours, remove the engine air shroud and clean out any debris from the engine cooling fins (SEE FIGURE 10).
Operator’s Manual Chipper/Shredders Inspect Chipping Knives Service Interval: Every 25 Hours, or As Necessary The chipping knives of this unit can be rotated or sharpened to provide a new cutting surface as required. When inspecting the knives be careful to avoid touching the sharpened edges. To inspect the chipping knives: 1. Disconnect the spark plug wire and secure it away from the spark plug. 2. Remove the nuts securing the chipper cone to the front of the chipper.
Operator’s Manual Chipper/Shredders Engine Oil Type & Capacity Select a quality engine oil using the chart in Figure 15. 8.5 torque rated models require 5/8 quart (0.6L) of oil. Use oil classified API Service Class SF, SG, SH, SJ or better with SAE Viscosity: 30 Conventional** Check Engine Oil Level Service Interval: Before Each Use Check the engine oil level at the oil fill and level check plug (A). SEE FIGURE 16 5W-30 10W-30 Conventional* 1. Stop the engine and wait for all moving parts to stop. 2.
Operator’s Manual Chipper/Shredders Troubleshooting Chart While normal care and regular maintenance will extend the life of your equipment, prolonged or constant use may eventually require that service be performed to allow it to continue operating properly. The troubleshooting guide below lists the most common problems, their causes, and remedies. See the information on the following pages for instructions on how to perform most of these minor adjustments and service repairs yourself.
Operator’s Manual Chipper/Shredders FIGURE 18 - Removing the Rotor Housing FIGURE 17 - Removing the Shredder Hopper E F Repair G Shredding Hammer Rotation and Replacement The cutting edges of the shredding hammers may eventually wear out requiring rotation of the hammer or replacement if all cutting edges have been dulled. Triangular hammers can be rotated twice after the first edge dulls, then flipped over once and rotated again for a total of 6 edges.
Operator’s Manual Chipper/Shredders Chipping Knives Sharpening and Replacement The chipping knives should be sharpened or replaced when tree limbs require extra force to feed into the chipper cone. The chipping knives may be sharpened at a 30 degree angle until the distance between the edge of the blade bevel and the mounting hole is less than 1/16” (1.6mm). SEE FIGURE 22 WARNING AMPUTATION HAZARD.
Operator’s Manual Chipper/Shredders Specifications NOTE: Specifications are correct at time of printing and are subject to change without notice. * Actual sustained equipment horsepower will likely be lower due to operating limitations and environmental factors. CHASSIS: All Models Chipping Capacity Approximately 3” (7.
Operator’s Manual Chipper/Shredders HOPPER & ENGINE GROUP PARTS EXPLOSION 27 23 2 11 3 22A 5 6 1 10 7 4 7 25 4 12 14 22 18 21 24 26 19 8 13 17 28 29 30 20 31 8 8 16 15 32 Optional CE metal cone assembly P/N 3550842 9 33 24 Check for parts online at www.getearthquake.
Operator’s Manual Chipper/Shredders HOPPER & ENGINE GROUP PARTS LIST KEY # PART # DESCRIPTION QTY. KEY # PART # DESCRIPTION QTY. 23 - ENGINE, 14.
Operator’s Manual Chipper/Shredders HOUSING & ROTOR GROUP EXPLOSION 1 10 5 6 4 7 9 8 28 11 13 29 17 14 16 30 10 12 2 2 18 2 15 12 12 3 19 26 20 19 21 31 23 31 22 27 19 25 22 27 19 24 23 25 The J-Hammer (not shown) on the opposite side of the rotor faces outward for balanced rotation. There is also a second Chipper Knife and Tri-Hammer (not shown) opposite the ones in the explosion above. 26 Check for parts online at www.getearthquake.
Operator’s Manual Chipper/Shredders HOUSING & ROTOR GROUP PARTS LIST KEY # PART # DESCRIPTION QTY. KEY # PART # DESCRIPTION QTY. 21 1916950 NUT, HEX 3/8-16 2 1 3525100 LINER, HOPPER 1 2 1917356 LOCK WASHER, SPLIT 5/16 10 22 1709614 SPACER, TUBE 4 3 6518100 CAP SCREW, SOCKET HD 3/8-16 X 5/8 2 23* 4 4 1930642 NUT, 2-WAY LOCK 1/4-20 2 1709616 SPACER, 3/4" O.D.
Operator’s Manual Chipper/Shredders 12727 VACUUM KIT (OPTIONAL ACCESSORY) 14 13 1 3 12 15 11 2 7 4 5 10 9 9 6 KEY # PART # DESCRIPTION QTY. 1 1021100 ADAPTER 1 2 1023100 COUPLER 1 3 1025100 PLUG, CAP 1 4 1035100 HOSE, 4" DIA. X 10' LONG 1 5 1027100 LEAF TRAY 1 6 1030100 NOZZLE 1 7 1024100 RING, NOTCHED, 5" DIA.
Operator’s Manual Chipper/Shredders 1692327 TOW BAR KIT (OPTIONAL ACCESSORY) 3 9 6 8 4 5 2 7 5 5 1 KEY # PART # DESCRIPTION QTY.
Operator’s Manual Chipper/Shredders HOPPER EXTENSION PARTS EXPLOSION, PARTS LIST AND FULL ASSEMBLY (CE EUROPEAN MODELS ONLY) KEY # 30 PART NO. DESCRIPTION QTY. 1 1960507 BOLT 1/4-20 X 3/4 SBH BLK ZN 16 2 1930642 NUT 1/4-20 HFLTPLK BLK ZN 16 3 179470 EXTENSION CHIPPER HOPPER CE 2 4 1921319 WASHER, PLAIN 17/64 X 5/8 X 3/64 (NOT SHOWN) 16 Check for parts online at www.getearthquake.
Operator’s Manual Chipper/Shredders Check for parts online at www.getearthquake.
Operator’s Manual Chipper/Shredders 32 Check for parts online at www.getearthquake.
Operator’s Manual Chipper/Shredders Check for parts online at www.getearthquake.
Operator’s Manual Chipper/Shredders 34 Check for parts online at www.getearthquake.
Operator’s Manual Chipper/Shredders Check for parts online at www.getearthquake.
Operator’s Manual Chipper/Shredders CHIPPER/SHREDDERS Warranty Terms and Conditions PRODUCT WARRANTY: 1-YEAR LIMITED WARRANTY Ardisam, Inc., a manufacturing company, warrants this EARTHQUAKE™ CHIPPER/SHREDDER to be free from defects in the material or workmanship for a period of one year from the date of purchase. During the one-year warranty of this product, Ardisam will furnish, at their discretion, parts and labor to correct any defect caused by faulty material or workmanship.
Operator’s Manual Chipper/Shredders EXPLANATION OF EMISSIONS CONTROL WARRANTY PROVISIONS The United States Environmental Protection Agency, the California Air Resources Board and Ardisam, Inc., are pleased to explain the emission control system warranty on your small off-road engine/equipment. In the United States and California, new small off-road engine/equipment must be designed, built and equipped to meet the State’s stringent anti smog standards.
Operator’s Manual Chipper/Shredders NOTES _______________________________________________________________________________________________________ _______________________________________________________________________________________________________ _______________________________________________________________________________________________________ _______________________________________________________________________________________________________ ____________________________________________________
Operator’s Manual Chipper/Shredders NOTES _______________________________________________________________________________________________________ _______________________________________________________________________________________________________ _______________________________________________________________________________________________________ _______________________________________________________________________________________________________ ____________________________________________________
Earthquake™, Division of Ardisam, Inc. 1160 8th Avenue, PO Box 666 Cumberland, WI 54829 800-345-6007 | Fax 715-822-2223 E-mail: info@getearthquake.com All weights, specifications and features are approximate and are subject to change without notice. Due to continuous product improvements, product images may not be exact. Items used for props not included. Some assembly may be required. Check for parts online at www.getearthquake.