
Product Manual


Get parts online at www.getearthquake.com or call 800-345-6007 M-F 8-5 CST.
Operator Manual
Pioneer Dual Direction Rear Tine
10
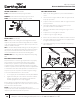
HEIGHT POSITIONS: SEE FIGURE 3
LOW: Install handlebar assembly using holes B & C.
MIDDLE: Install handlebar assembly using holes C & D.
HIGH: Install handlebar assembly using holes A & D.
DRAG STAKE: SEE FIGURE 4
CRT: In CRT (counter-rotating tines) the drag stake limits the
depth of cut, therefore the lower the drag stake, the less depth
of till. If the drag stake is placed in the upper most position, the
depth of cut will be deepest.
SRT: In SRT (standard (forward)-rotating tines) the drag stake is a
speed limiter. The lower the drag stake, the slower the machine
will propel itself forward. Therefore, if the machine lurches or
moves forward faster than desired, lower the drag stake.
TRANSPORT: Raise drag stake all the way when transporting
tiller.
BELT TENSION ADJUSTMENT
Proper belt tension is critical to good performance. A properly
tensioned belt ensures that the belt will be fully engaged
and won’t slip or squeal. Also, exposed cables between the
engagement levers and the handlebar tube will not sag. After
1/2 hour of operation, both cables may need to be adjusted due
to initial belt stretch. After initial adjustment, check the tension
every ten (10) hours of operation, and after long term storage.
To increase forward belt tension, do as follows:
1. Loosen upper jam nut at handlebar assembly. SEE FIGURE 5
2. Tighten the lower jam nut in 1/8 inch increments until the
beehive spring stretches 3/16" (5mm) longer when the
forward engagement lever is fully engaged.
Reverse belt tension adjustment: If the reverse function ceases
to operate, adjust the jam nuts on the reverse cable one turn at a
time until reverse function works.
NOTE: This procedure can be repeated until no more
adjustments can be made. If fully adjusted and belt tension is not
satisfactory, the belt may need to be replaced.
PRESTART INSPECTION:
1. Make sure all safety guards are in place and all hardware is
secure.
2. Check oil level in engine crankcase. Refer to engine manual
for proper procedure.
3. Inspect air cleaner for cleanliness. Refer to engine manual for
proper procedure.
4. Check fuel supply. Refer to engine manual for proper
procedure and fuel recommendations.
5. Examine underneath and around engine for signs of oil or
fuel leaks.
6. Inspect fuel hoses for tightness and leaks.
7. Inspect for signs of engine damage.
8. Remove excessive debris from muer area and recoil starter.
9. Turn fuel shuto valve to the ON position if equipped. Refer
to engine manual for procedure.
10. Check that spark plug is securely installed, and spark plug
wire is attached.
Figure 5
Upper Jam Nut
Lower Jam Nut
3/16"
(5mm)
Stretch
Figure 4
Deep Tilling
Shallow Tilling
Deep Tilling
Shallow Tilling
Figure 3
A
B
C
D