
- Ardisam Chipper User Manual


Page 23
GetEarthquake.com
1-800-345-6007
Troubleshooting & Repair
Repair
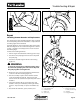
Shredding Hammer Rotation and Replacement
The cutting edges of the shredding hammers may eventually
wear out requiring rotation of the hammer or replacement if
all cutting edges have been dulled.
Triangular hammers can be rotated twice after the first edge
dulls, then flipped over once and rotated again for a total of
6 edges. J-hammers can be flipped over once for a total of
two cutting edges.
To rotate the shredding hammers:
1. Turn the engine off and wait for all moving parts to stop.
2. Disconnect the spark plug wire and secure it away from
the spark plug.
3. Detach the shredder hopper from the rotor housing
(Figure 12).
4. Remove the rotor cover by removing the hardware that
secures it to the main housing (Figure 13).
5. Note the assembly sequence of the hardware used to
secure the hammers (Figure 14). Using a 5/16” allen
wrench remove the socket head capscrew (A) and related
hardware.
6. Inspect the hammers (G, H), spacer tubes (D, E), and
hardware. If the spacer tube (D, E) shows signs of wear,
replace it. Inspect and flip, or replace the hammers (G,
H).
7. Reassemble the hammers, spacers, washers, and
Figure 12. Removing the Shredder Hopper Figure 13. Removing the Rotor Housing
F
E
G
F
H
E
D
C
B
A
D
C
B
A
WARNING
To avoid serious injury from accidental starting, always
disconnect the spark plug wire and secure it away from
the spark plug when servicing the unit.
Figure 14. Removing Rotor Housing
A. Socket Hd. Capscrew
B. Lockwasher, 3/8
C. Washer, 7/8
D. Spacer, Long
E. Spacer, Short
F. Washer, 3/8 (9070300,
9010400, 9010140 only)
G. J-Hammer
H. Triangular Hammer