
Operating instructions

8
ASSEMBLY
HOPPER
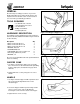
1. See Figure 3. Attach the hopper to the rotor housing,
using care to engage the metal lip of the hopper liner
to the inside of the housing.
2. Secure the hopper to the rotor housing using (2) 5/16
x 1/2 hex head bolts and (2) 5/16 flat washers. Do not
tighten hardware at this time.
3. See Figure 4. From the inside of the hopper, install (1)
5/16-18 x 3/4 hex head bolt, 5/16 lockwasher, and
5/16 flat washer into each of the upper and lower
holes of the metal hopper liner. Do not tighten at this
time.
4. Make sure the hopper is properly seated on the rotor
housing, and then tighten all hardware securely.
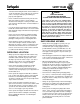
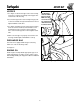
DISCHARGE BAG
Your unit comes equipped with a bag for collecting
debris as it exits the discharge chute.
See Figure 5.
ENGINE OIL
Fill the engine oil sump with the appropriate type of oil
required by that type of engine. See the engine service
manual shipped with your chipper/shredder for additional
information.
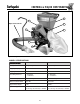
Figure 5. Discharge Bag Installation
Lift discharge
chute and slide
bag over chute.
Make sure bag
noose fits over
top of discharge
chute and notch
in chute bottom.
Pull drawstring tight