
User manual


5
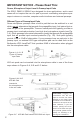
elements of the RimMount™. First, loosen the thumbscrew so there is more
than enough space for the Delrin® cushioned rim-guide to clear the bottom
of the drum rim. Then determine where on the drum rim you want to put the
microphone, then put the “hook portion” of the RimMount bracket in that place
on the drum rim.
Soft Polyolen® Coated
Metal Bracket
Rubber
Mic
Holder
Delrin®
Cushioned Rim-guide
Hook Portion
of Bracket
Thumbscrew
Figure 7-A. Elements of the RM1 RimMount™
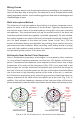
Notice that the Delrin® cushioned rim-guide has two sets of grooves. One
groove is in the “center” of the rim-guide which should keep the RImMount
metal bracket parallel to the drum shell (#1 in Fig. 7-B below). The other
groove is “off center” allowing the metal bracket of the RimMount to be placed
closer or further from the drum shell (Fig. 7 #2 & #3). The object is to keep
the metal bracket parallel to the drum shell so the microphone can be placed
higher or lower in the rubber mic holder without the mic or its connector being
obstructed by the drum shell.
Centered
Groove for
typical mic
positioning
Offset groove
on the left
places mic
closer to the
rim
Offset groove
on right places
mic further
from the rim
1
2
3
Figure 7-B Positioning the Cushioned Rim-guide
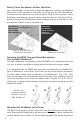
Adjusting the Microphone Height
Once the RimMount™ is mounted securely and parallel to the drum rim, with
the DM20 microphone housed in the rubber holder, the microphone body can
be moved either up or down in the rubber holder for the desired height. Then
the gooseneck will provide a significant amount of latitude in positioning the
microphone head from any body height. Adjusting the height of the DM20
microphone body is indicated in Figures 8-A and 8-B on the following page.
Various types of metal drum rims have the bottom flange either closer to or fur-
ther from the drum shell. One of the three positions (Fig. 7, 1, 2 or 3) will allow
the RimMount™ bracket to be mounted parallel to the drum shell. Position the
rim-guide so the bottom edge “flange” of the drum rim fits comfortably into one
of the rim-guide grooves. This will ensure the cushioned rim-guide remains