
User's Manual


The small tip on many of our microphones allows them to capture the highest frequencies of
your sound. Please be gentle and considerate when handling the microphones with these tips.
(Microphones such as the SR314 and SR40V shield the tip within their capsule, and are thus
more durable.)
Please do not excessively bend the Flexwand beyond 90 degrees. Doing so on a consistent
basis will cause the wand portion to deteriorate and lose its ability to stay in the desired position.
1 C30/C or C30/HC Microphone
1 PW1 Foam Windscreen
YOUR PURCHASE INCLUDES
Thank you for purchasing the
Earthworks C30 Hanging Microphone!
Before setting up the microphone, pull back all existing settings and EQ. By doing this, you will have a
baseline understanding of how our microphones sound, and will then be able to adjust accordingly.
Begin by removing all included components from the packaging. Make sure to mute any incoming
signal to speakers or headphones to avoid any loud “pops” when connecting.
The ChoirMics™ use Canare™ Star Quad™ microphone cable which has two twisted pairs and a shield.
Solder the shield to pin 1, the white twisted pair (i.e. both white wires) to pin 2. and the blue twisted pair
(i.e. both blue wires) to pin 3.
Before hanging the C30s, consider how they will be placed in relation to the choir being captured. Use
of mics with two rows for large choirs allows zoning and better control when mixing. Typically, one row
of mics is sufcient.
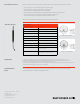
Begin placing the C30s where they will be hung. The mic heads should be 2.5 - 3 ft. in front of the row
of singers you want to pick up. Common practice is to center C30s on groups of 4, 5, or 7 singers. For
better articulation and detail, aim the mic head at the face of the singers, not pointing down at the top
of their heads. (See Figure A below.)
Once they are hung, conrm that they can be connected with XLR cables to a mixing console capable
of supplying 24-48V Phantom Power.
To guarantee your microphone provides years of performance, follow these guidelines:
• Avoid touching the front protective screen.
• Never attempt to disassemble the microphone.
• Avoid extreme heat and condensing humidity. Allow the microphone to warm up when bringing it
in from the cold.
• Rough handling may damage the microphone even if no markings are visible.
GETTING STARTED
PROPER
MAINTENANCE
IMPORTANT
NOTICE