
Installation & Assembly


2. Bostik BEST or equivalent moisture-cured urethane adhesive
3. Bostik MVP moisture barrier (if required)
4. Notched Trowel-- follow Glue Manufacturer’s guidelines for recommended size
5. Bostik Ultimate Adhesive remover or wipes
6. Guide Strip, Chalk reel, Tape measure, Speed square
7. Hammer, Pull bar, Knocking block
8. Flooring straps
9. 100 lb Roller
10. Electric saw or Hand saw
IMPORTANT: Do not apply any tape to the surface of your floor at any time during installation, or
thereafter. This includes “special” tapes that say they are made for wood flooring.
Preparing and leveling the sub-floor:
The sub-floor should be free of any surface defect. If it is not, fill gaps with a Portland-based leveling
cement (for concrete floors only) or sand down uneven areas.
The sub-floor must be level, i.e., a slope of no more than 3/16" (5 mm) over 10’ (3048 mm).
The surface must be clean and free of debris and contaminants such as wax, paint, grease, dust, oil,
nails, staples, etc
For concrete installation, ensure that the concrete is not low-density (below 3000 psi) or friable.
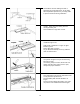
Glue Down Installation Steps:
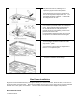
Lay out 4 to 5 rows of planks ahead of time that
match in terms of joints and color.
Cut out imperfections in planks or place them
in less visible areas.
For concrete installation, ensure concrete is not
low-density (below 3000 psi.).
Use chalk line to trace starting line with ½”
expansion joint at the side and ¼” at row end.
Nail the guide planks along the starting line.
The plank will serve as a guide for the 1
st
row
of plank.
Width of the guide plank will be the same as
the width of the flooring you choose.
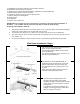
Use the trowel and apply adhesive at a
45°angle from the starting line outward.
Install the first plank along the guide strip with
tongue facing you and the groove facing the
starting wall.
The adhesive should not be applied if the
subfloor or room temperature is above 85
0
F
(29.6
0
C) or below 50
0
F (10
0
C).