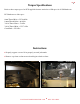
2015 Corvette Supercharger System Instructions These instructions are meant to serve as a guide to the installation of the ECS 2015 Corvette Supercharging system. Please be sure to use all safety equipment including gloves and eye protection. Please use proper techniques to capture and dispose of, or reuse, factory fluids. Utilization of the proper tools will make the install smoother and faster. Installation should take between 6-8 hours for a qualified mechanic. Do not rush the install.
n2n Tools Needed 3/8 inch drive ratchet 7mm, 8mm, 10mm, 11mm, 13mm, 14mm, 17mm, 18mm, 19mm, 24mm sockets T15, T20 torx wrenches or sockets 7/16 inch, 9/16 inch, 11/16 inch wrenches 13mm wrench Large 3/8 inch breaker bar or air impact gun Box cutter with new blade 1/2 inch drive 6 inch long extension and ratchet Phillips screwdriver and small flathead screwdriver Sensor safe RTV EASTCOASTSUPERCHARGING.
Torque Specifications n3n Refer to these torque specs for ECS supplied fasteners and refer to GM specs for all GM hardware. ECS hardware no lube specs: 8mm Thread Bolts = 225 inch/lbs 10mm Thread Bolts = 40 ft/lbs 3/8-16 Thread Nuts = 33 ft/lbs 3/8-16 Thread Bolts = 35-37 ft/lbs Crank Bolt = 225 ft/lbs Instructions n Properly support car on a lift or properly secured jackstands. n Remove cap from coolant reservoir and begin to drain coolant. EASTCOASTSUPERCHARGING.
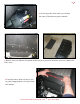
n4n On the right side of the trunk, you will find the battery. Disconnect negative terminal. n Remove lower air deflector and splash shields held on by fourteen 7mm bolts and seven 10mm bolts. Place aside. n Carefully remove both coil pack covers by gently snapping them out of place from their mounts. n EASTCOASTSUPERCHARGING.
n5n n Remove aero scoop held on by four 7mm bolts. Next, is removal of stock air box assembly. Start by removing two breather hoses—one on the front of the driver side valve cover, and the other is the first vent hose on the dry sump tank (if equipped) as pictured below or on the passenger side valve cover. n Push in gray tabs to release the quick disconnect fittings. n EASTCOASTSUPERCHARGING.
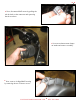
n6n Next, disconnect MAF sensor by pulling the red tab back on the connector and squeezing the tab to release. n Loosen two 8mm worm clamps on intake and remove assembly. n Next, remove air filter/MAF housing by removing the two T20 torx screws. n EASTCOASTSUPERCHARGING.
n7n Next, modify MAF housing by measuring 3 1/2 inches from the airbox inlet. Use supplied ziptie to mark a perfect circle around the inlet tube. Proceed to cut as straight as possible. Make sure to file down and clean out any plastic shavings. n Using supplied pencil or a silver marker, mark off the sides of the inlet as pictured below to later be ground off. n j EASTCOASTSUPERCHARGING.
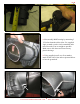
n8n Using a grinding tool or a hand file, smooth down the sides of the airbox inlet to clear the rubber coupler and clamp. n Remove metal screen from air filter inlet and smooth down the six mounting bolt bosses so the restrictor plate will sit flush. Next, apply a small bead of sensor safe RTV around the restrictor plate and place face down on air filter inlet, as shown above. n EASTCOASTSUPERCHARGING.
n9n j j n Next, remove air filter housing by removing two 10mm bolts holding it on, as pictured above. With air filter housing out of the car, on the right side mark for two holes, as pictured above, and drill one 5/8 hole on the bottom hole and one 3/4 inch hole on top for breather hoses that will be added later (See Page 42) n EASTCOASTSUPERCHARGING.
n 10 n Reinstall air filter housing along with supplied high-flow air filter, followed by air box inlet and tighten the two T20 torx screws. n j Next, remove fan assembly first by disconnecting the fan connector. Next unclip the two radiator hose clamps (they unclip from below), followed by removing two 10mm bolts that hold the fan assembly on. Remove fan assembly by moving it up and out away from the radiator. n EASTCOASTSUPERCHARGING.
n 11 n Remove both front wheels, followed by removing the two front lower control arm air deflectors held on by four T15 torx bolts on each side. n Using a 18mm wrench and an 8mm socket and ratchet, loosen the sway bar link nuts, as pictured below left. Also, loosen 21mm nut on the steering tie-rod. n EASTCOASTSUPERCHARGING.
n 12 n Once the sway bar links and tie-rod are free, loosen the sway bar hold-downs held on by two 13mm bolts. Remove sway bar from vehicle. n j j With sway bar removed proceed to remove ABS block bracket by removing two 13mm bolts below and loosening two 10mm bolts on the actual ABS block. Remove bracket from vehicle. Make sure to save rubber groment. n EASTCOASTSUPERCHARGING.
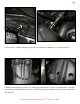
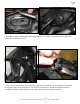
n 13 n j j Next, prepare for steering rack removal. Start by disconnecting the marked connectors, as pictured above left, followed by disconnecting the steering shaft from the steering rack by removing the 11mm bolt. n n Gently close hood, not latching it all the way. You will notice on the C7 Corvette that the hood struts are mounted to the sway bar mounts. You will need to release the hood struts from the sway bar mounts by releasing the clip, as pictured above left.
n 14 n At this point, the rack is ready to be removed. Start by removing two 18mm bolts and then once free, slide the steering rack towards the passenger side of the car, being careful not to damage any wires. n The ECS balancer pulley is designed with six locating tabs on the backside to properly locate it on the C7 balancer. n Below Picture 1 shows the CORRECT placement of the locating tabs. Picture 2 shows the INCORRECT placement of the locating tabs.
n 15 n For ECS balancer installation, remove and discard stock balancer bolt, if using impact gun take care not to damage the radiator as the bolt backs out. Then properly locate the balancer pulley over the stock balancer while making sure the locating tabs sit properly as shown in the pictures above. n Next, place small amount of red loc-tite on new supplied balancer bolt and handtighten. While still loose, turn the balancer counter-clockwise to make sure locating tabs are locked into place.
n 16 n At this point, reinstall the streering rack, making sure to plug all connectors back in. Be sure to reconnect steering shaft to steering rack and reinstall 11mm bolt and torque to spec. Note to leave out the driver’s side 18mm steering rack bolt, as it will be used to mount the ABS block relocation bracket. n Next, reinstall sway bar/hood strut mounts. Pay attention as these are side-specific. Reattach the hood struts to each. n EASTCOASTSUPERCHARGING.
n 17 n n ABS Block Relocation: To ensure proper clearance of the ABS block it needs to be relocated closer to the frame rail. This can be achieved by slightly loosening the 13mm ABS lines with a 13mm wrench. (Do not loosen them too much to avoid getting air in the system.) Once the lines are loose, swing the ABS block towards the fire wall and the frame rail at the same time as pictured in Pictures 1 and 2 below. Some bending of the ABS lines will be needed.
n 18 n j j j n Radiator Hose Extension: Measure 7 inches from the end of the bend on the driver’s side of the radiator hose and cut where the protective mesh ends, as shown in Picture 1 below. Use supplied extension to extend the radiator hose and secure with supplied clamps. Picture 1 EASTCOASTSUPERCHARGING.
n 19 n Reinstall fan assembly and attach only the passenger’s side hose clamp (Picture 1). Discard the other one. n Once extended, the rad hose should clear the steering rack (Picture 2) to allow for more clearance of the charged piping. n Picture 1 Supercharger Head Unit Assembly 2 1 3 EASTCOASTSUPERCHARGING.
n 20 n Your Paxton SL1500 should arrive properly clocked and ready to install as shown below. Note the reference points and the drain line location and blower outlet. If your blower does not match this picture, remove the holding straps and clock the blower outlet to the desired location and do the same with the drain. n j j Next, install bracket assembly 1 on to supercharger with six 9/16 bolts and torque down bolts to 40ftlbs. n EASTCOASTSUPERCHARGING.
n 21 n Install supplied 8-rib supercharger pulley with the long snout up. Install supplied keyway and retainer using small amount of blue loc-tite. Secure to 40ft-lbs. n EASTCOASTSUPERCHARGING.
Water Pump Manifold Installation n 22 n With your ECS 2015 C7 Supercharger Kit, a machined and modified water pump manifold must replace the factory water pump manifold. Remove the factory accessory belt. Disconnect and remove alternator along with the factory thermostat and water pump. Disconnect temperature sensor on top of the water pump manifold and relocate to the new ECS-supplied piece.
n 23 n With supplied .350 spacer, relocate wiring harness on front side of DS head. Next, install bracket assembly 2 on to DS head using three 17mm bolts and one 13mm bolt. n Locate the wiring harness bracket on the driver’s side head. The bracket must be turned around and trimmed to fit on the long side so it can bolt up to the driver’s side head bracket assembly, as shown below using the factory harness clip. n EASTCOASTSUPERCHARGING.
n 24 n Next secure tensior pulley with some blue loc-tite. Install bracket assembly 3 on to water pump using the two 9mm socket cap bolts, as shown below. n Although not necessary and it can be done at any time, at this point you can lay in place the supplied 8-rib belt and prepare for head unit installation. n EASTCOASTSUPERCHARGING.
n 25 n Slide blower assembly into place making sure all four studs line up evenly. Tighten all four studs with the 9/16 flaired nuts. n n Use supplied adjuster tool to tighten idler all the way and secure 11/16 nut. EASTCOASTSUPERCHARGING.
n 26 n To adjust the tensioner, place a 1/2 inch drive extension with a ratchet on to adjuster plate. Rotate tensioner clockwise until plate is maxed out. Secure both 17mm bolts. n EASTCOASTSUPERCHARGING.
Radiator Shroud Trimming and Intercooler Installation n 27 n Next, the lower radiator shroud will need to be trimmed to make room for the intercooler. The above picture shows a rough outline of the area that needs to be trimmed. Follow the pictures below for reference as well. (We recommend carefully using a small airsaw or a new sharp box-cutter knife.) n Picture 1 As show in Picture 1, measure 2 1/2 inches from the radiator cradle.
n 28 n Take your time when trimming this, as it is critical that your cuts are straight and smooth to help retain as much of the factory aerodynamic design. n EASTCOASTSUPERCHARGING.
n 29 n Using the supplied 6 x 1mm riv-nut and install into the existing radiator cradle hole in between the two other shroud mounts. n EASTCOASTSUPERCHARGING.
n 30 n Next, it’s time to install the intercooler assembly. Begin by mounting the intercooler mount using the two 1/4-20 flair bolts supplied. Make sure to pay attention to the orientation of the bracket in the top right picture below. n Hand-tighten the three 6 x 1mm bolts that hold the intercooler mount to the radiator cradle. Leave slightly loose so you can still move the intercooler as needed. n EASTCOASTSUPERCHARGING.
n 31 n Next, install the Tial BOV. First place the O rig around the BOV pipe assembly and secure the valve with the supplied clamp. Also at this time, make sure to install the top fitting. n Install 3 in. x 3 in. coupler on intercooler and slide BOV pipe assembly into place. Secure coupler with 3 in. stainless t-bolt clamps. n EASTCOASTSUPERCHARGING.
n 32 n Using the smaller of the two supplied 3 in. 45-degree elbows, connec the BOV pipe assembly to the supercharger outlet. Use a 3.12 t-bolt clamp on the supercharger outlet and a 3.38 t-bolt clamp on the BOV pipe assembly. n On the passenger side of the intercooler, install the longer of the two 3 in. 45degree elbows with the short leg facing upwards towards the motor. n EASTCOASTSUPERCHARGING.
n 33 n Install the 3 in. 45-degree aluminum elbow with the short side towards the intercooler and secure with 3 in. clamps. n Move the MAF into the ECS MAF pipe. Note orientation and secure with factory screws. n EASTCOASTSUPERCHARGING.
n 34 n Next, prepare the MAF pipe for installation. Install the 3 in. to 3.5 in. reducer on the intercooler side of pipe. Secure with 3.38 and 3.88 t-bolt clamps. Install the 3.5 in. to 4 in. coupler on the throttle body side and secure with 3.88 and 4.12 t-bolt clamps. n The MAF harness needs to be extended. This can be done by simply removing the protective cover as shown below. This will allow you to plug the MAF into the ECS charge pipe. j n EASTCOASTSUPERCHARGING.
n 35 n Install the 4 1/2 inch to 4 inch coupler on the factory airbox and the 3 3/4 inch to 4 inch coupler on the supercharger. n Proceed to install the air inlet tube. We suggest first sliding the air inlet tube into the supercharger first followed by the factory airbox coupler. n n Secure air inlet tube with supplied worm clamps. n Important: Once the blower is secure, check the A oil level. Make sure the blower vent plug (A) and the blower dipstick (B) are in the proper locations.
n 36 n Sway Bar and Lower Splash Shield Installation: Reinstall sway bar and torque all n fasteners to spec. Using supplied clamp, secure supercharger drain line to the front cradle. n EASTCOASTSUPERCHARGING.
n 37 n Install the modified lower splash shield. Transfer the 10 speed nuts from the OEM splash shield to the ECS modified one. Next, install the sealing foam as shown in Picture 2. n Picture 1 Picture 2 Picture 3 Picture 4 Slide splash shield into position and secure with OEM hardware followed by the lower radiator fan shroud as shown in Picture 4. n EASTCOASTSUPERCHARGING.
n 38 n At this point, you will need to modify your stock GM air deflector. Measure 1 inch from the tip of the mounting tab, as shown in Picture 1. Drill small 1/4 inch hole centered with the factory mounting hole, as shown in Picture 2. n Picture 1 n Picture 2 Proceed to install modified air deflector using the OEM hardware. EASTCOASTSUPERCHARGING.
n 39 n Next you will need to install the two side air deflectors supplied in the kit. Begin by installing the air deflector using the first 7mm bolt that holds the intercooler shroud, leaving the bolt loose. Make sure the air deflector angle matches up, as shown in Picture 1. Tighten 7mm bolt and proceed to drill a 1/4 inch hole through the existing mounting hole on the deflector, as shown in Picture 2.
n 40 n EVAP System Check Valve: The only modification you need to make to the EVAP system is to add an ECS supplied OE check valve in with the factory EVAP system as shown below. n Cut the factory EVAP line and insert the line into the ECS 3/8 EVAP hose. The clamp provided is to clamp the hose around the evap line. The clamp can easily be tightened using a pair of dykes (side cutting pliers) or similar. n j EASTCOASTSUPERCHARGING.
n 41 n n Vacuum Fitting Installation: Find the factory vent hose located on the front of the driver’s side head and by pressing the two gray tabs, remove it, as shown in Picture 1. Next remove the factory quick disconnect fittings by carefully cutting a small slit on the factory heat-shrunk hose, as shown in Picture 2. Picture 2 Picture 1 Picture 3 Picture 5 Picture 4 For the vacuum system, block off the valley cover and install the new ECS vacuum tee.
n 42 n n PCV System Re-routing: On both valve covers the breather lines are connected to the valve covers with GM QC fittings that contain a check-ball that can and will become stuck not allowing for proper crankcase ventilation, and one must be removed (passenger side) and the other replaced with the new supplied QC fitting. Follow the steps below to properly remove the check ball from the passenger side valve cover fitting and re-install. Locate the passenger side valve cover breather.
n 43 n On the driver’s side, install the supplied 1/2 inch OEM QC fitting and using the supplied 1/2 inch hose, route under throttle body and behind the MAF wiring, as shown in Pictures 1 and 2. Route other end to 3/4 inch hole on the air box (as drilled on page 9) shown in Picture 6 on the next page. n Picture 1 Picture 2 *Dry sump oil system cars only Picture 3 j j j j Dry sump oil system cars only: Locate the breather hose coming out of the dry sump tank and into the passenger side valve cover.
n 44 n Picture 4 Picture 5 All cars: Install the ECS supplied OEM 3/8 inch hose into the factory QC fitting on the passenger side valve cover and route the supplied 3/8 inch hose into 5/8 inch hole in the air box as drilled on page 9. Use the OEM straps to tie both breather lines together for an OEM look. n Picture 6 Note: As part of your regular maintainence you should check your airbox for any oil residue to prevent build-up in the airbox. n EASTCOASTSUPERCHARGING.
n 45 n Reinstall the factory heat extractor shroud with the OEM hardware. n Double check all of your work prior to first start-up. Proceed to refill your cooling system and start the car, letting it warm up and checking for any leaks. Make sure the supercharger belt is tracking properly. n From this point on, proper PCM calibration is required to avoid serious engine damage. It is recommended that you contact an experienced tuner in your area before driving the vehicle.