FCC ID: PA48E1587 User Manual Part 3 Operation and Maintenance Returned cartridges are carefully inspected. Only components that meet strict quality standards are reused. Components that do not meet the standards are sent to recycling centers for reclamation. This program is part of Kodak’s commitment to reduce the environmental impact of our products. To recycle your empty film cartridges: 1. Replace your empty film cartridges in their original packages. Return as few or as many as you like each time.
Operation and Maintenance image quality parameters to ensure optimum image quality by monitoring the density patch printed on each film. The laser imager adjusts the parameters each time the laser imager prints a calibration film to ensure image consistency from film-to-film and lot-tolot. A calibration film is printed whenever: • AIQC detects that a new film lot number has been loaded. • You request a calibration test from the local panel.
Operation and Maintenance EPA Resource Recovery Act. Under RCRA, you may dispose of the filters in a landfill or incinerator with energy recovery in a municipal, commercial or industrial facility. Contact your state or local government to determine if additional disposal requirements apply. Latches Filter cover Charcoal filters Filter holder Replacing the Charcoal Filters To install new filters: 1. Open the 2 latches and pull the filter holder forward. 2. Remove the two used charcoal filters. 3.
Operation and Maintenance 7. Discard the 2 used filters. Preventive Maintenance To maintain optimum performance from the laser imager, Kodak recommends that preventive maintenance is completed by a Kodak authorized Service Provider after every 20,000 film cycles. The Status screen displays a “Preventive Maintenance” icon when the film count reaches 20,000 sheets of film. You can also monitor the “Prints to PM” line on the System Information screen.
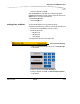
Operation and Maintenance Key Operator Information A Key Op icon appears on every screen where Key Operator access is possible. This icon indicates when the Key Operator level is active. When active, the icon is hightlighted. Key Operator access remains until any of the following conditions occurs: • The system times out (xx minutes) and returns to the Status screen. • You use the Key Op icon to cancel the access level. Up to 10 Key Operator accounts are allowed.
Operation and Maintenance 3. Enter your passcode. Touch OK. When the Key Op access is activated, the icon appears highlighted. Key Op access deactivates if the laser imager times out and returns to the Status screen or if you cancel the access level. To deactivate Key Op access: • Touch the Key Op icon. Setting Time and Date The time and date appears in the right side of the title bar. Key Operators have the ability to set the time, time format, and date format.
Operation and Maintenance 4. Use the left and right arrows to navigate to your desired time or date value. 5. Use the up and down arrows to change the time or date values. 6. Touch OK.
Operation and Maintenance Audible Alarm (On/Off) An audible alarm alerts operators when an error message or notice appears on the local panel. Key Operators have the ability to disable or enable the audible alarm function. To enable or disable the audible alarm: 1. At the Main Menu screen, touch the System Function button. 2. At the System Functions screen, touch the Audible Alarm button. The Key OP Login screen appears. 3. Enter your ID and touch the Enter Passcode box.
Operation and Maintenance 4. Enter your passcode. Touch OK. 5. At the System Function screen, touch the Audible Alarm button. Selecting Bins Key Operators have the ability to select bins for each available modality. To assign a modality to a bin: 1. At the Image Sources screen, use the up and down arrow icons to select a modality. 2. Touch the Edit button. The Key Op Login screen appears.
Operation and Maintenance 3. Enter your ID and touch the Enter Passcode box. 4. Enter your passcode. Touch OK. The Image Source Editor screen appears. 5. Touch the up or down navigation icons to hightlight Bin. 6. Touch the + or - icon to select your desired bin. 7. Touch the Save icon.
Operation and Maintenance Changing Dmax Key Operators have the ability to change the Dmax value for each for each available modality. To change a Dmax value: NOTE: Modality settings may override these settings. 1. At the Image Sources screen, use the up and down arrows to select a modality. 2. At the Image Sources screen, touch the Edit button. The Key Op Login screen appears.
Operation and Maintenance 3. Enter your ID and touch the Enter Passcode box. 4. Enter your passcode and touch OK. The Image Source Editor screen appears. 5. Use the up and down arrow icons to hightlight Dmax. 6. Touch the + or - icon to select your desired Dmax value. 7. Touch the Save icon.
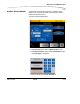
Operation and Maintenance Deleting Print Jobs Key Operators have the ability to delete one or all print jobs in the print queue. To delete a print job or all jobs in the queue: 1. At the Job Management screen, use the up and down arrow icons to select Active, No Media or Undelivered - print queue. 2. Touch the View List button. The Selected Queue: screen appears. 3. Use the up or down arrow icons to navigate to your desired print job.
Operation and Maintenance Delete job Delete all jobs 4. Touch the Delete icon or the Delete all Jobs icon. The Key Op Login screen appears. 5. Enter your ID and touch the Enter Passcode box. 6. Enter your passcode and touch OK. The Delete this job or the Delete all jobs in the queue pop up menu appears.
Operation and Maintenance 7. Touch Yes. Reprinting Print Jobs Key Operators have the ability to reprint completed print jobs. To reprint a print job: NOTE: The reprint capability of the laser imager enables Levels 2, 3, and 4 operators to command reprinting of images that may contain patient-identifiable data. Therefore, operation of the laser imager by operators at these levels is controlled by a login procedure that can assist operators in meeting requirements to control access to such information. 1.
Operation and Maintenance 4. Touch the Reprint icon. The Key Op Login screen appears. 5. Enter your ID and touch the Enter Passcode box. 6. Enter your passcode and touch OK. The Print Requested pop up menu appears. 7. Touch OK. Image Resizing Icons June 12, 2003 If an image has been resized or cropped, an icon appears on the bottom corner of the film. There are three types of icons that appear.
Operation and Maintenance • Crop. The image perimeter is removed to allow the image to fit on the film and print at the same scale as the anatomical area of interest. An image might be cropped if it is too large to print on the selected film size, and the size of the area of interest is important to retain. CAUTION: If anatomical areas of interest are near an outer edge of the image, they might be removed from the image when it is printed. • Minify. The image file is reduced by the removal of pixel data.
4 Troubleshooting Status, Error Messages, and Notifications Occasionally, you may have to correct minor problems. If more serious malfunctions occur, you must contact a trained Kodak Authorized Service Provider. See “Calling for Support” on page 4-25 for more information. To determine the operator action required, you should monitor imager operation and note the imager status and error messages.
Troubleshooting Main Status Screen Details Preventive Maintenance indicator Call Service to schedule Preventive Maintenance. Film Drawer Status Messages Details Opening... Please wait The film cartridge is currently opening. Open The film supply door is open. Calibrating... Please wait A calibration is in progress for this film cartridge. Not Calibrated The film cartridge is not calibrated. Fail An error has occurred, affecting normal operation.
Troubleshooting 1. When an error message appears, touch anywhere in the error popup menu. 2. When a no-media message appears, touch any tray button or the Job Management button on the Status screen. NOTE: The laser imager prints a job only with the specified size/media base type requested. If the size/base is not loaded, the print request is put into the “No Media” queue and the laser imager waits for the correct type to be loaded. If this action does not clear the error message, call for service.
Troubleshooting Lid” on page 4-17. 4-4 Number Message display Message Details 02-104 Inadequate Disk Space for Too many undelivered jobs New Job are queued. 03-111 Undelivered Job due to Rendering Error 20-208 Front Door Failed to Open Jobs will continue to be queued. Film affected by the error will be reprinted. 20-914 Internal Image Data Transfer Failed Jobs will continue to be queued. Film affected by the error will be reprinted.
Troubleshooting Number Message display 21-125 Internal Hardware Failure: Jobs will continue to be Feed Rollers queued. Printing will continue from any other supply drawer. 21-126 Film Jam in Area 1: Feed Rollers Jobs will continue to be queued. Film affected by the error will be reprinted. 21-135 Drawer Failed to Open Jobs will continue to be queued. Film affected by the error will be reprinted. 21-139 Unable to Identify Film Cartridge Jobs will continue to be queued.
Troubleshooting 4-6 Number Message display Message Details 21-178 Film Cartridge Failed to Open Jobs will continue to be queued. Printing will continue from any other supply drawer. 21-179 Film Cartridge Failed to Close Jobs will continue to be queued. Printing will continue from any other supply drawer. 21-631 Calibration Failed: Film Dmin Outside Target Jobs will continue to be queued. Printing will continue from any other supply drawer.
Troubleshooting Number Message display 22-120 Internal Hardware Failure: Jobs will continue to be Film Pickup queued. Printing will continue from any other supply drawer. 22-125 Internal Hardware Failure: Jobs will continue to be Feed Rollers queued. Printing will continue from any other supply drawer. 22-126 Film Jam in Area 1: Feed Rollers Jobs will continue to be queued. Film affected by the error will be reprinted. 22-135 Drawer Failed to Open Jobs will continue to be queued.
Troubleshooting 4-8 Number Message display Message Details 22-177 Film Cartridge Failed to Close Jobs will continue to be queued. Printing will continue from any other supply drawer. 22-178 Film Cartridge Failed to Open Jobs will continue to be queued. Printing will continue from any other supply drawer. 22-179 Film Cartridge Failed to Close Jobs will continue to be queued. Printing will continue from any other supply drawer.
Troubleshooting Number Message display 23-118 Internal Hardware Failure: Jobs will continue to be Film Pickup queued. Printing will continue from any other supply drawer. 23-119 Internal Hardware Failure: Jobs will continue to be Film Pickup queued. Printing will continue from any other supply drawer. 23-120 Internal Hardware Failure: Jobs will continue to be Film Pickup queued. Printing will continue from any other supply drawer.
Troubleshooting 4-10 Number Message display Message Details 23-176 Film Cartridge Failed to Open Jobs will continue to be queued. Printing will continue from any other supply drawer. 23-177 Film Cartridge Failed to Close Jobs will continue to be queued. Printing will continue from any other supply drawer. 23-178 Film Cartridge Failed to Open Jobs will continue to be queued. Printing will continue from any other supply drawer.
Troubleshooting Number Message display Message Details 24-154 Internal Communications Failure: Film Cartridge Controller Jobs will continue to be queued. Film affected by the error will be reprinted. 25-154 Internal Communications Failure: RF Tag Jobs will continue to be queued. Film affected by the error will be reprinted. 25-922 Internal Diagnostic Failure: RF Tag Jobs will continue to be queued. Film affected by the error will be reprinted.
Troubleshooting 4-12 Number Message display Message Details 26-543 Film Jam in Area 5: Processor Jobs will continue to be queued. Film affected by the error will be reprinted. 26-544 Film Jam in Area 5: Densitometer Jobs will continue to be queued. Film affected by the error will be reprinted. 26-545 Film Jam in Area 5: Sorter Jobs will continue to be queued. Film affected by the error will be reprinted. 26-546 Film Jam in Area 6: Sorter Jobs will continue to be queued.
Troubleshooting Number Message display Message Details 27-601 Calibration Failed: Optics Jobs will continue to be queued. Film affected by the error will be reprinted. 27-602 Calibration Failed: Optics Jobs will continue to be queued. Film affected by the error will be reprinted. 27-603 Calibration Failed: Optics Jobs will continue to be queued. Film affected by the error will be reprinted. 27-604 Calibration Failed: Optics Jobs will continue to be queued.
Troubleshooting 4-14 Number Message display Message Details 27-642 Internal Hardware Failure: Jobs will continue to be Optics queued. Film affected by the error will be reprinted. 27-643 Internal Diagnostic Failure: Optics Jobs will continue to be queued. Film affected by the error will be reprinted. 27-644 Internal Communications Failure: Optics Jobs will continue to be queued. Film affected by the error will be reprinted.
Troubleshooting Number Message display Message Details 28-155 Internal Communications Failure: Processor Jobs will continue to be queued. Film affected by the error will be reprinted. 28-501 Internal Hardware Failure: Jobs will continue to be Processor queued. Film affected by the error will be reprinted. 28-506 Internal Communications Failure: Processor Jobs will continue to be queued. Film affected by the error will be reprinted.
Troubleshooting 4-16 Number Message display Message Details 29-926 Internal Diagnostic Failure: Densitometer Jobs will continue to be queued. Film affected by the error will be reprinted. 29-927 Internal Diagnostic Failure: Densitometer Jobs will continue to be queued. Film affected by the error will be reprinted. 29-931 Internal Communications Failure: Densitometer Jobs will continue to be queued. Film affected by the error will be reprinted.
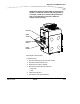
Troubleshooting Clearing Film Jams The numbers in the illustration identify key areas on the path from film pickup to exposure, through development and onto the film sorter. 4 6 5 1U 2 1M 1L 3 Jam Areas 1 Film pickup from the cartridge. 2 Vertical film path between the film pickup area and the film platen, and between the film platen and the processor drum. 3 Exposure platen. 4 Film processor drum. 5 Film feed through the densitometer and onto the sorter. 6 Film feed within the sorter.
Troubleshooting NOTE: If the drawers are opened without the film cartridge closing, several sheets of film at the top of the cartridge will be exposed (fogged) and should be discarded. Before opening the drawer, make the room as dark as possible to minimize exposure. Film Cartridge Rollback Knob To manually close the film cartridge: 1. Lift up the desired drawer override latch. 2. Pull the film drawer out to its furthest extension. 3.
Troubleshooting the local panel. NOTE: When problems occur in Area 1, the film cartridge remains open. When you open the drawer, the top sheets of film in the cartridge will be exposed (fogged). Before opening the drawer, make the room as dark as possible to minimize exposure. Discard any fogged film. 1. The Film Jam in Area 1: message appears. 2. Touch the Show Jam button. The Door Control screen appears and the affected drawer is highlighted. 3. Touch the affected drawer icon. The drawer opens. 4.
Troubleshooting Vertical Transport Rollback Knobs 1. The Film Jam in Area 2: error message appears. 2. Touch the Show Jam button. The Door Control screen appears and the affected area is highlighted. 3. Touch the front door icon. The front door opens. 4. Locate the jammed film in the vertical transport. 5. Remove the jammed film. If the film is jammed in one of the feed roller sets, turn the rollback knob in the appropriate direction to free the film. 6. Close the front door. 7.
Troubleshooting 3. Touch the front door icon. The front door opens. 4. Locate and remove the jammed film in the platen or vertical transport. 5. If the film is jammed in one of the feed roller sets, turn the rollback knob in the appropriate direction to free the film. 6. Close the front door. 7. If you cannot clear the jammed film, call Service. Clearing Film Jams from Area 4 The film processor drum is Area 4. If film stalls in this area, an error message occurs on the local panel.
Troubleshooting Exercise caution when removing jammed film from the processor. 4. Release the two clamps at the left of the processor. CAUTION: Whenever you raise or lower the drum cover, grasp the cover only on the lift handle to avoid the possibility of pinching your fingers. 5. Open the drum cover. CAUTION: To prevent damage to the surface of the processor drum, do not use any type of tool to remove jammed film. 6. Clear the jammed film from the processor area. There may be more than one sheet.
Troubleshooting Densitometer Transport rollers before and after the densitometer Clearing Film Jam 5 1. The Film Jam in Area 5: error message appears. 2. Touch the Show Jam button. The Door Control screen appears and the affected area is highlighted. 3. Open the upper hood to its first locking position. CAUTION: Hot Surface. Drum and rollers inside the processor are hot. Exercise caution when removing jammed film from the processor. 4.
Troubleshooting 6. Close the upper hood. 7. If you cannot clear the jammed film, call Service. Clearing Film Jams from Area 6 The sorter is Area 6. If film stalls in this area, an error message appears on the local panel. Release button Sorter Knob 1. The Film Jam in Area 6: error message appears. 2. Touch the Show Jam button. The Door Control screen appears and the affected area is highlighted. 3. Open the upper hood to its first locking position. CAUTION: Hot Surface.
Troubleshooting a. Hold the sorter with one hand. b.Press down on the release button. c. Carefully tilt the sorter to the left until it is in a resting position. 6. Remove any jammed film. If the film is jammed in one of the feed roller sets, turn the sorter knob in the appropriate direction to free the film. 7. Carefully tilt the sorter back to its locked position. 8. If you cannot clear the jammed film, call Service.
Troubleshooting 4-26 5E6155 June 12, 2003
5 Specifications Dimensions June 12, 2003 Height: 60 in. (152 cm) Width: 32 in. (81 cm) Depth: 39 in.
Specifications Electrical Voltage: 120 V ±10%, 60 Hz ±3 Hz 230 V ±10%, 50 Hz ±3 Hz 100 V ±10%, 50/60 Hz ±3 Hz Current Draw: 120 V: less than 12 A 240 V: less than 7 A 100 V: less than 15 A Power Consumption: 5-2 5E6155 • 1440 W peak for line voltages between 90 V and 106 V (and tapped at 100 V) • 1150 W peak for line voltages between 108 V and 127 V (and tapped at 120 V) • 1450 W peak for line voltages between 180 V and 212 V (and tapped at 200 V) • 1530 W peak for line voltages between 198 V and 23
Specifications Laser Specifications Wavelength: 810 nm Power: 100 mW Class: 3B Type Diode Temperature: 15° to 35° C (59° to 95° F) Humidity: 20% to 75% RH, non condensing Airflow 0.5 cubic feet per minute of fresh outside air, per square foot of floor area, assuming a maximum occupancy of 10 persons/1000 square feet in the room where the laser imager is located.
Specifications • • • • • 8 x10 in. DryView Film 10 x 12 in. DryView Film 11 x 14 in. landscape DryView Film 14 x 14 in. DryView Film 14 x 17 in. DryView Film Film Types The 8900 Laser Imager processes the following film types: • DryView Blue Film • DryView Clear Film Film Throughput The film throughput is approximately 180 films per hour. Agency Compliance See “Safety and Related Information” on page 1-1 in this manual.
Specifications June 12, 2003 5E6155 5-5
Specifications 5-6 5E6155 June 12, 2003
6 Film Technical Information General Description This section describes the characteristics of Kodak DryView Laser Imaging Film, not the operation of the 8900 laser imager.DryView Laser Imaging Film is a high-resolution, infrared-sensitive, photothermographic film designed specifically for the family of DryView Laser Imagers. DryView Laser Imaging Film is packaged in daylight load packages, available in blue or clear, 7-mil polyester base, and is available in the following five sizes: • 8 x 10 in.
Film Technical Information Characteristics Sensitometric 3.5 3 Density 2.5 2 1.5 1 0.5 0 0 0.5 1 1.5 2 2.5 3 Relative Log Exposure Image Quality DryView Laser Imaging Film delivers diagnostic-quality, continuous-tone images along with sharp alphanumerics and optimum contrast. This highquality, silver-based film provides radiologists with the same diagnostic information they are accustomed to viewing - including the spatial resolution, contrast and grey levels.
Film Technical Information Slight density variations are corrected automatically. Environmental Impact Tests show that DryView Laser Imaging Film is not considered hazardous to the environment. As a result, you can develop, recycle, and dispose of film with less impact on the environment than if you were using wet-developed silver halide films.
Film Technical Information developed films. However, prolonged exposure to intense light or excessive heat (130° F/54.4° C) for more than 3 hours, may cause some gradual darkening of images. Leaving films in vehicles in hot climates for extended periods of time is not recommended. For best results, store film in sleeves when not being reviewed.
Film Technical Information periodic replacement. DryView Laser Imagers require no special venting. Dissipating Heat DryView Laser Imagers use controlled heat to develop DryView Laser Imaging Film. The heat has virtually no effect on the air temperature of the work area. The amount of heat dissipated into an area during a day is typically less than the heat generated by four 100-watt light bulbs.
Film Technical Information June 12, 2003 5E6155 6-6
Glossary AIQC CR CT Restart the laser imager DICOM Dmax Dmin dPatch DR DRE DSA DVB DVC FAZ Film model Key operator LED MCS Modality June 12, 2003 Automatic Image Quality Control. Computed Radiography, the process of creating digital radiographic images. Computed Tomography, the process of creating digital tomographic images. Restart means to shut down and restart the laser imager. Digital Imaging and Communications in Medicine.
Monotonic MR GSM N/A PACS Link (MIM) Platen RF Tag Service image Shutdown SMPTE test pattern SST Test type TFT Undelivered queue UPS Version Glossary-8 MRI). Continuously increasing. When a calibration sheet, which consists of strips of increasing density (Dmin) to maximum density (Dmax), is read by the densitometer, the density values must be monotonic (continuously increasing). If they are not, an error message is generated. Magnetic Resonance. Gray Scale Manager.
-2 5E6155 June 12, 2003
EASTMAN KODAK COMPANY 343 State Street Rochester, N.Y. 14650 Kodak and DryView are trademarks of Eastman Kodak Company.