Cambridge Aero Explorer™ for Windows® Version 1.
Cambridge Aero Explorer User’s Guide Copyright Copyright© 2001 by Cambridge Aero Instruments All Rights Reserved First Edition 2001 Trademarks Aero Explorer is a trademark of Cambridge Aero Instruments. Microsoft and Windows are registered trademarks of the Microsoft Corporation. All other trademarks or registered trademarks are owned by their respective holders. Mailing address: Cambridge Aero Instruments P.O. Box 1420 Waitsfield, VT 05673 USA Shipping address: Cambridge Aero Instruments 1673 Main St.
Cambridge Aero Explorer User’s Guide Table of Contents Chapter 1. Introduction................................................................ 1 Overview of the Program ................................................................................... 1 Terminology ...................................................................................................... 1 Cambridge Aero Explorer Versions.............................................................. 2 Customer Support .........................
Cambridge Aero Explorer User’s Guide Chapter 5. Flight Analysis ......................................................... 32 Introduction ............................................................................................... 32 Task Analysis............................................................................................ 32 Measuring with the cursor.......................................................................... 36 Chapter 6. Appendix .........................................
Chapter 1. Introduction Chapter 1. Introduction Overview of the Program This manual explains how to use the Cambridge Aero Instruments flight management software, Cambridge Aero Explorer™ . This program is a powerful tool that lets you manipulate, view and analyze your flights graphically using a simple point and click interface. Cambridge Aero Explorer also facilitates work with navigation point databases and special use airspace files.
Cambridge Aero Explorer User’s Guide format. Files with the .igc extension are in a standard format defined by the IGC (International Gliding Commission). GPS-NAV - A Cambridge Aero product such as the model 20 GPS receiver/data logger. A GPS unit stores a navpoint database, pilot preferences, and flight logs recorded by the recorder. The Cambridge Aero Explorer program can read and update all information stored in the Cambridge GPS-NAV units.
Chapter 1. Introduction Customer Support If you experience problems with your version of Cambridge Aero Explorer or have questions about its operation, our website has extensive technical data on all of our products and may contain the answer to your question. You can reach our website by typing the following web address in your Internet browser: http://www.cambridge-aero.com. You can get access the Cambridge Aero Explorer web site directly from the program. From the Help menu, choose Web Support.
Cambridge Aero Explorer User’s Guide Chapter 2. Getting Started Installing the Software From CD-ROM 1. 2. Insert the Cambridge Aero Explorer CD-ROM your computer’s CD-ROM drive. The installation program starts if your computer is configured to automatically run the CD-ROM install program. If the installation program doesn’t start, double-click the My Computer icon normally located in the top left corner of the Windows desktop screen. Double-click the CD-ROM drive icon, then double-click the Setup.
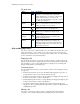
Chapter 2. Getting Started Icons in the Recorder and PC Panes The PC and Recorder panes of the Explorer bar allow you to quickly and easily find, organize and manage the files you need to work with your Cambridge recorder. When working with these panes, you will see numerous entries in a cascading tree structure. Each entry has an icon and a label associated with it.
Cambridge Aero Explorer User’s Guide PC pane icons Entry Workspace Icon Directory Folder Navpoints SUA files Log in IGC Format Log in CAI Format Description Represents a directory (folder) on the computer’s hard drive or a removable drive or flashcard. Double-clicking the icon expands or collapses the folders in this workspace so you can see its contents. The right and left arrow keys also expand or collapse the workspace. Represents a folder on your hard drive, removable drive, or compact flashcard.
Chapter 2. Getting Started Copying a file You can copy navpoint, special use airspace, or flight log files between different workspaces on the computer. Press and hold the Ctrl key while you click and drag the file to the desired folder. Command Menu Operations The menu bar in the Cambridge Aero Explorer contains all the commands that you use to accomplish tasks in the program.
Cambridge Aero Explorer User’s Guide 2. 3. 4. Double click on the “My Documents” folder on the Desktop to open it. Once opened right click in that folder and from the New menu, select Folder. Type in “Cambridge Files” as the name for this new folder. Start the Cambridge Aero Explorer and from the File menu, choose New Workspace… . From the browse for Folder dialog, select the “Cambridge Files” folder under the “My Documents” entry. Then click OK. 5.
Chapter 2. Getting Started Program Setup Navpoint files Introduction Navpoints are navigation points used by soaring pilots during their flights. They are defined by latitude, longitude and elevation. They also have attributes to describe how the pilot may use the point. Each navpoint can have one or more attributes. The following table describes the meaning of each navpoint attribute: Attribute Description The home airfield for this navpoint database.
Cambridge Aero Explorer User’s Guide Editing Right click on any navpoint file in the Navpoint folder in the PC pane and select Edit from the menu. This opens the navpoint-editing dialog box. The navpoints that make up this file are initially listed in ascending numeric order. However, you can sort the list by clicking on the column title bar to sort by the value in that column. For example, if you click the Latitude bar at the top of the column, the program resorts the list by latitude.
Chapter 2. Getting Started Downloading navpoints from the Internet Many pilots prefer to use lists of navpoints that have already been created for a favorite soaring site. The most well known web site to download navpoints from is the “Worldwide Soaring Turnpoint Exchange“ The following instructions are applicable to that site only. To download a navpoint database from this site, follow these steps: 1. Start the Cambridge Aero Explorer.
Cambridge Aero Explorer User’s Guide 6. Now you will see a form asking where to save these navpoints on your computer. Click on the drop down list next to “Save in” and select the folder you saw in step 2. 7. 8. After selecting the correct folder, select “Save”. Now restart the Cambridge Aero Explorer, and open the Navpoint folder you identified in step 1. The navpoints you downloaded from the Internet should be visible there.
Chapter 2. Getting Started 2. 3. 4. 5. 6. First select the navpoint list you wish to use for task creation. Select either the list loaded on the recorder, or choose a database already stored on your computer. For the Use Navpoints from recorder option to work, you must have a recorder connected to your PC which has valid navpoints stored in it. In the Turnpoints: window type the numbers of the turnpoints you will be flying as they appear in the database list. For example, the 82.
Cambridge Aero Explorer User’s Guide 3. If you want start and finish gates, select Display Start Gate and Display Finish Gate. Then select the gate definition by clicking Define Gate for each. This puts the start and finish gates in the list. The ID of the start point in the list will have an “S” after it in the first column. Similarly, the finish point will have an “F” after the ID in the first column. 4. Enter a Turnpoint Radius. This radius is used to display a black circle around each turnpoint.
Chapter 2. Getting Started Displaying a flight In the lower left pane of the Cambridge-Aero Explorer, click on the + sign next to the folder named Flights and then click on the + sign next to the folder named Demo. Click and drag any flight icon in this folder to the right hand display pane. The top flight in the Demo folder was completed on April 29, 2000 at Caesar Creek Soaring Club.
Cambridge Aero Explorer User’s Guide changes to a small ruler and a small window pops up in the upper-left corner to display data. Click on a point in the flight trace and drag to another point on the trace or a displayed navpoint. As you drag the cursor, the upper-left window displays distance, time, speed, altitude differential and average climb for the section of the flight over which you dragged the cursor.
Chapter 2. Getting Started Displaying airspace Click the + next to the folder named Airspace to expand the list of airspaces. Then click and drag the airspace icon named Caesar into the display pane. This overlays the airspaces on the navpoints, allows you to view the special use airspaces along with navpoints and flight logs. Hide the explorer bar The left hand side of the screen, comprised of the Recorder pane and the PC pane, is collectively called the Explorer bar.
Cambridge Aero Explorer User’s Guide Selecting the Display Start Gate and Display Finish Gate checkboxes enables these features in the visual display of a task. Clicking Define Start Gate or Define Finish Gate allows you to select the start and finish gate parameters. Click Define Start Gate. The default parameters for the Start Gate Settings are standard for most contests; however you can change as desired. Click OK to accept the start gate definition and return to the Task Display dialog box.
Chapter 2. Getting Started In this instance, Line is selected for the Type of finish gate. The default setting is cylinder. Click OK to accept these parameters and return to the Task Display dialog box. Below Turnpoints is a text box where you can enter the turnpoint numbers for the task. To select turnpoints from a list, click Browse next to the text box to see a list of turnpoint possibilities for this flight. Click turnpoint number ten, Highland Co.
Cambridge Aero Explorer User’s Guide Displaying maps Now zoom in on the Edenton Lake turnpoint of this example. Adjust the zoom until the scale in the lower left is about 5 miles. To turn the map display on, click on the green button next to the reset (R) button in the toolbar. You should see a display similar to the one below.
Chapter 3. Communication with Data Recorder Chapter 3. Communication with Data Recorder Connecting to recorder Before you can access the information in your Cambridge logger, it must be connected to your computer. To connect your recorder to the Cambridge Aero Explorer, follow these steps: 1. Connect your recorder to your computer with a serial cable. 2. Make sure your recorder is turned on. Some recorders will need to have power supplied to it from either an A/C adapter or external battery.
Cambridge Aero Explorer User’s Guide CAUTION! When the configuration is changed, any logs already stored in the recorder are destroyed. Log Manager From the Recorder menu, choose Log Manager. This dialog displays the flight log contents of your data recorder. By far the easiest and most convenient way to access your flight logs is with the Recorder pane. However, the Log Manager can also be used. By default, the log manager downloads your files to your default flight log folder.
Chapter 3. Communication with Data Recorder Transferring data to the recorder prior to taking off When flying at a new location, you may want to load a new navpoint database for that location into your recorder. To transfer a new set of navpoints to your recorder, follow these steps. 1. Connect your recorder to the computer with a serial cable. Make sure your recorder is turned on. 2. Make sure your navpoint database file is visible in the PC pane.
Cambridge Aero Explorer User’s Guide then that folder will automatically visible as a workspace in the PC pane. Similarly, it your flashcard contains a folder named Flights this will also be visible as a workspace in the PC pane. Transferring data to the recorder via a flashcard. Navpoint, SUA and flight log files can be transferred to a Cambridge recorder that is permanently mounted in the glider using a flashcard. To transfer navpoints and SUA files to a recorder using a flashcard, follow these steps.
Chapter 4. Flight Display Chapter 4. Flight Display Introduction Your Cambridge GPS-NAV or similar product records data as you fly and saves a series of GPS location fixes in a flight log. Cambridge Aero Explorer allows you to view these flights on your computer. Some features available when displaying your flights are: ? ? You can use the mouse, mouse wheel or keyboard to control the display of your flight trace. ?? The program displays the flight in 3 dimensions.
Cambridge Aero Explorer User’s Guide ?? Show full trace length - Often the display can become quite cluttered from trace points recorded very early in the flight, which can hinder viewing and analysis of later segments. To address this problem, clear this checkbox to display only the most recent segment of the flight. You can then enter the Display Length (in minutes). For example, if you enter 5, then only the most recent 5 minutes of the trace is displayed.
Chapter 4. Flight Display Click and drag over display Shift+click and drag over display Ctrl+click on display Ctrl+right-click on display Right-click on display Rotate mouse wheel (if available) Changes the cursor to a hand icon, mouse movements cause the display to shift or pan. Rotate the display, allowing 3 dimensional viewing of the flight. Moving the mouse up and down in the middle of the screen causes the flight to be viewed from different elevations.
Cambridge Aero Explorer User’s Guide Scrolling and Rotating a Flight You can move the pot display to the left, right, up or down by clicking and dragging in the Plot pane. The cursor changes to a hand when you click in the Plot pane. You can also rotate the view in 3 dimensions by Shift+clicking and dragging on the center of the flight. The view of the flight rotates in 3 dimensions as you drag the mouse.
Chapter 4. Flight Display Dragging the mouse to the left and right rotates the flight view about the vertical axis of the screen.
Cambridge Aero Explorer User’s Guide Moving the mouse up and down in the right third of the screen causes the flight view to be rotated about an axis normal to the screen. To return to a top down view, click the R button in the toolbar or in the View menu, choose Reset view. Making the Display Follow a Flight Occasionally you will want to view in detail a flight that spans a long distance.
Chapter 4. Flight Display Displaying Multiple Flights It is very popular to compare flights made by two different pilots on the same day, or even different days, together on the screen at the same time. This is easily done with the following steps. 1. Find the first flight to display in the PC pane and display it by doing one of the following: ? ? Double-click the flight icon. ? ? Right-click the flight icon and choose Display. ? ? Click and drag the flight icon to the Display pane. 2.
Cambridge Aero Explorer User’s Guide Chapter 5. Flight Analysis Introduction Flight Analysis is a term used to describe the calculation and display of speeds, distances, rates of climb and other parameters from a flight log. The Cambridge Aero Explorer provides two types of analysis: task analysis and cursor measurements. Task analysis analyzes a flight against a user-declared task and calculates distance, speed, time on course and other information about the flight.
Chapter 5. Flight Analysis When analyzing a flight during a soaring contest, you should not use the navpoints stored in your log. You should instead get a copy of the official navpoints for that contest from the official scorer and select that file to be used in the analysis. It is possible that the navpoints in the log might be slightly different than those provided by the scorer. One and only one of the navpoints must have the Home attribute set.
Cambridge Aero Explorer User’s Guide When the turnpoint selection is complete, click Next. Step 4 – Review Results At this point the analysis is complete and the results are displayed. Press Ctrl+C to copy the results of the analysis to the Windows clipboard. You can then paste the results into another application for printing or further analysis. The “Advanced… ” button will bring up a dialog that displays analysis results for each fix in the log.
Chapter 5. Flight Analysis Comp ID Total Flight Time Number of Fixes Task Status Distance Time On Course Speed Roll Time Start Time Finish Time Landing Time Turnpoints Achieved Notes: Contest ID from of the glider Elapsed time between the roll time and landing time. Useful for determining the time for a flight logbook entry The number of position fixes in the IGC file. Tells if the task was successfully completed.
Cambridge Aero Explorer User’s Guide ?? ?? Note that the height of the start cylinder is defined as height above the ground. The top of the start cylinder is the height of the start cylinder plus the elevation of the start point. Check where the trace crosses the finish line or enters the finish cylinder. Also check the altitude against the top of the finish gate. Use the “Advanced… ” button to bring up the dialog containing the detailed analysis of the flight.
Chapter 5. Flight Analysis To use the measurement cursor for task planning, use the following steps. 1. Move the mouse pointer to the first navpoint in the task. Click the navpoint and drag to the next point in the task. As the mouse pointer approaches a navpoint, it is selected and the name is displayed in the analysis window. This is useful when several points are close together. 2.
Cambridge Aero Explorer User’s Guide
Chapter 6. Appendix Chapter 6. Appendix The Appendix contains additional reference material that you may find helpful. It includes a listing of menu commands, right-click menu commands, troubleshooting information, and a description of selected file formats. Menu Commands The menu bar in the Cambridge Aero Explorer contains all the commands that you use to accomplish tasks in the program.
Cambridge Aero Explorer User’s Guide The Recorder Menu Connect - Attempt to connect the Cambridge Aero Explorer to a data recorder on the serial port. Properties - Communicate with the recorder and display a screen with essential glider and GPS-Nav data. Log Manager - Display a window that facilitates transferring flight logs to Cambridge Aero Explorer. Actions menu Display - Graphically display the selected file in the Plot pane. Overlay - Display the selected file with the contents of the Plot pane.
Chapter 6. Appendix Close all - Close all open windows in the Display pane. Displayed files are listed below the previous three commands with a check mark to the left of the file that is the current display. Help menu Help topics - Display the online help for the program. Web Support - Start your web browser and open the support page on the Cambridge web site if an Internet connection is available.
Cambridge Aero Explorer User’s Guide Change Workspace… - This menu will change which folder, disk or flashcard the workspace represents. Paste - This command will copy the file from the Windows clipboard to the selected workspace. This menu is only active after a flight log, SUA file or navpoint file has been either cut or copied to the windows clipboard. This cut or copy operation could have been done either from the PC pane in the Cambridge Aero Explorer, or anywhere in the Windows file explorer.
Chapter 6. Appendix Cut - This command will copy the selected file from the workspace to the Windows system clipboard. When the file is pasted elsewhere, it will be removed from its original location. Note that you can cut from the PC pane and paste to another folder or workspace in the PC pane, or you can even paste to a folder in the Windows file explorer. Copy - This command will copy the selected file from the workspace to the Windows system clipboard.
Cambridge Aero Explorer User’s Guide ?? ?? ?? Check enough disk space is available for the installation. 4MB is required for the basic installation, however if many maps are also selected for installation, this could increase significantly. Close all other programs. This includes programs started automatically when the computer is turned on. They can be identified by a small icon immediately to the left of the system clock in the lower right portion of the screen.
Chapter 6. Appendix 4. 5. The file name has the southern latitude and western longitude encoded in it. For example, the file N39W085.bmp is the sectional data for latitudes 39-40 north and longitudes 85-84 west. Put this file into the Map File folder. To find out where this is, click on the “Tools, Options… ” menu, then select the “File Locations”. Special Use Airspace File Format The format of the SUA is commonly known as the “Tim Newport-Peace's Special Use Airspace Format”.
Cambridge Aero Explorer User’s Guide # RADIUS, CENTRE and TO keywords is when describing an Arc # or Circle.), and describes an arc to be drawn Clockwise # or Anti-Clockwise from the current # position, and should be constructed as follows: # ANTI-CLOCKWISE RADIUS=8 CENTRE=N522734 W0014494 TO=N521948 W0014754 # or CLOCKWISE RADIUS=8 CENTRE=N522734 W0014494 TO=N521948 W0014754 # The units of Radius are Nautical Miles. # # CIRCLE= Similar to Arc but with only RADIUS and CENTRE Secondary # keywords. # e.g.
Chapter 6. Appendix # End of File.
Cambridge Aero Explorer User’s Guide Index Error! No index entries found.