
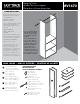
Installation Sheet


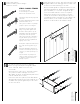


Congratulations!
Your installation is complete.
¡Felicitaciones!
Haz finalizado la instalación.
Félicitations!
Vous avez terminé l’installation.
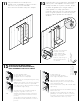
15
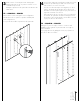
IMPORTANT. Attach support cleat to the back
wall of the closet into at least one stud using
#8 x 50mm screws.
IMPORTANTE. Con tornillos #8 x 50mm, fija el listón de
apoyo, al menos en una viga, en la pared posterior
del closet.
IMPORTANT. Fixez le tasseau au mur arrière du placard
dans au moins un montant à l’aide de vis nº 8 x 50mm.
TIP • CONSEJO • CONSEIL
Place the cleat beneath the bottom shelf if your unit includes
drawers. Otherwise, place the cleat beneath a fixed shelf.
Coloca el listón debajo del estante inferior si tu unidad
incluye gavetas. De lo contrario; coloca el listón debajo
de un estante fijo.
Si votre unité comprend des tiroirs, placez le tasseau sous la tablette
inférieure. Sinon, placez-le sous l’une des tablettes montées.
Cleat
Listón
Tasseau
14
The Stow Company 3311 Windquest Drive Holland, MI 49424 © The Stow Company Printed in U.S.A.
p: 800.562.4257 616.399.3311 f: 616.399.8784 www.easytrack.com Item # RV1472-INS 09/16
#8 x 2" screw
#6 x
1
/
2"
zinc screws
Toggle bolt
#8 x 50mm screw
#8 x 50mm tornillos
#8 x 50mm vis