QF2E-E-A4
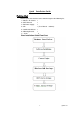
Quick Installation Guide P a ck in g L i st Untie the pack and check the items contained against the following list; 1)Wireless IP Camera 1 2)Wi-Fi Antenna 1 3)DC Power Supply 1 4)CD 1 (User Manual﹑software) 5)Qualified Certificate 1 6)Mounting Bracket 1 7) Srews 2 Base Installation Guide Flow Chart 2 QF2E-E-A4
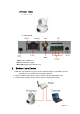
1.Product views (1)Front View (2)Rear panel LAN: RJ-45/10-100 Base T DC5V: 5V/2A Power supply Micro SD:Support up to 32G SD card 2. Hardware Installation Follow the steps below to set up your camera hardware.Make sure to follow each step Carefully to ensure that the camera operates properly 1) Plug the network cable into the camera and then into your Cable/DSL router. 2) Plug the power adapter into the camera and then into the power outlet.
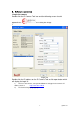
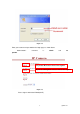
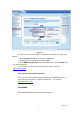
3. Software operation 1.Login the camera Double click the IP Camera Tool icon and the following screen should appearFinder” and a dialog box will pop u Figure 1.4 Double click the IP address on the IP Camera Tool or click open button which will display the login UI 1) To access the camera ,start your web browser and type in the camera’s IP address,Such as http://192.168.1.
Figure 1.5 Enter your account and password on the login page as shown above Administrator’s passwo username is: admin and no If you use IE browser choose here sign in If you use smartphone browser choose here sign in Figure 1.
Figure 1.7 Note: Before IE monitoring through web, it is necessary to install a ActiveX. 2. Wireless LAN Settings Click the Scan button (at least two times),select your wifi SSID, and write in your wifi’s password. Figure 1.
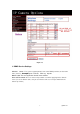
Figure 1.9 3. DDNS Service Settings Chooser server : The system support prtocols from some DDNS providers,and our own ddns ( built-in).. Example:ipcam(built-in)、3322.org、Dyndns DNS Account: The user application domain name address User and Password: the user name and password used when applying for the domain name .
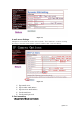
Figure 2.0 4. mail server Settings Configure the E-mail box to receive and send mails. The E-mail box is used for receiving the images sent after alarm and the system IP address after successful dial-up. Figure 2.1 1) Input mail server 2) Input sender email andress 3) Input receiver email andress 4) Sender email user 5) Sender email password 5. Port forwarding 1.
Figure 2.2 Pls make sure the Server IP Address,start port and end port be same with your camera’s. 1)Enter IP Camera Finder to set the basic configuration, 2)Login the Camera homepage as Administration. 3)Enter DDNS Settings Page and enable DDNS service. Click and the device will reboot 4)You can access the Camera from Internet by domain name( like: http://demo.ipcam.
QF2E-E-A4