Forword This series product is specific on network video surveillance including wired box ip camera, wireless box ip camera, wired dome ip camera wired IR waterproof ip camera, etc. It uses processor with high-performance chips to realize audio/video capture, compression, transmission, and the standard Motion-JPEG coding algorithm can confirm the clear-fluent effect of video transmission.
Forword ...................................................................................................................................... - 1 2 Features ..................................................................................................................................... - 3 3 Appearance and interface .......................................................................................................... - 5 3.1 Device appearance ........................................................
1 Product Overview IP Camera is designed as web server running on network, it can transmit real-time video to anywhere through internet, and user can view real-time live video via web browser any time. It is available to large stores, schools, factories, houses, etc. Basic function: IPCAM can transmit real-time live video data to remote place through internet with hardware compression method MJPE which providing high-quality video image and 25fps frame rate on LAN/WAN (local area network/wide area network).
● support network protocols: HTTP/TCP/IP/UDP/STMP/DDNS/SNTP/DHCP/FTP System feature Core Video security Three-level account, password and user authority management Built-in ddns (free) Built-in unique lifelong free DDNS,no need Oray,no worry about frequent offline and good speed. Such as http://demo.ipcam.
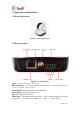
3 Appearance and interface 3.1 Device appearance Picture 1- device appearance 3.2 Device interface Picture 2- device interface power:external power adapter DC 5V/2A Ethernet interface:10/100M self-adaptable Ethernet interface,can connect to many network devices, such as hub, router, switch, etc.
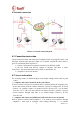
4 Network connection Picture 3- network connection guide 4.1 Connection instruction Connect camera to router and connect power adapter before accessing IP Camera,and check the network light and power light if it is normal, confirm the cable status is good. To connection mode in picture 3: 1)camera-1 and camera-2 separately connect to two different LANS 2)the two LANS must directly connect to internet , and there is router in the LAN,the connection mode can be ADSL or optical fiber, etc.
computer-1 can access camera-1,then configure router-1(do port forwarding in router-1),to transfer the computer-2’s access apply to go through router-1 then to camera-1. Normally, computer-2 only can reach router-1 without port forwarding for camera-1. 4.3 Connect network via ADSL Connect camera to router through cable. Configure parameters via IP Camera tool (refer to: 5.1 IPcamera tool). Login device by administrator,access PPPOE settings page to input user and password..
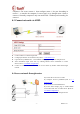
5.Software operation 5.1 IPcamera tool In picture 3,camera-1 and computer-1 are in different subnets,run Devfind.exe in CD,click search,then select searched IP Camera to modify the parameters,refer to picture 4. Picture 4- LAN configuration interface Note: the default parameters of camera: IP 192.168.1.
5.2 Login device IPCAM can be accessed from “open” function in camera finder or directly by inputting access link (IP added port) via browser.
5.3 Operations Record: click Snapshot: click Listen: click ,it will change into ,then we can listen sound coming from camera terminal on computer monitoring interface, click again to disable the function. Talk: click ,it will change into ,then we can talk to camera terminal via headset on computer terminal. Click again to disable the function.
5.4 Basic network configuration Basic network configuration IP address: it can support manually modifying IP, mask, gateway, DNS, etc. Http port: In most cases, the default port is 81. but if the current network limits the port, we should select other port ranged 0 to 65535, such as 8080,85,8888, etc.
5.5 DDNS configuration In picture 3,router-1 obtain wide area network IP address through ADSL,the IP address is dynamic,we could not know the real-time IP address of the device from internet,therefore,we need to obtain the address through DDNS server in internet, camera-1 will send message to the DDNS server for each defined-interval time,the DDNS server analyze the IP address of router-1 it connected,then we can obtain the IP address from DDNS server.
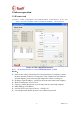
need to add a colon and port behind the ddns,such as: http://easyn.3322.org:81 5.6 E-mail service configuration Picture 14- email service configuration The information in picture 14 is must,if some options are not correct,the settings would not work. Note: it is best test the settings in Outlook Express before configuration to confirm the settings working. SMTP: input e-mail SMTP server Sender address: e-mail address to send mail Receiver address: e-mail address to receive snapshot and IP address.
Software condition: Windows2000/WindowsXP/Windows2003/Windows Vista/Windows 7,recommendation Windows XP 6.2 Installation steps Double click installation package,it pops up as below: Select path then click “next”. After installation, it creates an icon on desktop as below: At program list as below: 6.
【Login】the default user is admin and no password,click “ok”to access software main interface. 【Logout】only admin authority can logout,user and guest authority can not It needs to input administrator user and password when logout. 6.
Click to change to preview interface Click to change to playback interface Click to change to map operating interface Click to change to configuration interface Click to change to log operating interface Logout or change user Click to logout ◆Devices list: 【List mode 】 display area, settings and channel from user set 【Group mode 】 display group and channel from user set 【Current screen】 display devices current screen connected, only available on List mode ◆Real-time preview: electronic enlarging butto
Circle view button, single click to enable/disable Devices list fold/unfold button, click to fold/unfold Alarm information list fold/unfold button, click to fold/unfold 2.3 DEVICE MANAGEMENT 2.3.1 Add device Firstly click “Config” button on label list to access device management page. 6.5 Device management 1. Add device Firstly click “Config” button on label list to access device management page.
button to add device to area. ◆ Add device manually: Click button then pop up add device dialog, as below: 【Name】Device name, support custom, length less than 30 byte. Only display name instead of IP after input name. 【Channel】Support different channel on case that one device has many channels, presently device only supports one channel.
After add groups, configure groups Configuration: select group, click “+” in front of device IP or name, then select Channel 01, click button to add device channel to group.
1. Non-cycle preview Click “+” in front of device’s name or IP, then double click Channel 01 or drag Channel 01 to the window to view video. device connected Channel 01, if the display as It displays a blue triangle after , it means device does not connect. And if the display as , it means there is alarming.
: 【Connected All】connect device in selected area 【Disconnected All】disconnect device in selected area 【Arm All】devices in selected area arm 【Disarm All】devices in selected area disarm 【Start Manual Record of Area】enable manual record in selected area 【Stop Manual Record of Area】disable manual record in selected area 【Main Stream All】connect device with main stream in selected area 【Sub Stream All】connect device with sub stream in selected area If device is in connection, it should be disconnected then reco
changes into label of disable-manual-record label. 【Main Stream】connect device with main stream, on tick means current selection is main stream. 【Sub Stream】connect device with sub stream, on tick means current selection is sub stream. 【Auto Adjust】selected channel auto adjusts view proportion 【Check Time】selected channel synchronizes time with PC.
Enlarge aperture, need device hardware support Narrow aperture, need device hardware support Enlarge focus, need device hardware support Narrow focus, need device hardware support Focus forward adjustment, need device hardware support Focus back adjustment, need device hardware support Light button, click to light on/off, need device support Wiper button, click to wiper on/off, need device support 2.5.
【Goto preset position】Select window to call preset position, then select preset position number, click “Goto” button. 【Del preset position】Select window to delete preset position, then select preset position number, click “Del” button. 1. Image color configuration Click “Color” button to access image color adjustment dialog. Adjust image brightness Adjust image white balance Adjust image contract Adjust image color Recover to factory set color 6.8 Video management 1.
record”, picture as above: 【enable plan record】Select channel to record, then left click to drag out a green box(the box range is the time to record). Click “Save” to finish. 【disable plan record】Untick “Enable the plan of record”, then click “Save”. Or cancel the green box then click “Save”. Left click on green box then drag mouse to cancel. Notice: if to set same plan to all devices, click “Copy” then “Save” after set up one device, then all devices enabling plan.
default path is D:\. Note: Software can support 20 pieces of disk partitions. 1.
【Alarm Duration Time】Alarm duration time, default is 10 seconds, selecting range is 5-60 seconds. 【 Pre-recorded alarm Length 】 Pre-recording’s length on alarm, default is 5 seconds, selecting range is 1-15 seconds. Arm and Disarm 【Arm】Press “Preview”, select area or device for arming, after arming it will logo in front of device IP or name. display disappears. 【Disarm】After disarm, logo Note: 1. Linkage alarm only is available on arm condition, if device disarms, linkage alarm is not available. 2.
Snapshot button; select windows then press this button for snapshot Enlarge button; press this button then select area for enlarging on windows Full screen button; press this button for full screen show, double click on single windows for one windows full screen Drop down options for selecting playing speed, default is normal Sound button; click to sound on/off, default is closed Input time point then click to go to selected time to start playing 【Record search】 Step 1: define file type and searching tim
Step 1: select file type and device channel Step 2: select searching time then click “Search”, the eligible files should list on device tree Step 3: select playback windows then double click record file to view video, it can support one video displaying on four windows at the same time 6.10 Electron map 1.
6.11 Parameters configuration 1. To connect device for configuration on parameters configuration page (double click device channel, the image should display on right side image frame).
【Stream Type】support main stream and second stream 【Resolution】different resolution for different model 【Frequency】support 50Hz and 60Hz, default is 50Hz 【Bit Rate】different bit rate for different model 【Frame Spaced】N standard or 60Hz device has range 1-30fps, P standard or 50Hz device has range 1-25fps 【I Frame Spaced】the interval of two I frame of image 【Rate Control】support VBR and CBR 【Rate Quality】support 6 levels, lower level with better quality i.
【Camera Name】tick to enable adding name on image 【Time OSD】tick to enable adding time on image 【OSD Name】input OSD name then click Apply button, it can support 18 bit iii. Network To configure network parameters on current condition, the software only displays network parameters of current device, despite it is manually configured or DHCP. iv.
Step 4: click “Linkage Alarm” to select alarm type Step 5: enable arm function for device, otherwise it can not support alarm linkage v. PTZ For ptz control, it should be fulfill with right parameters, different ptz has different protocol, protocol code and baud rate. vi.
6.12 User management Factory set administrator name is admin, no password. Login with administrator then add, delete and configure user authority. User authority includes three levels: admin, user and guest.
【All logs】record all information of system 【System log】record information of user login, logout and user configuration, etc. 【Operation log】record user operations 【Alarm log】record device alarm information 2.11.1 Log Retention Time Step 1: click “Config” then “Other Settings” Step 2: select retention time for log, it supports 1, 2, 3 or 6 months, then click “Save” button 2.11.
【Time verify】tick and configure time, software verify time to all devices at appointed time to match time on PC 【Snapshot format】format of snapshot, support JPG and BMP 【Snapshot save path】the save path of snapshot 【Save】click “Save” button to enable configuration 【Exchange User】click “Logout”, after that, click on other page to re-login 7 Port forwarding Referring to picture 3,computer-1 can access camera-1,for computer in internet(such as computer-2, computer-3)to access camera-1,it needs to expose the
Please adjust video parameters for camera(mode, brightness, contrast, saturation, etc). If the background light is too strong,please adjust the range to view. The camera finder can not find device. Please check if the camera and computer are in the same subnet. And if the cable or power adapter is not good, it will cause the problem too.【Normally, the power light (yellow)is always on,the network light (green) is always flickering】. If it is the firewall limiting the access of camera finder.
8.