Network camera quick installation guide 1.
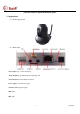
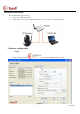
2. Hardware installation Please install following below steps: 1) insert power adaptor DC12V/1A ; 2) connect cable,one end to camera Enthernet interface, the other end to router/switch,as below: 3. Software configuration 1. login Double click camera finder , the software running interface as below: Figure 1.
Double click camera IP address or click open button to pop up login interface. 1 ) access camera. Run IE browser, input ip link or domain link to access camera, for example: http://192.168.1.126:81 2) the login interface as below: Input user name Input password Figure 2. Input user name and password to login, default setting is user name:admin password:admin Figure 3.
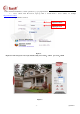
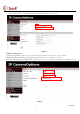
2.WIFI configuration Tick to enable wireless network adapter, then select ESSID, input password, as below: Figure4. 3.DDNS configuration Select service provider: select service provider, for example: ipcam(factory free ddns),3322.org,dyndns Dynamic domain name address: input applied domain name address, for example:test.ipcam.hk. User name and password: input DDNS user name and password, factory ddns user and password are on sticker of device Figure 5.
-5- QH7E-E-A1