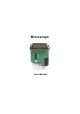
Microscope User Manual
For customers in North and South America For customers in USA This device complies with Part 15 of the FCC rules. Operation is subject to the following two conditions: (1) This device may not cause harmful interference. (2) This device must accept any interference received, including interference that may cause undesired operation. For customers in Canada This Class B digital apparatus meets all requirements of the Canadian Interference-Causing Equipment Regulations.
Table of Contents Page 1.System Requirements ----------------------------------------------------------------------3 2.Package Contents ----------------------------------------------------------------------------3 3.About the Microscope-----------------------------------------------------------------------4 4.
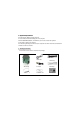
1. System Requirements • PC with Pentium 166 MHz or faster processor, • An active USB (Universal Serial Bus) port on the computer. • Windows 98SE/ME/2000/XP/7, CD ROM drive, color monitor, mouse and keyboard. • Color printer for printing color pictures. • For transferring still images via the Internet, the computer must have modem and communication software for Internet connection. 2. Package Contents All of the items shown below are included in the package.
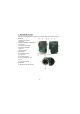
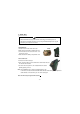
3. About the Microscope Refer to the following illustrations to familiarize yourself with the buttons and controls of this microscope. 1. Optical Zooming switch 2. Power LED 3. POWER & ZOOM IN & MENU button 4. LCD monitor 5. FUNCTION (Right) button 6. PLAYBACK (left) button 7. USB Port 8. SD Card Socket 9. Strap Eyelet 10. SHUTTER/OK button 11. TV OUT port 12. View case (optional) 13. Battery Compartment Cover 14. Lens 15. Tripod /Screw Socket 16. LED lights 17.
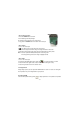
4. Quick Start CAUTION • Please install the microscope driver before connecting your microscope to a PC. • The best way to transfer pictures to PC is by using the Mass Storage mode. Copy all pictures to your computer in this mode. • Install Batteries: 1. Rotate the screw .Take off the View case. 2. Slide and open the battery compartment cover. 3. Put in the batteries in the correct direction.+ and – terminals has shown. 4. Slide and close the battery compartment cover. • Insert an SD card: 1.
• Turn on the microscope: 1. Press the POWER button as shown. 2. The indicator (power LED) will light. The welcome screen will show on the LCD monitor. 3. Long press the POWER button to shutdown the microscope. • Take a Picture 1. Turn on the microscope. 2. icon will show on the upper left corner of the screen. 3. Move the microscope to aim at the target. The target will show on the screen. 4. Hold the microscope firmly and gently press the shutter button to take a picture. Note: 1.
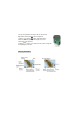
3.5x and 35x magnification of the target. User can also screw the Magnification Revolving Switch to make fine adjustment. 1. Slide the switch to “ ” station, keep 60mm distance between the view case (optional)and the target. The user can view the target in its original size. 2. Slide the switch in “3.5X” station and “35X” station, the target will be magnified by 3.5X and 35X. 5.
6. Select Function Press the Function button to enter function menu. You can see the icons on the screen as shown.Press the Left or Right buttons to select function. • DV Mode Select the DV Mode button and press the OK button to confirm. Press the OK button to take the video, and press it again to stop recording. • SETUP In SETUP, You can see the icons show on the screen. 1. Set time and date Press the left or right button to select the date format from MM/DD/YYY, DD/MM/YYYY or YYYY/MM/DD.
4. USB Connection Select USB Connection and press OK button to confirm. PC Cam: Use your microscope as a PC camera (PC microscope). Disk Driver: Use your microscope as a mass storage for transfering files to your computer. 5. anti-flicker Frequency Set the anti-flicker frequency to 50Hz. (Please use 50Hz if using the microscope in Europe, Japan and Asia) Set the anit-flicker frequency to 60 Hz. (Default setting. Please select if using the microscope in the United States) 6.
9. Exit Select Exit to exit SETUP and back to Function menu. • Exposure value Select EV mode and press OK button to confirm. Exposure compensation helps you increase or decrease the EV to adjust the results. This feature is applied to render the subject appropriately. The adjustment unit is 1/3, within the range –2EV ~ +2EVʳ You can check the result of the compensation by viewing the image on the screen. • Take Continuous Pictures Select Take Continuous Pictures and press the OK button to confirm.
You will see the icons on the screen as shown. Press the Left or Right buttons to select one function. • Single When you select the icon, press OK button to confirm. You need press Left or Right button to review the previous or next picture. Press the POWER button to go back to the Playback mode. • Slide Show Select the Slide Show Mode and press OK button to confirm. The microscope will automatically play the photos continuously . Press any button to stop the slide show.
8. Download Files to PC • For Windows 98 SE/ME customers: Connect the microscope to PC via USB cable. “USB Mass Storage driver” will appear on the computer screen. • For Windows 2000: Double click on “My computer”, and then double click on Removable Disk Drive. Check the folder in the drive. • For Windows XP/ Vista /7 : Connect the microscope to PC via USB cable.A dialogue box with options will appear as shown.You could select “Open folders to View files” to open the folder.
E.g. In Windows XP, Double click “my computer” (or “Computer” in Windows Vista), then click the “standard camera”, you can live view in PC-Cam mode now. 10. ArcSoft Media Impression 2 ArcSoft Media Impression 2 enables users to easily, creatively, and productively manage their multimedia with simple workflow and powerful tools. Organize your media easily and create simple projects with editing tools. There are endless ways to present and share; worry-free media file backup & restore.
• Organize Connect the Digital Microscope to PC via USB cable .Click Import, and then you can enter the Organize groups. 1. Auto face tagging automatically finds all faces in photos, groups them, and then tags them 2. Auto scene tagging automatically analyzes content of photos then tags them with different scenes 3. Auto rating automatically detects and rates poor-quality and high-quality photos Ratings & tags compatible with Windows Vista (XMP support) 4.
• Present Click the pictures / videos then you can view / editing / share your photo files. 1. A quick Photo Viewer to view photos in a window 2.View photos in a slideshow mode or full screen mode with frequently used editing with background music and cool tools themes 3. Light weight Media Player plays video/music 4.
• Photo and video editing 1. Easy Fix – Simply fixes in a few clicks 2.Face beautify helps beautify the eyes, mouth, and skin of the face mouth, and skin of the face 3. Creativity – Text and clip art, frames and edges, color effects 4.
5. Burn slideshow and video as a VCD or DVD 6.
• Share 1.Export photos to a digital photo frame 2.Upload pictures to Flickr and Facebook 3.Upload video to YouTube 4.Order Photo Prints, Photo Book, Mug, Canvas, T-shirt, Puzzle, and Mouse Pad right in application 5.Stream photos, music, and videos to DLNA compatible players such as Sony PS3, TV, DPF, and mobile phones etc 6.Send photos & videos to friends and family via email 7.
• Protect 1.Archive media files to CD/DVD 2.
Appendix: Specifications Sensor Resolution Lens Specification Illumination O/S Magnification White Balance Exposure Control Still image size TV OUT Video Mode Compression Digital zoom Display CMOS 1280 x 1024 Pixels, Sensor Area 1 / 3" F8.0, f = 7.45 mm, View Angle 55°, 2G2P Built-in LED x 4 (TBD) Microsoft Windows 98 SE / 2000 / ME / XP/ Vista / Win 7 2.4” Screen: 3.5x / 35x 17” Screen: 19x /190x Auto Automatic, VGA---640 x 480 Pixels 1.
WEEE Directive & Product Disposal At the end of its serviceable life, this product should not be treated as household or general waste. It should be handed over to the applicable collection point for the recycling of electrical and electronic equipment, or returned to the supplier for disposal.