
Quick Start Guide

Note: xxx of CamViewInstaller-xxx.exe is the version number.
Day & Night IP Camera
001015181
Inter net
NAT/Router
IP Cam
P
a
c
k
a
g
e
a
n
d
P
r
o
d
u
c
t
V
i
e
w
Step
Step
Step
Step
1
2
3
Power Adapter
LAN
WAN
Lens
Ethernet Indication LED
Status Indication LED
Microphone
IR LED
Light Sensor
Reset Button
Power Jack
Antenna Jack
Bracket screw
Ethernet Jack
NET
I
P
C
a
m
e
r
a
Automatic day and night mode switch : the IP cam automatically turns on/off the IR LEDs according to the
status of the built-in light sensor.
Scheduled time of night mode : the IP Cam can also be scheduled to turn on/off the IR LEDs.
Manual night mode control : the IP Cam can be manually forced to night mode( IR LEDs on ) or day mode(
IR LEDs off ).
There are three ways to control the night mode( IR
LEDs )(On the web page of the IP Cam) :
1
2
1
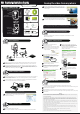
Make sure you correctly plug in the power adapter and the Ethernet cable. IP Cam will get the IP
address from the NAT/ Router automatically. The diagram above shows you how to connect the
devices correctly.
Check the status indication LED of IP Cam to see if IP Cam is correctly connected. Constant red
light means that IP Cam is working fine. Then, you can move forward to install the CamView ( video
management software). Otherwise, go back to and check it again carefully. If the status
indication LED is still blinking, contact your retailer then.
1
2
Step
CamView Software Installation
Before installing CamView on your PC or laptop, please make sure you have correctly installed the
IP Cam. It's highly recommended to close other Windows applications to prevent the installation
from any possible confliction.
Insert the installation CD into your CD-ROM drive and find the CamViewInstaller-xxx.exe.Double
click on it and press “Next” button till the end of the installation.
Note: xxx of CamViewInstaller-xxx.exe is the version number.
3
The right page “Installation Successful” should be displayed if
everything is correct. If not, re-install it again. Contact your
retailer if it is not working.
1
2
Start the CamView application from either
Start->Programs->CamView->CamView or the shortcut on the desktop of the Microsoft windows.
Once the CamView started, it will search all the IP Cam in your
Local Area Network automatically and shows the Cam ID of each of
the found IP Cam in the tree menu-“Auto Search” folder of the
“Cam List” page.
CamView Software Usage
3
To view the video, simply double-click on the Cam ID which you
want to see or drag the Cam ID to one of the video play windows.
To save the found Cam ID on your PC, simply drag it from “Auto Search” folder to “CameraList”. By doing
so, you can easily play the video without memorizing the Cam ID.
Note:
If the Cam you want to see is outside of your LAN and the Cam ID is not stored in the “CameraList”,
please right-click on the “CameraList”, choose “New Camera” and enter the Cam ID and password.
Note1:
For further operation, please refer to the full-version user manual of CamView.Note2:
1
Please make sure the Ethernet cable is
connected to the IP Cam.
2
Start the CamView. In the “Auto Search” folder,
right-click on the Cam ID of the IP Cam that you
want to configure. Click the “Web Configure …”
to open the browser.
3
4
5
6
Key in the admin account and password,
respectively, to enter the web page of IP Cam.
Click “Save & Apply” to save the configuration.
Click “WiFi Security” in the menu items to see
the current settings of the WiFi.
Click the “WiFi Scan” button, all the available
wireless AP will be listed. Click the AP you want
to use, then key in the encryption key of the
wireless AP.
admin
Note
Default admin
account is “admin”
and the password
is empty.
t
d
el
e
enabled
Note
7
8
Note
You can check the settings to see if they are
correct, go to “WiFi security” page and click the
“WiFi test ” button in bottom right corner. Wait
for about 15 seconds, the result will be
displayed.If it’s failed, please double check the
settings you have entered.
Now you are ready to activate the wireless
connection by plugging off the Ethernet cable
from the IP Cam.
DO NOT plug off the Ethernet
cable during the WiFi testing!
If the Ethernet cable is not
plugged off from the IP Cam,
the wireless function will not
be activated even if you have
enabled it.
Warning
This device complies with part 15 of FCC Rules. Operation is Subject to the following two conditions: (1) this device may not
cause harmful interference, and (2) this device must accept any interference
FCC Compliance Statement:
This equipment has been tested and found to comply with limits for a Class B digital device ,pursuant to Part 15 of the FCC rules.
These limits are designed to provide reasonable protection against harmful interference in residential installations. This equipment
generates, uses, and can radiate radio frequency energy, and if not installed and used in accordance with the instructions, may cause
harmful interference to radio communications.
However, there is no guarantee that interference will not occur in a particular installation. If this equipment does cause interference to
radio or television equipment reception, which can be determined by turning the equipment off and on, the user is encouraged to try to
correct the interference by one or more of the following measures:
-Reorient or relocate the receiving antenna -Move the equipment away from the receiver-Plug the equipment into an outlet on a circuit
different from that to which the receiver is connected.
-Consult the dealer or an experienced radio/television technician for additional suggestions You are cautioned that any change or
modifications to the equipment not expressly approve by the party responsible for compliance could void Your authority to operate
such equipment.
This device complies with Part 15 of the FCC Rules. Operation is subjected to the following two conditions
1) this device may not cause harmful interference and
2) this device must accept any interference received, including interference that may cause undesired operation.
Next
CamViewInstaller-xxx.exe
Quick Installation Guide
Seeing the video from anywhere
IP Cam
Installation CD
QIG
Bracket
Ethernet Cable
Power Adapter
Anchors
and Screws
Account Card
IP Cam Installation
Wireless Setting of IP Cam
Night mode control
Step
Please search the software name “mcamview” on the App Store for iPhone/iPad or on Android
Market for Android mobiles
Software for iPhone/iPad and Android mbiles
66
EN