HANDY SCANNER Instruction Manual
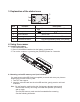
Manual 1. Key features Color JPG/PDF scan selection 900/600/300 dpi scan selection Direct save JPG/PDF file to microSD card Support microSD card up to 32GB Driver free to download for Windows 7 / Vista / XP and Mac OS10.4 or above (direct plug-in, driver installation not required) 2. Functional parts 1 8 2 4 9 10 3 5 11 6 7 Part Function 1 Battery door For 2x AA alkaline batteries 2 Power/Scan Power On/ Off: Press and hold this key for 2 seconds to turn power on or off.
. Explanation of the status icons EFFECT 1 JPG 2 RESOLUTION Item 1 PDF FULL 3 4 HI MI LO 5 Description Function SD card indicator Photos will be stored in m icro SD card 2 Battery indicator Battery is full 3 Effect indicator JPG or PDF Empty battery 4 Counting indicator Show scanned files in micro SD card 5 Selected resolution High(900dpi)/Middle(600dpi/)Low(300dpi) 4. Using the scanner 4.1 Installing the battery 1. Open the battery door. 2.
.3 Time setting 1. Press [TIME SET] to enter time setting mode 2. In the LCD, it shows 1 XX, and press (JPG/PDF & DPI) buttons for up & down number selection 3. Press ( SCAN ) button to confirm setting 4. In the LCD, it jumps to next setting mode as below sequence 1 XX year setting 2 XX month setting 3 XX date setting 4 XX hour setting 5 XX minute setting 5. After all the information has been set, press ( TIME SET ) button again to exit 4.4 Formatting the microSD memory card 1.
. LED light indications “GREEN” SCAN LED ON “GREEN” SCAN LED OFF Scan in progress. Standby/Scan is complete. “RED” ERROR LED ON Scanning too fast. May cause scanning error. Restart and scan again. “RED” ERROR LED OFF No error in scanning speed. Continue scanning process. 6. Connect to computer You may also connect your scanner to your computer and view pictures on the computer monitor . Computer USB 7.
File format 21cm (8.27”) High resolution:35” Middle resolution:45” Low resolution:98” JPEG(default)/PDF LCD Auto Power Off USB Port External memory Scanning status display 3 Minutes USB 2.0 high speed microSD Card Standard Battery 2XAA alkaline batteries Scan width Scan length 8. Computer system minimum requirement Operating system Windows 7 / Vista / XP and Mac OS 10.4 or above (direct plug-in, driver installation not required) CPU Pentium II or above RAM 64MB Interface USB port 9.
Bedienungsanleitung 1.Eigenschaften - Farbauswahl - Auflösung 900/600/300 - Direktes Speichern als JPG/PDF-Datei auf eine Mikro-SD-Karte - Unterstützt Mikro-SD-Karten bis zu 32GB - Kostenloser Software-Download für Windows 7 / Vista / XP und Mac OS 10.4 oder höher (direkt einstecken, Treiberinstallation nicht erforderlich) 2.
3. Erläuterung der Statussymbole EFFECT 1 JPG FULL 2 RESOLUTION Element 1 PDF 4 HI MI LO 5 Beschreibung Funktion Anzeige SD-Karte 3 Fotos werden auf der Mikro-SD-Karte gespeichert. 2 Batterieanzeige Batterie ist voll 3 Effektanzeige JPG/PDF 4 Zähler Zeigt die Anzahl der gescannten Dateien auf der Mikro-SD-Karte an. 5 Gewählte Auflösung Hoch: 900 DPI Mittel: 600 DPI / Niedrig: 300 DPI Batterie ist leer 4. Betrieb des Scanners 4.1 Einlegen der Batterien 1.
4.3 Zeiteinstellung 1. Drücken Sie [TIME SET], um in den Einstellungsmodus zu gelangen 2. In der LCD zeigt es 1 XX, und drücken Sie (JPG/PDF & DPI) Tasten für up & down um die Zahlen auszuwählen 3. Press (SCAN)-Taste um die Einstellung zu bestätigen 4. In der LCD, springt es zum nächsten Einstellmodus 1 XX Einstellung der Jahreszahl 2 XX Monatseinstellung 3 XX Datumseinstellung 4 XX Stunden einstellen 5 XX Minuten-Einstellung 5.
5. LED-Anzeigen „GRÜNE“ SCAN LED LEUCHTET „GRÜNE“ SCAN LED LEUCHTET NICHT Scan-Vorgang läuft. Standby oder das Scannen ist beendet. „ROTE“ FEHLER-LED LEUCHTET Scannen erfolgt zu schnell. Kann zu Scan-Fehlern führen. Den Scan-Vorgang erneut starten. „ROTE“ FEHLER-LED LEUCHTET NICHT Kein Fehler bei der ScanGeschwindigkeit. Setzen Sie der Scan-Vorgang fort. Der Scan-Vorgang beginnt, wenn gedrückt wird. Zum Beenden des Scan-Vorgangs erneut drücken. 6.
Scanbreite Scanlänge 21cm High resolution:35” Middle resolution:45” Low resolution:98” JPEG/PDF Anzeige des Scanstatus Dateiformat LCD Automatisches Ausschalten USB-Port Externer Speicher Mikro-SD-Karte Standardbatterie 2x AA Alkali-Batterien 3 Minuten USB 2.0 Hochgeschwindigkeit 8. Mindestanforderungen an den Computer Betriebssystem Windows 7 / Vista / XP und Mac OS 10.
Entsorgungshinweise Altbatterie- Rücknahme Altbatterien dürfen nicht in den Hausmüll. Verbraucher sind verpflichtet, Batterien zu einer geeigneten Sammelstelle bei Handel oder Kommune zu bringen. Bitte kleben Sie bei Lithiumbatterien die Pole ab und achten bitte auf völlige Entladung der Batterie. Altbatterien enthalten möglicherweise Schadstoffe oder Schwermetalle, die Umwelt und Gesundheit schaden können.
Manuel 1.Fonctions clé Sélection de numérisation en Couleur Sélection de numérisation 900/600/300 dpi Sauvegarde directe de fichier JPG/PDF vers la carte MicroSD Supporte une carte microSD jusqu'à 32Go Pilote à télécharger gratuitement pour Windows 7 / Vista / XP et Mac OS10.4 ou au-dessus (plug-in direct, installation pilote non requis) 2.
3. Explication des icônes d'état EFFECT 1 JPG 2 RESOLUTION Elément 1 PDF FULL 4 HI MI LO 5 Description Function Indicateur de carte SD 3 Les images seront stockées dans la carte MicroSD 2 Indicateur de pile Piles pleines 3 Indicateur d'effet JPG/PDF 4 Compteur Affiche le nombre de fichiers numérisés dans la carte MicroSD 5 Résolution sélectionnée Haute : 900dpi Middle : 600dpi ou Basse : 300dpi Piles vides 4. Utilisation du scanner 4.1 Installation des piles 1.
4.3 Impostazione del tempo 1. Appuyez sur [TIME SET] pour entrer en mode de réglage 2. Dans le LCD, il affiche 1 XX, et appuyez sur ( JPG/PDF& DPI) pour les boutons haut et bas de sélection numéro 3. Appuyez sur (SCAN) pour confirmer le réglage 4. Dans le LCD, il saute au mode réglage suivant la séquence ci-dessous 1 XX ans fixant 2 XX Réglage du mois 3 XX Date de mise en 4 XX réglage de l'heure 5 XX réglage des minutes 5. Après toutes les informations a été réglée, appuyez sur (TIME SET) pour quitter 4.
5. Indications des voyants LED LED “VERTE” SCANNER ALLUMÉE LED “VERTE” SCANNER ÉTEINTE LED “ROUGE” ERREUR ALLUMÉE LED “ROUGE” ERREUR ÉTEINTE Numérisation en cours. En Veille ou la numérisation est terminée. Numérisation trop rapide. Peut causer une erreur de numérisation. Redémarrer et scanner à nouveau. Pas d'erreur concernant la vitesse de numérisation. Continuer le processus de numérisation.
Largeur de numérisation Longueur de numérisation Format de fichier 21cm (8.27”) Haute résolution:35” Middle résolution:45” Basse résolution:98” JPEG/PDF Mémoire externe Écran affichant l’état de numérisation 3 Minutes USB2.0 grande vitesse Carte MicroSD Pile standard 2 piles alcalines AA LCD Mise hors tension Auto Port USB 8. Configuration minimum requise pour l’ordinateur Système d’exploitation Windows 7 / Vista / XP et Mac OS 10.
Manual 1.Características principales Selección de exploración color Selección de exploración 900/600/300 dpi Guarda directamente los archivos JPG/PDF en una tarjeta MicroSD Soporte de tarjeta microSD hasta 32Gb Descarga sin controladores para Windows 7 / Vista / XP y MacOS 10.4 o superior (conexión directa, no necesita instalar controlador). 2.
3. Explicación de los iconos de estado EFFECT 1 JPG 2 RESOLUTION Objeto 1 PDF FULL 4 HI MI LO 5 Descripción Función Indicador de tarjeta SD 3 Las fotos se guardarán en la tarjeta microSD 2 Indicador de batería Batería llena 3 Indicador de efecto JPG/PDF 4 Contador Muestra los archivos escaneados de la tarjeta MicroSD 5 Resolución seleccionada Alta: 900dpi Middle: 600dpi Baja:300dpi Batería vacía 4. Uso del escáner 4.1 Instalación de las baterías 1. Abra la tapa de baterías 2.
4.3 Impostazione del tempo 1. Premere [TIME SET] per accedere alla modalità di impostazione tempo 2. Sul display LCD, mostra uno XX, e premere (JPG/PDF e DPI) pulsanti per l'up & down di selezione numero 3. Premere (SCAN) per confermare l'impostazione 4. Sul display LCD, si passa alla modalità di impostazione successiva come qui di seguito la sequenza 1 XX anno impostazione 2 XX impostazione del mese 3 XX Data di impostazione 4 XX impostazione delle ore 5 XX impostazione dei minuti 5.
5. Testigos LED LED “VERDE”DE ESCANEO ENCENDIDO LED “VERDE” DE ESCANEO APAGADO LED “ROJO” DE ERROR ENCENDIDO LED “ROJO” DE ERROR APAGADO Escaneo en curso. Espera/Escaneo finalizado. Escaneo demasiado rápido. Puede provocar un error en el escaneo. Reinicie y escanee de nuevo. No hay errores de velocidad de escaneo. Prosiga el proceso de escaneo. el escaneo comenzará cuando se pulse el botón para finalizar el escaneo, pulse el botón 6.
Anchura de escaneo Longitud de escaneo Formato de archivo LCD 8.27” Alta resolución :35” Middle résolution:45” Baja resolució:98” JPEG/PDF Indicación de estado de escaneo 3 Minutos Apagado automático Puerto USB Memoria externa tarjeta microSD Batería estándar 2 baterías AA alcalinas USB2.0 de alta velocidad 8. Requisitos mínimos del sistema informático Sistema operativo Windows 7 / Vista / XP y Mac OS 10.
Manual 1.Características chave Seleção de Cor Seleção de escaneamento 900/600/300 dpi Salvamento direto arquivo JPG/PDF para micro cartão SD Suporta micro cartão SD até 32GB Drive livre para baixar para Windows 7 / Vista / XP e Mac OS10.4 ou acima (plug-in direto, a instalação de driver não requerida) 2.
3. Explicação dos ícones de estado EFFECT 1 JPG 2 RESOLUTION Item 1 PDF FULL 4 HI MI LO 5 Descrição Função Indicador SD 3 As fotos serão armazenadas em micro cartão SD 2 Indicador de Bateria Bateria cheia 3 Indicador efeito JPG/PDF 4 Indicador contagem Exposição arquivos escaneados em micro cartão SD 5 Resolução selecionada Alta: 900dpi Middle : 600dpi Baixa:300dpi Bateria vazia 4. Usando o scanner 4.1 Instalação da bateria 1. Abra a porta da bateria 2.
4.3 Ajuste do tempo 1. Pressione [TIME SET] para entrar no modo de ajuste de tempo 2. No LCD, que mostra uma XX, e prima (JPG/PDF & DPI) botões para cima e para baixo número de seleção 3. Press (SCAN) para confirmar a definição 4. No LCD, ele salta para o modo de configuração que vem como seqüência abaixo 1 XX anos configuração 2 XX meses definição 3 XX configuração de data 4 XX configuração horas 5 XX configuração minutos 5.
5. Indicações Luz de LED “VERDE” LED SCANEAMENTO LIGADO Escaneamento em progresso “VERDE” LED ESCANEAMENTO DESLIGADO Standby/Scaneamento está completo. Escaneamento rápido Pode causar erro de “VERMELHO” LED ERROR LIGADO escaneamento. Reinicie e escaneie de novo. “VERMELHO” LED ERROR DESLIGADO Nenhum error em velocidade de escaneamento. Continue o processo de escaneamento. escaneamento COMEÇARÁ quando o botão para FINALIZAR escaneamento, pressione o botão for pressionado novamente. 6.
8.27” Largura Escaneamento Comprimento Escaneamento Alta resolução :35”Middle resolução:45” Resolução Baixa:98” JPEG/PDF Formato arquivo Exibição estado escaneamento LCD 3 Minutos Auto Desliga USB2.0 alta velocidade Porta USB Memória Externa Micro cartão SD Bateria padrão 2xAA baterias alcalinas 8. Requisitos Mínimos Sistema de Computador Sistema Operacional Windows 7 / Vista / XP e Mac OS 10.4 ou superior (plug-in direto, instalação driver não exigida).
Manuale 1.Caratteristiche principali Scelta tra scansione a colori Scelta tra scansione a 900 600 o 300 dpi Salvataggio diretto dei file JPG/PDF su micro scheda SD Supporto micro scheda SD fino a 32GB Driver scaricabile gratuitamente per Windows 7 / Vista / XP e Mac OS10.4 o superiori (plug-in diretto, installazione del driver non necessaria) 2.
3. Descrizione delle icone EFFECT 1 JPG RESOLUTION 1 3 4 2 Icona PDF FULL HI MI LO 5 Funzione Descrizione Indicatore scheda SD Le foto vengono salvate su micro schedaSD 2 Indicatore batteria Batteria carica 3 Indicatore effetti JPG/PDF 4 Contatore Mostra il numero di file scansiti contenuti nella micro acheda SD 5 Indicatore risoluzione (High): 900dpi (Middle): 600dpi (Low): 300dpi Batteria scarica 4. Utilizzo dello scanner 4.1 Installazione delle pile 1. Aprire lo sportellino.
4.3 Impostazione del tempo 1. Premere [TIME SET] per accedere alla modalità di impostazione tempo 2. Sul display LCD, mostra uno XX, e premere (JPG/PDF e DPI) pulsanti per l'up & down di selezione numero 3. Premere (SCAN) per confermare l'impostazione 4. Sul display LCD, si passa alla modalità di impostazione successiva come qui di seguito la sequenza 1 XX anno impostazione 2 XX impostazione del mese 3 XX Data di impostazione 4 XX impostazione delle ore 5 XX impostazione dei minuti 5.
5. Indicatori luminosi Scansione in corso. Standby/Scansione completata. Spia di scansione“VERDE” accesa Spia di scansione“VERDE spenta Spia di errore“”ROSSA” accesa Spia di errore“”ROSSA” spenta Scansione troppo veloce. Potrebbe causare un errore di scansione. Rifare la scansione. Nessun errore di velocità. Continuarecon la scansione. la scansione INIZIA quando si preme il tasto per TERMINARE la scansione, premere il tasto 6.
Ampiezza scansione Lunghezza scansione Formato file LCD Auto-spegnimento Porta USB Memoria esterna Batteria standard 8,27 pollici Alta risoluzione :35” Middle risoluzione:45” Bassa risoluzione:98” JPEG/PDF Mostra lo stato della scansione 3 minuti USB 2.0 alta velocità Micro scheda SD 2 pile alcaline AA 8. Computer: requisiti minimi di sistema Sistema operativo Windows 7 / Vista / XP e Mac OS 10.
Gebruiksaanwijzing 1.Functies Selectie voor scannen en kleur Selectie voor scannen met 900/600/300 dpi Direct opslaan van JPG/PDF-bestanden in de micro SD geheugenkaart Ondersteunde micro SD kaart tot 32 GB Kostenloze download van besturingen voor Windows 7 / Vista / XP en 2. Componenten 1 8 2 4 9 10 3 5 11 6 7 3 4 Functie Voor 2 x AA alkaline batterijen Apparaat in/uitschakelen: Deze toets 2 seconden gedrukt houden om de scanner in of uit te schakelen.
3. Statusindicaties EFFECT 1 JPG 2 RESOLUTION Nummer 1 PDF FULL 4 HI MI LO 5 Beschrijving Functie SD-kaartindicatie 3 Scan-bestanden worden op de micro SD-kaart opgeslagen 2 Batterij-indicatie Batterijen vol 3 Modus-indicatie JPG/PDF 4 Teller Geeft het aantal opgeslagen bestanden op de micro SD-kaart aan 5 Geselecteerde resolutie HI (900 dpi) MI (600 dpi) LO (300 dpi) Batterijen leeg 4. Scanner gebruiken 4.1 Batterijen inleggen 1. Batterijafdekking afnemen. 2.
4.3 Datum en klok instellen 1. Op de toets voor de tijdinstelling drukken om de instelmodus te openen. 2. In het LCD-venster verschijnt 1 XX. Met de toetsen JPG/PDF en DPI de betreffende waarde selecteren. 3. De toets drukken, om de instelling te bevestigen 4. Het LCD-venster geeft de parameters in de volgende volgorde weer: 1 XX Jaar 2 XX Maand 3 XX Dag 4 XX Uur 5 XX Minuut 5. Wanneer alle gegevens ingesteld zijn, drukt u opnieuw de toets voor de tijdinstelling om de modus te verlaten. 4.
5. LED-indicaties Groene LED SCAN aan Groene LED SCAN uit Er wordt gescand. Standby, scanproces beëindigd Rode LED ERR. aan Scanproces te snel. Foutieve scan mogelijk. Opnieuw starten en opnieuw scannen. Rode LED ERR. uit Scansnelheid correct. Scanproces voortzetten. Scanproces begint, wanneer u op de toets drukt Om het scannen te beëindigen, drukt u opnieuw op de toets 6.
21 cm Hoge resolutie:35”Middle resolutie:45” Geringe resolutie:98” JPEG/PDF Statusindicatie voor het scannen 3 minuten USB 2.0 High Speed Scanbreedte Scanlengte Bestandsformaat LCD Autom. uitschakelen USB-aansluiting Extern geheugenmedium micro SD-kaart Batterijen 2 x AA alkaline batterijen 8. Minimum systeemeisen Bedrijfssysteem Windows 7 / Vista / XP en Mac OS 10.
AM-N410-GDFEPI-CLV-R