User Manual Setup and Adjustment
Easyrig 3 with Gimbal Rig Specifications Model of Easyrig 1/4 in. screw-holder Suspension line Camera hook Serial no. Side support adjustment Support arm Adjustment knobs Weight complete with Gimbal vest adjustable arm +130................... 4,1 kg (9 Ibs) Height (mounted).................................................................. 90–100 cm (35–39 in) Height (folded)....................................................................................
Congratulations on your new Easyrig 3 gimbal rig! The Easyrig 3 gimbal rig is patended and specially designed by a photographer for professional photographers. Easyrig 3 gimbal rig is manufactured in Sweden and has been ergonomically tested with optimal results. The Easyrig 3 gimbal rig gives you the same advantages as our other Easyrig models with the added benefit of being able to adjust the line tension to adapt to many different cameras and configurations.
Using the Easyrig 3 gimbal rig It´s easy to get into the Easyrig 3 gimbal rig vest, just as with a backpack. Your Easyrig 3 gimbal rig is loaded with adjustments for your customized comfort. When the vest is adjusted properly you should feel the weight of the camera primarily on your hips. It is also important that the support bar is vertical. If not, the load will be unevenly distributed on the hips causing the camera to possibly contact the bar.
1 Getting started with the Easyrig 3 gimbal rig Fig. 1 Unlatch the buckle and unfold the support arm. 2 3 4 Fig. 2 Let the tube attatched to the support arm slide into the lower tube section and pull over the bellows. Fig. 3 Put on your Easyrig 3 gimbal rig. Adjust the hip belt until you find the rig comfortable. Pull the belt tightly. Fig. 4 Attatch your camera to the Easyrig. Use your middle finger to open the hook. Secure the hook by turning the knob clockwise. Fasten the safety line.
5 6 7 6 Fig. 5 If adjustment is needed, loosen the knobs and move the hip and back support to find the right position. Fig. 6 By adjusting the side supports you will move the weight on your hips. Fig. 7 Adjust the chest strap if necessary, but don’t pull it too tight. Your Easyrig 3 gimbal rig is now ready to be used.
kg camera weight at +20°c 68 10 12 14 16 18 20 22 kg 300 N 400 N 500 N 600 N 700 N 850 N lbsl 13 17 22 26 30 35 camera weight at 68°f 40 44 48 bs Serial No 7
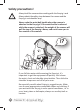
Safety precautions! Always hold the camera when working with the Easyrig 3 and Always attach the safety strap between the camera and the Easyrig 3 vest shoulder loop. Never undo the waist belt buckle when the camera is attached to the Easyrig 3! If the waist buckle is released while the camera is attached, the weight of the camera will pull the top of the Easyrig 3 down, and could cause you to lose control of the camera.
Some practical advice • Try to keep the camera as close to your body as possible, to avoid unnecessary strain on your back. • When filming upwards, you might find it easier if you have the camera tucked under your arm. • When filming at hip level during longer periods of time, rest the camera on the hip belt to increase stability. • Use the Easyrig 3 for transporting your camera to and from the filming site.
Easyrig 3 gimbal rig limited Warranty Manufacturer’s products are warranted to be free from defects caused by faulty materials or workmanship for a period of two years from the date of purchase. The liability of the Manufacturer under this warranty is limited to repairing, replacing, or at its option issuing credit for any of its products which are returned by purchaser during such period provided, however, that: A.