Part #12746 TIG 200 AC/DC WELDER ASSEMBLY & OPERATING INstructions
TIG Welding is the most controllable, efficient and most versatile method of welding many metals including steel, stainless steel, aluminum and more. Your Eastwood TIG200 Welder with High-Frequency Inverter Technology is capable of welding thin or heavy gauge steel and aluminum with precision and ease.
Safety Information Flammability Hazard • Before beginning, make sure the work surface is cleaned of any oils, coatings or other materials which can ignite and or emit dangerous fumes or vapors. • Molten metal can be ejected away from the welding area with significant force and speed. Make sure the entire work area is clear from flammable or easily damaged materials or objects.
Required Items Before you begin using the Eastwood TIG Welding System, make sure you have the following: • Our TIG200 is supplied with the popular NEMA 50P plug, requiring a NEMA 50 receptacle. If a 220-240 VAC, 30 Amp outlet is used a UL listed 30 Amp plug may be installed by a licensed and qualified electrician. • The TIG200 will also operate on a 110-120 VAC 20 Amp circuit. To operate on this voltage it is necessary to connect the included adaptor cord to the plug hard wired to the TIG200.
COMPONENTS AND CONTROLS 1. Power Switch – The Power Switch also serves as the overload Circuit Breaker and is located at the right of the rear panel (Fig. C). 2. Amperage (Front Panel) – Set the Output Amperage Knob marked “A” (Fig. A) located at upper left of the top panel to an appropriate setting based on the thickness and type of the metal being welded. (Refer to Data Chart for actual settings). 3.
sETUP FIG. E SHIELDING GAS CONNECTION A Shielding Gas Bottle is not included with your Eastwood TIG200 but is necessary while TIG welding. A Shielding Gas Bottle can be bought at most local Welding Supply Stores. Eastwood recommends the use of 100% Argon shielding gas when TIG welding Steel, Aluminum, and Stainless Steel. 1. Place the Eastwood TIG200 in its dedicated area or on a welding cart. 2.
PREPARING TO WELD Tungsten FIG. H Torch Disassembly/Assembly DISASSEMBLY: Collet Gas Nozzle Back Cap ✑✒✓✔ ✑✒✓✔ Collet Body ✑✒✓✔ ASSEMBLY: ✑✒✓✔ 1. Make sure the welder is turned off and unplugged. 2. Remove the back cap from the torch. 3. If there is a tungsten installed in the torch pull it out of the front of the torch 4. Slide the collet out of the torch. 5. Unscrew and remove the gas nozzle. 6. Unscrew and remove the collet body. 1.
SETTINGS SELECTION With the materials selected of which you will be welding you can begin to set up the welder for the specific material. 1. AC/DC – The type of current will need to be selected depending on the type of material being welded. For the most part when welding steels the switch will be set to DC and when welding aluminum the switch will be set to AC. 2. Clearance Effect – This step can be omitted if welding in DC. If welding in AC this will need to be set.
WELDING FIG. J IMPORTANT NOTE: These instructions are intended only to provide the user with some familiarity of the Eastwood TIG200. TIG welding is a highly complex procedure with many variables.
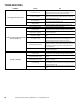
Problem Problem TROUBLESHOOTING Problem Arc is triggered but will not start Cause Incomplete CauseCircuit Incomplete CauseCircuit Incorrect Tungsten Arc is triggered but will not start Incomplete Circuit Incorrect Tungsten No shielding gas Arc is triggered but will not start Incorrect ungsten Wrong PTolarity No shielding gas Wrong Polarity No shielding gas Wrong Polarity Poorly prepped
TROUBLESHOOTING To order parts and supplies: 800.345.1178 >> eastwood.
ACCESSORIES TIG WIRE & TUNGSTEN: • • • • • • • • • • #12253 – ER70S-2 Steel TIG Wire 1/16-36” #12254 – ER70S-2 Steel TIG Wire 3/32-36” #12375 – 4043 Aluminum TIG Wire 1/16-36” #12376 – 4043 Aluminum TIG Wire 3/32-36” #12463 – 308L Stainless TIG Wire 1/16-36” #12464 – 308L Stainless TIG Wire 3/32-36” #12869 – Pure Tungsten (Green) 1/16-7” 2pc #12870 – Pure Tungsten (Green) 3/32-7” 2pc #12871 – Thoriated Tungsten (Red) 1/16-7” 2pc #12872 – Thoriated Tungsten (Red) 3/32-7” 2pc Replacement Items: • • • • • •