
Owner`s manual


25
Display Interface Menus
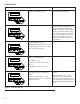
The LCD display is organized as detailed below:
• The “Home” page is the default page that will be displayed if no keys are pressed for fi ve (5) minutes. This page normally shows the current
Status message and the current date and time. The highest priority active Alarm and/or Warning will be automatically posted on this page as well,
and the backlight will fl ash when such an event is detected. In the case of multiple Alarms or Warnings, only the fi rst message will be displayed. To
clear an Alarm or Warning, press the OFF button and then press the ENTER key.
• The display backlight is normally off. If the user presses any key, the backlight will come on automatically and remain on for 30 seconds after the
last key was pressed.
• The “Main Menu” page will allow the user to navigate to all other pages or sub-menus by using the Up/Down and Enter keys. This page can
be accessed at any time with several presses of the Escape key. Each press of the Escape key takes you back to the previous menu until the
main menu is reached. This page displays the following options: HISTORY, STATUS, EDIT AND DEBUG. (See the Menu System Diagram in the
Owner’s Manual).)
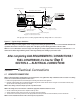
7.2 GENERATOR ACTIVATION
When battery power is applied to the generator during the installation process, the controller will light up. However, the generator still needs to be
activated before it will automatically run in the event of a power outage.
Activating the generator is a simple, one-time process that is guided by the controller screen prompts. Once the product is activated, the
controller screen will not prompt you to activate again, even if you disconnect the generator battery.
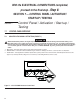
After obtaining your activation code, please complete the following steps at the generator’s control panel in the Activation Chart.
Upon fi rst power up of the generator, the display interface will begin an installation wizard. The installation wizard will prompt the user to set the
minimum settings to operate the generator. These settings are: Current Date/Time and Exercise Day/Time. The maintenance intervals will be
initialized when the exercise time is entered.
The exercise settings can be changed at any time via the “EDIT” menu.
If the 12 volt battery is disconnected or the fuse removed, the installation wizard will operate upon power restoration. The only difference is the
display will only prompt the customer for the current Time and Date.
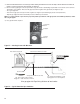
7.2.1 SETTING THE EXERCISE TIMER
This generator is equipped with an exercise timer. Once it is set, the generator will start and exercise every seven days, on the day of the week and
at the time of day specifi ed. During this exercise period, the unit runs for approximately 12 minutes and then shuts down. Transfer of loads to the
generator output does not occur during the exercise cycle unless utility power is lost.
IF THE INSTALLER TESTS THE GENERATOR PRIOR TO INSTALLATION, PRESS THE “ENTER” BUTTON TO SKIP SETTING UP THE
EXERCISE TIMER
.
17 and 20kW units can run at 2,400 rpm while exercising. While providing the necessary periodic exercise operation, the lower rpm also reduces fuel
consumption, engine wear and noise.
NOTE: The exerciser will operate only when the generator is placed in the AUTO mode and will not work unless this procedure is per-
formed. The current date/time will need to be reset every time the 12 volt battery is disconnected and then reconnected, and/or when the
fuse is removed.
7.3 BEFORE INITIAL START-UP
NOTE: These units have been run and tested at the factory prior to being shipped and do not require any type of break-in.
Never operate the engine with the oil level below the “Add” mark on the dipstick. Doing this could damage the engine.
NOTE: This unit comes filled with 30 weight organic oil from the factory. Check the oil level and add the appropriate viscosity and amount
if necessary.