
Full Product Manual
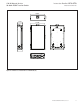

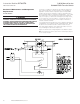

18
Instruction Booklet IB 70-8778
Effective November 2011
O & M Manual for the
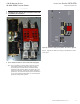
50-400A EGSX Transfer Switch
EATON CORPORATION www.eaton.com
For Catalog # EGSX200A Only
When protected by one of the following circuit breakers rated not
more than 400 amperes, this transfer switch is rated for use on a
circuit capable of delivering not more than 25,000 RMS symmetrical
amperes, 240 volts maximum, but not more than the interrupting
capacity of the selected circuit breaker.
•
Eaton
DK KD KDB HKD JDC KDC
LCL LA JDB JD HJD CSR
BW BWH FD FDC
•
Siemens
FD6-A FXD6-A HFD6 CFD6
•
Square D
KI LE LX LXI
•
GE
SF SFL SFP
When protected by circuit breakers without adjustable short-time
response only or by fuses this transfer switch is rated for use on a
circuit capable of delivering not more than 10,000 RMS symmetrical
amperes at 240 VAC.
•
MANUFACTURER-ANY
•
BREAKER-ANY
•
TYPE-ANY
•
AMPS MAX-PER NEC
For Catalog #EGSX200NSEA and EGSX150NSEA Only
This switch is equipped with integral over-current protection.
Continuous load current not to exceed 80 percent of switch rating.
This Transfer Switch is rated for use on a circuit capable of delivering
not more than 25,000 rms symmetrical amperes, 240 volts maxi-
mum.
For Catalog #EGSX400NSEA and EGSX400NSE Only
This switch is equipped with integral over-current protection.
Continuous load current not to exceed 80 percent of switch rating.
This Transfer Switch is rated for use on a circuit capable of delivering
not more than 35,000 rms symmetrical amperes, 240 volts maxi-
mum.
Section 5: Functional Testing
WARNING
YOU ARE READY TO ENERGIZE THE EQUIPMENT. VOLTAGES WITHIN THE
ENCLOSURE ARE CAPABLE OF CAUSING SEVERE PERSONAL INJURY OR
DEATH. USE EXTREME CAUTION TO AVOID CONTACT WITH ENERGIZED
EQUIPMENT.
5.1 Preliminary Checks
Step 1: Check all loads connected to the TS to ensure that
they are ready to be energized.
5.2 Energize the Switch
Step 1: Using a voltmeter, measure the line-to-line and the
line-to-neutral voltages across the utility line termi-
nals to ensure the utility voltage is correct.
Step 2: Close the upstream utility power source breaker or
switch to connect the TS to the utility power source
voltage.
Step 3: If the TS unit is not already in the UTILITY posi-
tion, and the voltage is acceptable, the solenoid will
engage and the contactor will automatically switch
to the UTILITY position.
WARNING
CONTACT WITH ENERGIZED COMPONENTS WILL CAUSE ELECTRICAL
SHOCK CAPABLE OF PRODUCING SEVERE PERSONAL INJURY OR
DEATH. USE EXTREME CAUTION TO AVOID CONTACT WITH ENERGIZED
COMPONENTS WHEN USING A METER FOR VOLTAGE CHECKS.
Step 4: Position the generator control selector switch, locat-
ed on the standby generator, to the OFF position.
5.3 Operational Checks
Step 1: Open the upstream utility breaker originally closed in step 2
of section 5.2
Step 2: Open the generator breaker
Step 3: Place the generator in the Manual position and allow it to
start.
Step 4: Verify Line to Line and Line to Neutral voltages to ensure
that the generator output is correct. If necessary, make
adjustments to the voltage regulator on the generator
according to the manufacturer’s recommendations to correct
any voltage deviations.
Step 5: Place the generator in the OFF position
Step 6: Close the generator breaker