
User`s guide
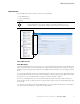
Table Of Contents
- Eaton Advanced Enclosure Power Distribution Unit (ePDU) User’s Guide
- Table of Contents
- Chapter 1 Introduction
- Chapter 2 Safety Warnings
- Chapter 3 Installation
- Chapter 4 Network Communication Configuration
- Chapter 5 Operation Overview
- Three-Phase Configurations
- Outlet Groups Management
- Menu and Status Display
- Operation Mode DIP Switches
- Restarting the Network Management Card
- LED Status Indicators
- Operation Concepts
- Common Operation Tasks
- Download/Upload the Network Management Card File Configuration
- Download/Upload the ePDU File Configuration
- Clear ePDU and Event Log
- Refresh the Data Display
- SNMP Agent Overview
- Actions on Individual Outlets and Groups of Outlets
- Restart the Network Management Card
- Restore the Default Factory Settings of the Network Management Card
- Settings
- Starting the ePDU
- Shutting Down the ePDU
- Chapter 6 LCD Operation
- Chapter 7 Web Interface Operation
- Chapter 8 Serial Interface Operation
- Chapter 9 Maintenance and Troubleshooting
- Chapter 10 Specifications
- Chapter 11 Service and Support

Web Interface Operation
Eaton Advanced ePDU User’s Guide P-164000042—Rev 2 www.eaton.com/ePDU 85
Review/Modify ePDU Groups
1. Access the Web interface and log in.
2. Under Power Management, select ePDU Groups. The ePDU Groups page displays.
3. Review basic monitoring information for Factory Groups and user-defined groups.
4. To apply an operative action to all outlets in a selected group, select one of the following values from the
drop-down list adjacent to the group, then click Save.
l
On: Turn on the selected group of outlets.
l
Off: Turn off the selected group of outlets.
l
Reboot: Reboot the selected group of outlets.
5. To modify ePDU threshold values for a specified group, click the Settings button adjacent to the group.
The Group Settings dialog displays.
6. Administrator or User with Read/Write/Control only. To specify the duration outlets in this group will
be Off before switching On during a reboot, type the number of seconds the outlets should be Off in the
Power Reboot Period text box. Click Save.
7. To enter new threshold values, type new values in any of the text boxes that follow, then click Save:
l
Low current warning threshold
l
High current warning threshold
l
High critical current threshold
8. To reset the threshold values to the default values, click Default, then click Save.
9. To reset a kilowatt hour (kWh) counter to zero, click Reset kWh, then click Save.
ePDU Outlets
Review/Modify ePDU Outlets
1. Access the Web interface and log in.
2. Under Power Management, select ePDU Outlets. The ePDU Outlets page displays.
3. Review basic monitoring information for individual outlets.
4. To apply an operative action for a selected outlet, select one of the following values from the drop-down
list adjacent to the outlet, then click Save.
l
On: Turn on the outlet.
l
Off: Turn off the outlet.
l
Reboot: Reboot the outlet.
NOTE 1 If you enter a value less than five seconds, some traps #33 (Outlet State change)
may be lost.
NOTE 2 This setting overwrites the Power Reboot Period defined for individual outlets on the
Outlet Settings dialog.
NOTE 1 You can change the state of an outlet (On, Off, or Reboot) through the Web interface
for Managed and Switched ePDUs only. You cannot change the state of an outlet
through the Web interface for Advanced Monitored ePDUs.