
User`s guide
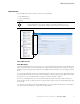
Table Of Contents
- Eaton Advanced Enclosure Power Distribution Unit (ePDU) User’s Guide
- Table of Contents
- Chapter 1 Introduction
- Chapter 2 Safety Warnings
- Chapter 3 Installation
- Chapter 4 Network Communication Configuration
- Chapter 5 Operation Overview
- Three-Phase Configurations
- Outlet Groups Management
- Menu and Status Display
- Operation Mode DIP Switches
- Restarting the Network Management Card
- LED Status Indicators
- Operation Concepts
- Common Operation Tasks
- Download/Upload the Network Management Card File Configuration
- Download/Upload the ePDU File Configuration
- Clear ePDU and Event Log
- Refresh the Data Display
- SNMP Agent Overview
- Actions on Individual Outlets and Groups of Outlets
- Restart the Network Management Card
- Restore the Default Factory Settings of the Network Management Card
- Settings
- Starting the ePDU
- Shutting Down the ePDU
- Chapter 6 LCD Operation
- Chapter 7 Web Interface Operation
- Chapter 8 Serial Interface Operation
- Chapter 9 Maintenance and Troubleshooting
- Chapter 10 Specifications
- Chapter 11 Service and Support

Web Interface Operation
Eaton Advanced ePDU User’s Guide P-164000042—Rev 2 www.eaton.com/ePDU 88
4. Review the alarm detection date/time and the alarm description.
Logs
Clear the Event Log
1. Access the Web interface and log in.
2. Under Logs & Notifications, select Logs. The Logs page displays.
3. Click Clear.
Download the Event Log as a Comma Separated Value File
1. Access the Web interface and log in.
2. Under Logs & Notifications, select Logs. The Logs page displays.
3. From the Save to File drop-down list, choose the range of data to saved as a Microsoft Excel Comma
Separated Value (CSV) file:
l
ALL: saves all events that are shown in the window.
l
SYSTEM: saves only the system-related events.
l
PDU: saves only the ePDU-related events.
4. Click Save to File. The File Download dialog displays.
5. Click Save. The Save As window displays.
6. From the Save in drop-down list, specify where the file should be downloaded.
7. Either accept the default file name (logevent.csv) or enter a new file name.
8. Click Save.
Email Notification
Configure the Email Receivers
1. Access the Web interface and log in.
2. Under Logs & Notifications, select Email Notification. The Email Notification page displays.
3. Select the e-mail receiver to configure from the combo box.
4. Type the e-mail receiver address, such as e-mail1@Recipient.com.
5. Type the descriptive text to identify the e-mail receiver.
6. Enable the e-mail receiver from the combo box.
NOTE The term “active alarms” indicates that the alarm is currently set. When an alarm
disappears, it is removed from this page. Note that this page is not automatically
refreshed.
NOTE A collated user cannot clear event logs. Only a non-collated user or an administrator
can clear the log.
NOTE If the e-mail receiver is a collocated user, the user can only change the e-mail
configuration if they have at least Read/Write privileges.