
Installation guide


Installing the Ergonomic Workstation
Attach Lower Frame
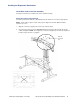
Follow these instructions and refer to the illustration below to attach the workstation support frame to
the assembled components. It is very important to perform these instructions in the sequential order
noted here; otherwise, failure to do so may result in personal injury or product damage.
CAUTION: To prevent personal injury and product damage, two or more people are required to
perform the following procedure.
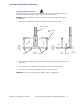
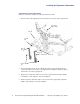
1. From the sides of the lift column, remove the two pre-installed Phillips screws (96983) as shown in
illustration below.
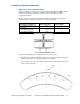
2. On the middle front of the lift column, loosen the center pre-installed Phillips screw (96983) by
approximately 0.125 inch.
IMPORTANT: Do not tighten any screws until the frame is level and aligned!
Ste
p
Step
Ste
p
Step
(2x)
Ste
p
Step
(2x)
Step
(2x)
Step
(2x)
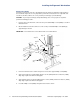
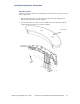
3. Hook the lower frame to the column using the loosened center support Phillips screw (96983).
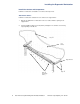
4. At the left leg support, insert two Phillips machine screws (97409) and two lock washers (18950).
Align edges square to the DL6 mounting plate.
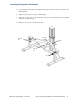
5. At the right leg support, insert two Phillips machine screws (97409) and two lock washers (18950).
Align edges square to the DL6 mounting plate.
6. Insert two Phillips screws (96983) through the frame into the column.
17 Eaton Profile Genesys Dual-Lift Ergonomic Workstation Installation wwww.eaton.com/powerquality 11-41 06-2011