
Specifications


EAW Smaart 6 Operation Manual Analysis Modes and Display Types
60
3. Click the Options/Units button above the Signal Level/SPL Readout again and
set the Weight and Speed settings for the readout to match those on the reference
SLM. Slow time integration (Speed) will make the steps that follow easier.
4. Click OK to set the change and exit the dialog.
5. Place your measurement microphone and SLM very close together at the same
distance from a loudspeaker then send a steady-state signal (e.g., sine wave or
pink noise) through the speaker.
6. Run Smaart and the SLM and note the SPL readings on both.
7. Subtract the Smaart reading from the SLM reading, then add 1 to the difference.
This is the new calibration offset.
8. Open the Amplitude Calibration dialog again (see Step 1) and enter the new
calibration offset found in step 7.
9. Run Smaart and the Reference SLM again and check the SPL readings. They
should now match each other very closely. If necessary, make additional
adjustments to the Calibration Offset value to make them even closer.
3.5 Capturing and Loading Measurement Data
It is possible to a capture and load static snapshots, called Reference Traces, of the live
traces in Spectrum and Frequency Response modes. We recommend storing these in a
folder specific to each project.
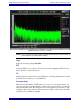
3.5.1 Capturing a Reference Trace
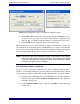
Click the Capture button at the top of the graph (or press the Spacebar). A modified Save
file dialog appears with a generic File Name and Description line filled in automatically.
The default description is highlighted so typing your text immediately replaces it. Also
note that the file name automatically changes to match your description as you type.
The dialog’s OK button is also selected by default so pressing the Enter key when
finished typing your description saves the file and displays your captured trace.
NOTE: If you are in n a rush, accept the default comment/file name by pressing the
Enter key immediately when the dialog opens.
To use a file name that does not match the trace description, highlight the File Name
field and type a new name. The matching function works in one direction and only
when the file name and description are already identical.