
Specifications


Page 31 of 89
4.3 Assigning Physical Arrays/Modules to Modeled Arrays/Modules
**EAW’s recommended best practice for Adaptive systems is to create your venue in
the Design View and determine the optimum arrays needed to provide the coverage
you will need prior to assembling, flying, energizing and connecting to the system. This
will ensure you know how the Arrays will need to be configured.
However, this is not required and you can simply fly the arrays and connect Resolution
2 to your system with a blank Venue loaded if needed. Note that the Adaptive
Performance processing for Adaptive Systems will be calculated for any venue surfaces
(or areas of coverage) in the model.
It is best to at least enter a simple representation of the area you intend the Adaptive
System to cover. Adding arrays in the appropriate positions prior to going online will
speed connection time allowing you to upload settings as soon as you associate a
modeled Array with its physical Array.
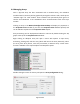
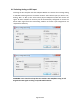
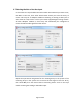
If you have not defined any Arrays in your Venue, then you can simply click on each
Array in the Online Devices list and drag them over to the Network Configuration
desktop. This will open the Array Assistant dialog. Once you enter the settings and
click finish, Resolution 2 will create an icon with the name of the Array, the list of
arrayed modules in each Column in the Array, an Array Mute button, Input Level and
Gain Reduction meters.
You can edit the X,Y,Z physical location, Min Trim, Max Hang and Aim Angle in the
Properties pane while that Array is selected.
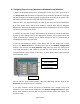
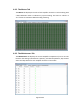
If you have created a venue and arrays in Resolution, then “virtual” Arrays and
Modules in your model will be displayed in the Network Configuration View as grey
boxes. Each module in the array will have a small indicator square that reports each
module’s status.
Array Mute
Array Name
Adaptive Module
Module Status Indicator
Module Status