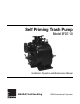
Self Priming Trash Pump Model EFQT-10 Installation, Operation and Maintenance Manual Ebara Fluid Handling Ebara International Corporation
TABLE OF CONTENTS INTRODUCTION........................................................................................... Pg. 03 WARNING – SECTION A ............................................................................ Pg. 04 INSTALLATION – SECTION B.................................................................... Pg. 05 Pump Dimensions...................................................................... PREINSTALLATION INSPECTION.................................................
TABLE OF CONTENTS (Continued) TROUBLESHOOTING – SECTION D ………………………............ Pg. 18 PUMP MAINTENANCE AND REPAIR – SECTION E……….......... Pg. 21 PERFORMANCE CURVE……………………………………….......... Pump Model ………………………………………………….......... PARTS LISTS................................................................................. Repair Rotating Assembly…………………………………........... PARTS LISTS.................................................................................
INTRODUCTION This Installation, Operation, and Maintenance manual is designed to help you get the best performance and longest life from your EBARA pump. The pump is designed for handling mild industrial corrosives, mud or slurries containing large entrained solids. The basic material of construction is gray iron, with ductile iron impeller and steel wearing parts. This pump is a EFQT Series, semi-open impeller, self-priming centrifugal model with a suction check valve.
SAFETY – SECTION A These warnings apply to EFQT series basic pumps. EBARA has no control over or particular knowledge of the power source which will be used. Refer to the manual accompanying the power source before attempting to begin operation. WARNING! After the pump has been positioned, make certain that the pump and all piping connections are tight, properly supported and secure before operation.
INSTALLATION – SECTION B Review all SAFETY information in Section A. Since pump installations are seldom identical, this section offers only general recommendations and practices required to inspect, position and arrange the pump and piping. Most of the information pertains to a standard static lift application where the pump is positioned above the level of liquid to be pumped.
PREINSTALLATION INSPECTION POSITIONING PUMP The pump assembly was inspected and tested before shipment from the factory. Before installation, inspect the pump for damage which may have occurred during shipment. Check as follows: Lifting a. Inspect the pump for cracks, dents, damaged threads, and other obvious damage. b. Check for and tighten loose attaching fasteners. Since gaskets tend to shrink after drying, check for loose hardware at mating surfaces. c.
If hose is used in suction lines, it must be the rigid-wall, reinforced type to prevent collapse under suction. Using piping couplings in suction lines is not recommended. Line Configuration Keep suction and discharge lines as straight as possible to minimize friction losses. Make minimum use of elbows and fittings, which substantially increase friction loss. If elbows are necessary, use the long radius type to minimize friction loss.
If it is necessary to position inflow close to the suction inlet, install a baffle between the inflow and the in suction lines, it must be the rigid-wall, reinforced type to prevent collapse under suction. Using piping couplings in suction lines is not recommended. Suction inlet at a distance 1 ½ times the diameter of the suction pipe. The baffle will allow entrained air to escape from the liquid before it is drawn into the suction inlet.
CAUTION! If the application involves a high discharge head, gradually close the discharge throttling valve before stopping the pump. Bypass Lines Self-priming pumps are not air compressors. During the priming cycle, air from the suction line must be vented to atmosphere on the discharge side.
AUTOMATIC AIR RELEASE VALVE When properly installed and correctly adjusted to the specific hydraulic operating conditions of the application, the EBARA Automatic Air Release Valve will permit air to escape through the bypass line, and then close automatically when the pump is fully primed and pumping at full capacity. Theory of Operation Figures 3 and 4 show a cross-sectional view of the Automatic Air Release Valve, and a corresponding description of operation.
INSTALL AIR RELEASE VALVE IN HORIZONTAL POSITION 90 LONG RADIUS ELBOW ° BLEED LINE 1" (25,4MM) DIA. MIN. (CUSTOMER FURNISHED) EXTEND 6" (152,4MM) BELOW LIQUID LEVEL SURFACE DISCHARGE PIPE CLEAN-OUT COVER DISCHARGE PIPE SUPPORT BRACKET SELF-PRINING CENTRIFUGAL PUMP SUCTION LINE DRAIN LINE WET WELL OR SUMP Figure 5. Typical Automatic Air Release Valve Installation The valve inlet must be installed between the pump discharge port and the non-pressurized side of the discharge check valve.
WARNING! When checking alignment, disconnect the power source to ensure that the pump will remain inoperative. CAUTION! Adjusting the alignment in one direction may alter the alignment in another direction. Check each procedure after altering alignment. Coupled Drives When using couplings, the axis of the power source must be aligned the axis of the pump shaft in both the horizontal and vertical planes. Most couplings require a specific gap or clearance between the driving and the driven shafts.
MISALIGNED: SHAFTS NOT PARALLEL MISALIGNED: SHAFTS NOT IN LINE ALIGNED: SHAFTS PARALLEL AND SHEAVES IN LINE Figure 6C. Alignment of V-Belt Driven Pumps Tighten the belts in accordance with the belt manufacturer’s instructions. If the belts are too loose, they will slip; if the belts are too tight, there will be excessive power loss and possible bearing failure. Select pulleys that will match the proper speed ratio; over speeding the pump may damage both pump and power source.
OPERATION – SECTION C Review all SAFETY information in Section A. Follow instructions on all tags, labels and decals attached to the pump. WARNING! This pump is designed to handle mild industrial corrosives, mud or slurries containing large entrained solids. Do not attempt to pump volatile; corrosive, or flammable liquids which may damage the pump or endanger personnel as a result of pump failure. CAUTION! Pump speed and operating conditions must be within the performance range shown on page 21.
If rotation is incorrect on a three-phase motor, have a qualified electrician interchange any of the Phase wires to change direction. If rotation is incorrect on a single-phase motor, consult the literature supplied with the motor for specific instructions. OPERATION Lines With a Bypass If an EBARA Automatic Air Release Valve has been installed, the valve will automatically open to allow the pump to prime, and automatically close after priming is complete (see INSTALLATION for Air Release Valve operation.
Strainer Check If s suction strainer has been shipped with the pump or installed by the user, check the strainer regularly, and clean it as necessary. The strainer should also be checked if pump flow rate begins to drop. If a vacuum suction gauge has been installed, monitor and record the readings regularly to detect strainer blockage. Never introduce air or steam pressure into the pump casing or piping to remove a blockage. This could result in personal injury or damage to the equipment.
Checking bearing temperatures by hand is inaccurate. Bearing temperatures can be measured accurately by placing a contact-type Thermometer against the housing. Record this temperature for future reference. A sudden increase in bearing temperature is a warning that the bearings are at the point of failing to operate properly. Make certain that the bearing lubricant is of the proper viscosity and at the correct level (see LUBRICATION in MAINTENANCE AND REPAIR).
TROUBLESHOOTING - SECTION D Review all SAFETY information in Section A. WARNING! Before attempting to open or service the pump: 1. Familiarize yourself with this manual. 2. Lock out or disconnect the power source to ensure that the pump will remain inoperative. 3. Allow the pump to cool if overheated. 4. Check the temperature before opening any covers, plates, or plugs. 5. Close the suction and discharge valves. 6. Vent the pump slowly and cautiously. 7. Drain the pump.
TROUBLE PUMP STOPS OR FAILS TO DELIVER RATED FLOW OR PRESSURE PUMP REQUIRES TOO MUCH POWER PUMP CLOGS FREQUENTLY EBARA Fluid Handling POSSIBLE CAUSE PROBABLE REMEDY Air leak in suction line. Correct leak. Lining of suction hose collapsed. Replace suction hose. Leaking or worn seal or pump gasket. Check pump vacuum. Replace leaking or worn seal or gasket. Strainer clogged. Check strainer and clean if necessary. Suction intake not submerged at proper level or sump too small.
TROUBLE EXCESSIVE NOISE BEARINGS RUN TOO HOT EBARA Fluid Handling POSSIBLE CAUSE PROBABLE REMEDY Cavitations in pump. Reduce suction lift and/or friction losses in suction line. Record vacuum and pressure gauge readings and consult local representative or factory. Pumping entrained air. Locate and eliminate source of air bubble. Pump or drive not securely mounted. Secure mounting hardware. Impeller clogged or damaged. Clean out debris; replace damaged parts.
PUMP MAINTENANCE AND REPAIR – SECTION E MAINTENANCE AND REPAIR OF THE WEARING PARTS OF THE PUMP WILL MAINTAIN PEAK OPERATING PERFORMANCE.
Figure 1.
ITEM NO.
Figure 2. Repair Rotating Element Figure 2.
ITEM NO.
WARNING! PUMP AND SEAL DISASSEMBLY AND REASSEMBLY Review all SAFETY Information in Section A. Follow the instructions on all tags, label and decals attached to the pump. This pump requires little service due to its rugged, minimum-maintenance design. However, if it becomes necessary to inspect or replace the wearing parts, follow these instructions which are keyed to the sectional views (see Figures 1 and 2) and the accompanying parts lists.
(Figure 2) The impeller (1) should be loosened while the rotating assembly is still secured to the pump casing. Before loosening the impeller, remove the seal cavity drain plug and drain the seal lubricant. This will prevent the oil in the seal cavity from escaping when the impeller is loosened. Clean and reinstall the seal cavity drain plug. Immobilize the impeller by wedging a block wood between the vanes and remove the impeller cap screw and washer (19 and 20).
After removing the shaft and bearings, clean and inspect the bearings in place as follows. Seal Removal (Figure 2) Remove the seal spring. Slide the sleeve and rotating portion of the seal off the shaft as a unit. Apply oil to the sleeve and work up under the bellows. Slide the rotating portion of the seal off the sleeve. Remove the seal sleeve o-ring (32).
Press the inboard oil seal (23) from the bearing housing. CAUTION! To prevent damage during removal from the shaft, it is recommended that bearings be cleaned and inspected in place. It is strongly recommended that the bearings be replaced any time the shaft and bearings are removed. Shaft and Bearing Reassembly and installation (Figure 2) Clean the bearing housing, shaft and all component parts (except the bearings) with a soft cloth soaked in cleaning solvent.
Figure 4. Inboard Bearing Positioning Seal Installation After the bearings have been installed and allowed to cool, check to ensure that they have not moved away from the shaft shoulders in shrinking. If movement has occurred, use a suitable sized sleeve and a press to reposition the bearings against the shaft shoulders. If heating the bearings is not practical, use a suitable sized sleeve, and an arbor (or hydraulic) press to install the bearings on the shaft.
R AT AIN ER SEAL PL ATE SPRING O-RING S IM PELLER SLEE VE O-RING IM PELLER SHIM S IM PELLER SH AFT BELLOW S ROT AT ING ELEM ENT ST ATION ARY ELEM ENT INTEG R AL SH AFT SLEEVE SHE AR RING (SHE ARED) DRIVE BAND SPRING CENTERING W ASH ER ST ATION ARY S EAT Figure 5. Cartridge Seal Assembly CAUTION! This seal is not designed for operation at temperatures above 160 º F (71º C). Do not use at higher operating temperatures.
Slide the tube over the shaft threads, then slide the O-ring off the and onto the shaft. Remove the tube, and continue to slide the O-ring down the shaft until it seats against the shaft shoulder. When installing a new cartridge seal assembly, remove the seal from the container, and remove the Mylar storage tabs from between the seal faces. CAUTION! As the stationery seat becomes fully seated, the seal spring compresses, and the shaft sleeve will break the nylon shear ring.
Carefully wash all metallic parts in fresh cleaning solvent and allow to dry thoroughly. CAUTION! Do not attempt to separate the rotating portion of the seal from the shaft sleeve when reusing an old seal. The rubber bellows will adhere to the sleeve during use, and attempting to separate them could damage the bellows. Inspect the seal components for wear, scoring, grooves, and other damage that might cause leakage. Inspect the integral shaft sleeve for nicks or cuts on either end.
NOTE Install the bearing housing and seal plate O-rings and lubricate them with light grease. Ease the rotating assembly into the pump casing using the installation tool. Be careful no to damage the Orings. Install the 6 screw of rotating assembly adjusting screw using the same thickness as previously removed. Secure the rotating assembly to the pump casing with the hardware. Do not fully tighten the cap screw until the back cover has been set. A clearance of .010 to .020 inch (0.25 to 0.
Periodically, the valve should be removed for inspection and cleaning. When reinstalling the relief valve, apply ‘Loctite Pipe Sealant With Teflon No. 592’, or equivalent compound, on the relief valve threads. Position the valve as shown in Figure 1 with the discharge port pointing down. Final Pump Assembly (Figure 1) Install the shaft key (8, Figure 2) and reconnect the power source. Be sure to install any guards used over the rotating members.
Contact your dealer or supplier for more information about other Ebara products: Ebara Fluid Handling 1651 Cedar Line Drive • rock Hill, SC 29730 (803) 327-5005 • (803) 327-5097 (fax) info@pumpsebara.com • www.pumpsebara.