
Manual


WARNING!
Use lifting and moving equipment in good
repair and with adequate capacity to prevent
injuries to personnel or damage to equipment.
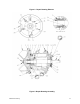
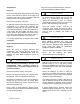
Cleanout Access And Suction Check Valve
Removal
(Figure 1)
Before attempting to service the pump, remove the
casing drain plug (41) and drain the pump. Clean
and install the drain plug.
For cleanout access, loosen the clamp screws (15)
and clamp bars (13) securing the cleanout cover
(16) to the suction head (49).
Suction Check Valve Removal
Remove the check valve assembly, reach through
the cleanout opening and remove the hardware (8,
9 & 10) securing the check valve (6) to the valve
body (4) and suction head.
NOTE
Further disassembly of the check valve is not
required since it must be replaced as a
complete unit. Individual parts are not sold
separately.
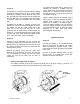
Suction Head and Wear Plate Removal
Figure 1
To remove the suction head, support it with a
suitable hoist and sling and remove the hardware
(42,43,44 & 45) securing it to the pump casing.
Remove the suction head gasket.
To remove the wear plate (38), position a wood or
soft metal wedge between the impeller blades and
wear plate, and tap the wedge with a hammer.
Turn the impeller every 45 degrees, repeating the
process until the wear plate is walked out of the
pump casing.
NOTE
The wear plate can be easily removed after
removing the rotating Assembly (2). It will
come out through the casing through the
element opening, once removed.
PUMP AND SEAL DISASSEMBLY AND
REASSEMBLY
Review all SAFETY Information in Section A.
Follow the instructions on all tags, label and decals
attached to the pump.
This pump requires little service due to its rugged,
minimum-maintenance design. However, if it
becomes necessary to inspect or replace the
wearing parts, follow these instructions which are
keyed to the sectional views (see Figures 1 and 2)
and the accompanying parts lists.
Many service functions may be performed by
draining the pump and removing the back cover
assembly. If major repair is required, the piping
and/or power source must be disconnected. The
following instructions assume complete disassembly
is required.
Before attempting to service the pump, disconnect
or lock out the power source and take precautions
to ensure that it will remain inoperative. Close all
valves in the suction and discharge lines.
For power source disassembly and repair, consult
the literature supplied with the power source, or
contact your local power source representative.
WARNING!
Before attempting to open or service the pump:
1. Familiarize yourself with this manual.
2. Disconnect or lock out the power source
to ensure that the pump will remain
inoperative.
3. Allow the pump to cool if overheated.
4. Check the temperature before opening
any covers, plates, or plugs.
5. Close the suction and discharge valves.
6. Vent the pump slowly and cautiously.
7. Drain the pump.
EBARA Fluid Handling
26