
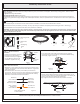
Assembly Instruction

(Step 7 Continued)
Supports (G). Then Follow the Step 6 of Rail Installation to install the
Rail (E) onto the other Rail Supports (G).
STEP 8 Spot Light Installation
NOTE: To ensure the fixture works correctly, make sure the
connection between the adapter and the rail is correct. The
Brass Strip in the top of the Rail is always facing towards the
ceiling.
Note: Adjust the spotlight head to a desired position.
-
A. Choose one spot light, unscrew (2) caps from the rail adapter of the
Spot Light (H), then open the moveable part of rail adapter body.
B. Attach the Rail (E) with (2) Brass Strips side facing towards the fixed
part of rail adaptor. Close the moveable part of rail adaptor over the
Rail (E), then reinstall the caps to the rail adaptor. Make certain that
the brass clips on the fixed part of rail adapter are connected
properly with the brass strips of the Rail (E).
C. Follow steps A~B in this step to install the other Spot Lights (H) onto
the Rail (E).
Your fixture is now assembled and ready to use. Enjoy!
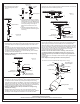
STEP 5 Install Rail support-
A. Disassemble support base
from Rail Supports (G) as
shown.
Rail Support
Support
Base
G
Figure 5A
B. Insert the Wall Anchor (C) into the
drilled hole on the ceiling. Pass the
Support Base over the Wall Anchor
(C) and then screw the self-tapping
screw (D) through the Support
Base into the wall anchor until
tight.
C. Thread the Rail Support (G) into
the Support Base and hand tighten
until snug.
Figure 5B
C
D
G
Support Base
CEILING
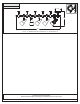
STEP 6 Instal Rail to Rail Support
NOTE: The Brass Strip in the top of the Rail is always facing
towards the ceiling.
-
A. Carefully take out the Rail (E) from the package and unfold it. There
is an Brass Strip in the top and (2) Brass Strips in one side of the
Rail (E).
B. Unscrew (2) caps on the Rail Support (G). Open the Moveable Part
of the Rail Support (G). Attach the Rail (E) with (2) Brass Strips side
facing towards the fixed part of Rail Support (G). Close the
moveable part of Rail Support (G) over the Rail (E), then reinstall
the caps to the Rail Support (G).
Brass Strip
Brass Strip
Cap
Fixed Part
of Rail Support
Moveable part
of Rail Support
Cap
Figure 6
G
STEP 7 Install Rail to Ceiling Canopy
NOTE: The Brass Strip in the top of the Rail is always facing
towards the ceiling.
-
A. Unscrew (2) caps on the rail adaptor. Open the Moveable Part of the
rail adaptor. Attach the Rail (E) with (2) Brass Strips side facing
towards the fixed part of rail adaptor. Close the moveable part of rail
adaptor over the Rail (E), then reinstall the caps to the rail adaptor.
Make certain that the brass clips on the fixed part of rail adapter are
connected properly with the brass strips of the Rail (E).
B. Shape the Rail (E) as desired. Then mark and drill the desired
positions on the ceiling for the rest of the Rail Supports (G). Repeat
the Step 5 of Rail Supports Installations to locate the rest Rail
2of3
Brass Strip
Brass Strip
Cap
Fixed Part
of Rail Adaptor
Moveable part
of Rail Adaptor
Cap
F
Brass Clip
Brass Clip
E
E
Figure 7
Fixed Part
of Rail Adaptor
Cap
Cap
E
Brass Strip
Brass Strip
Brass Clip
Moveable part
of Rail Adaptor
Brass Clip
H
ROTATE
Spotlight Head
Figure 8
G
E
F
Thank you for purchasing product.
Need assistance with parts or assembly? Call customer service or visit us on-line