
Installation & Assembly (Burlap)

* These instructions are provided for your safety.
It is very important that they are read completely
before beginning the installation of your fixture.
* DIRECT WIRE FIXTURES: WE STRONGLY RECOMMEND
INSTALLATLON BY A LICENSED ELECTRICIAN.
Shut off the main electrical supply at fuse box/circuit breaker.
Remove all parts from carton. Do not throw away any parts as shown.
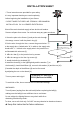
1.Screw the pole to the fixture (1) and put the wire through
the canopy. secure it with the plastic ring (4).
2.Put the wire through the I bar, connect the ground wires "〒"
to the supply wire, Cathode wire "N" in white to the supply wire,
Anode wire "L" in black to the supply wire in the junction box
as illustrated with wire nuts (3).
3. Affix the I bar (2) to the junction box by screws.
4. Affix the canopy to the I bar by screws (4).
5. Install the bulb (not included) (5).
6.Install the thread (6) to the lighting body and the washer (7) to
the thread (6), install the diffuser (8), secure it with washer (9) and the nut (10).
(if needed the depth of the diffuser (8) can be fine tuned
by adjusting the nut on the thread (6)
Turn on power and enjoy!!!
To avoid risk of fire, do not exceed the recommended wattage.
WARNINGS:
Turn off power (unplug from the wall outlet) before replacing the bulb(s),
making sure the bulb(s) have sufficient time to cool down.
Do not subject the lighting fixture to any shock while lit as
shattering of bulbs may result .
To clean, use a soft cloth only. DO NOT use any chemical or abrasive cleaners.
★ Keep this instruction for future reference
INSTALLATION SHEET
Use 60 Watt x 3 Max type A
BULB (Bulb not included)
5
8
10
1
7
9
3
2
4
6