
Technical data


35
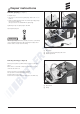
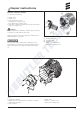
Repair step 8
Dismantle combustion chamber
(seeFigure9andSketch6)
• Repairstep3.
• Repairstep7.
• Unscrewthefixingscrews.
IntheAirtronic=3fixingscrews,
intheAirtronicM=4fixingscrews.
• Pulloutthecombustionchamberfromthefrontandremove
theheatexchanger’sseal.
Caution!
Whenassemblingthecombustionchamber,alwaysrenewthe
seal,whichisincludedwiththesparepart.
Tightenthefixingscrewsofthecombustionchamberwitha
tighteningtorqueof5+0.5Nm
Iftheheatexchangerisreplacedthecombinationsensor
(overheatingsensor/flamesensor)mustbedismantledand
fittedonthenewheatexchanger(seeRepairstep6,Page
33).
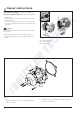
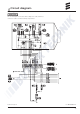
Sketch6
1Combustionchamber
2Alwaysrenewthesealbetweenthecombustionchamber
andtheheatexchanger.
3Heatexchanger
4Fixingscrew
Airtronic=3fixingscrews
AirtronicM=4fixingscrews
Figure9
Combustionchamber
Heatexchanger
Fixingscrew
Airtronic=3fixingscrews
AirtronicM=4fixingscrews
5
4
1
2
3
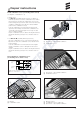
Repairinstructions
Please note!