
User guide


10-9-2013 3 ebode HDIK30
2. Introduction
Thank you for purchasing the ebode HDIK30. The ebode IR over HDMI set, HDIK30
contains two IR Adapters, one IR Receiver and one IR Blaster. These products are used for
the ebode HDMI splitters (HDSPLIT12 & HDSPLIT14), switchers (HDSWITCH31 &
HDSWITCH51) and could also be used as a stand-alone IR over HDMI solution. This kit
features two selectable IR modes; CEC and IR. CEC is used when your device (TV, DVD,
STB etc.) is CEC compatible. When your device is CEC compatible* you do not need to use
the included IR Receiver and IR Blaster since receiving and sending of IR is done over the
IR Receiver build into your TV and sources (DVD, STB etc.).
* Please note that in some cases your TV and source might be CEC compatible but cannot
use the CEC feature of our kit. At this moment there is no standard for IR control over CEC
so it’s a matter of testing and seeing the results.
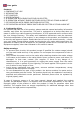
3. Set Contents
When unpacking your ebode HDIK30 please check if the items below are included, if any
items are missed or damaged, please contact your distributor.
2x HDMI IR Adapter
1x IR Receiver
1x IR Blaster
4. Specifications
Dual band IR Blaster and Receiver
HDMI Male to Female Adapter
Blaster and receiver support 30KHz – 60 KHz wide band IR
3.5mm Stereo Jack connector for IR
Blaster and receiver working distance 3-5m
IR over HDMI up to 100 meters
No external power adapter required
Switch between IR or CEC mode
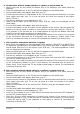
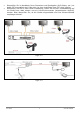
5. IR operation with ebode switcher or splitter
When using the HDIK30 kit with the ebode HDMI splitters (HDSPLIT12 & HDSPLIT14)
or switchers (HDSWITCH31 & HDSWITCH51) you would only need 1 adapter to send
the IR signal from the TV to the source (DVD, STB etc.). The receiving adapter is built
into our switchers and splitters.
Take the HDMI cable out of the TV and put the adapter on the HDMI cable.
Put the HDMI cable with adapter back into your TV.
Connect the IR receiver to the adapter at the TV side and place the Receiver on a good
clear visible spot near your TV so you can point at it with the remote of the source
(DVD, STB etc.).
Set the tiny switcher on the adapter at the TV side to “IR”.
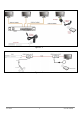
Connect the Blaster to the IR output on the Switcher or Splitter and place the Blaster in
front but within 2 meters of your source or sources such as DVD, STB etc. It is no
problem if the sources are in a closed cabinet as long as the Blaster has clear visibility
to the IR receiving windows on each device.
Test your IR over HDMI connection by pointing the remote of the source of your choice
to the IR Receiver and send an IR command such as power-on. Please verify if the
source is powered and ready to receive IR commands by controlling it directly first.