
User guide


24-8-2010 4 IR Link Pro
The IR Link Pro is a mains powered InfraRed Extender System that allows full remote control
operation of audio/video components (such as your Blu-ray player, A/V Receiver, DVR, Satellite
Box, Cable Tuner, etc.) which are located behind closed cabinet doors, in other rooms, or other
concealed and/or out-of-sight locations.
An InfraRed Extender in general consists of an IR (InfraRed) capture device, the IR Receiver, a
distribution circuit/connecting block, the IR Hub, and finally the IR LED output, the IR Emitter,
which flashes the IR signal to the A/V component.
3. Kit content
The IR Link Pro is a pre-packaged InfraRed Remote Control Extender System. It includes an
IRLPRO IR Link Pro Table Top IR Receiver, an IRHUB2 Connecting Block with 2 Emitter outputs +
Status input Jumper Cable, a 3IREDB Triple Blinking Emitter, a 1IRQC Quick Connect cable and a
12VDC Power Supply. These parts are all that are necessary to control up to four components.
4. How does the ebode IR Link Pro work?
The ebode IR Link Pro is intended for use in IR control systems where the IRHUB2 Connecting
Block is within reach of the 2-meter cable of the IRLPRO IR Receiver, e.g. when installing the IR
Link Pro in a cabinet where the controlled components are behind closed doors, and the
IRLPRO Receiver can be located on top of the cabinet, within line of sight of your remote
control.
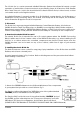
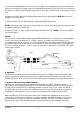
5. Installing the ebode IR Link Pro
The Hub sockets are colour coded for easy plug & play installation of the IR Receiver and IRED
Emitters, which have coloured jacks.
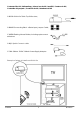
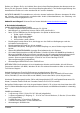
A typical system is shown in Fig. 1 below. Refer to this diagram and the procedure that follows
when making connections:
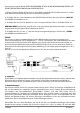
1. Attach the 3IREDB Emitters onto the IR Sensor Windows of the components
in your system that you wish to control. Refer to Fig. 2.
2a. Plug the yellow mini plugs of the 3IREDB into one of the yellow labelled
"EMITTERS" jacks of the IRHUB2 Connecting Block.
2b. Plug the IRQC cable into one of the yellow labelled “EMITTERS” jacks of
the IRHUB2, and the other side into the 3.5 mm mono IR input of your AVR.
IRED Mono TS 3.5mm pin configuration: tip is IR Data, sleeve is Ground.
(PLEASE CHECK THE MANUAL OF THE DEVICE FOR MATCHING PIN CONFIGURATION)
Fi
g
1
Fi
g
2